项目
博客
归档
资源链接
关于我
项目
博客
归档
资源链接
关于我
Spring AI构建MCP服务与Cherry Studio配合使用案例
2025-06-13
·
·
原创
·
AI大模型
·
本文共 832个字,预计阅读需要 3分钟。
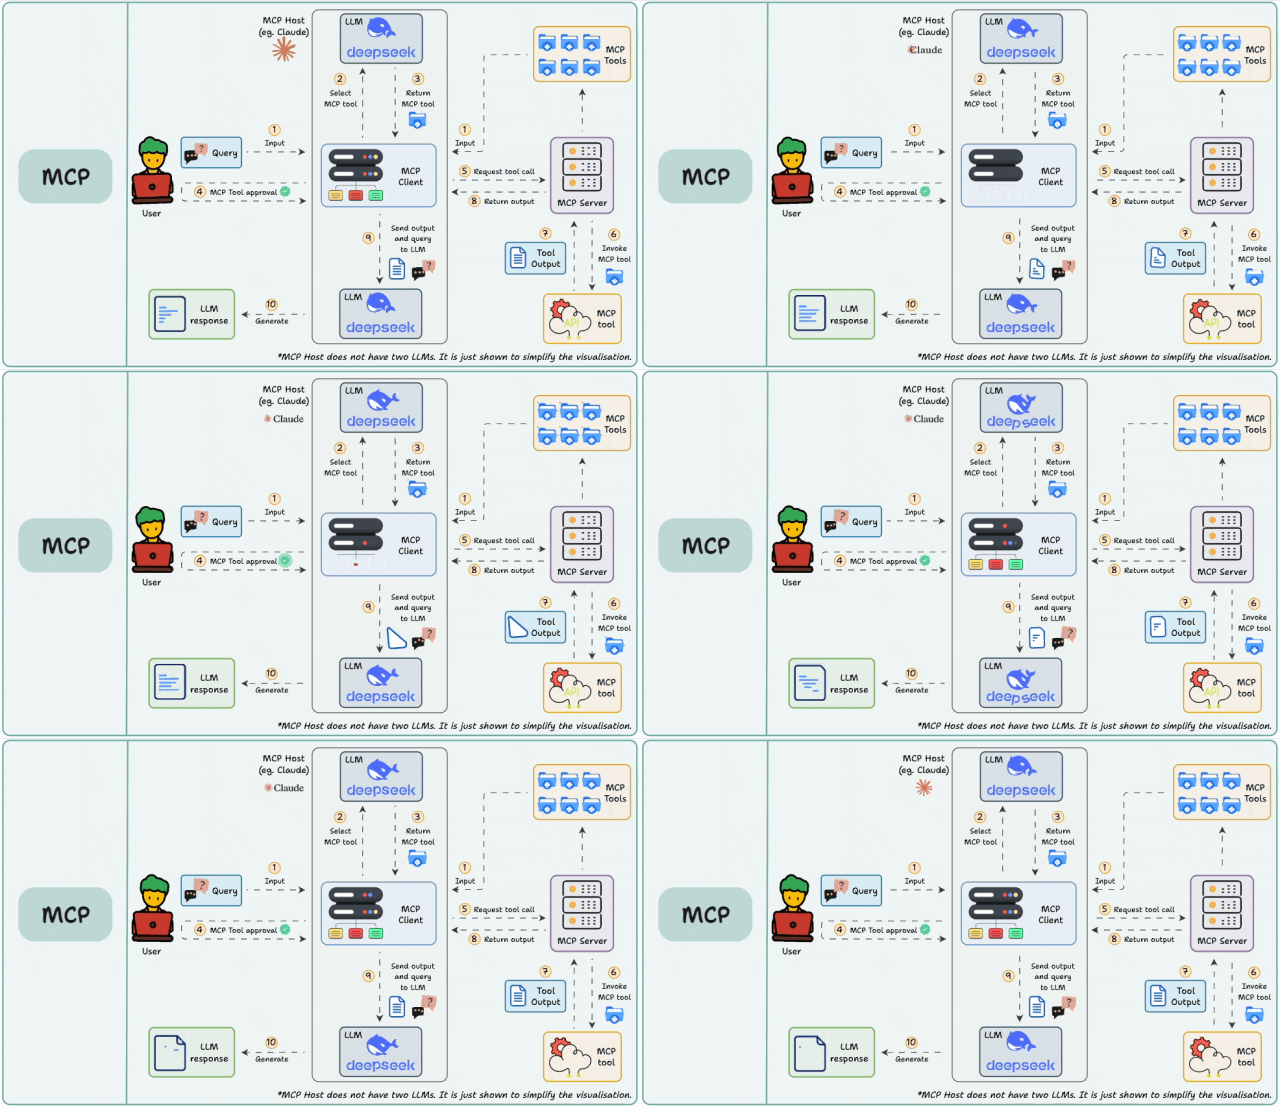
### MCP相关概念 **MCP**(**Model Context Protocol**,即**模型上下文协议**)是由 **Anthropic**(**Claude** 的母公司)于 **2024年11月** 开源发布的一项 **全新技术** <sup>`1`</sup>。 MCP 是一个开放标准,旨在连接AI助手与数据所在的系统,包括内容存储库、业务工具和开发环境。其目标是帮助前沿模型产生更好、更相关的响应。 MCP为 AI 模型连接不同数据源和工具提供了标准化方法。 ### MCP 的核心组成部分 MCP 遵循客户端-服务器架构,其中主机应用可以连接到多个服务器。 **服务器(Server)**:提供特定功能的工具,比如网页搜索、文件访问等 **客户端(Client)**:在AI应用中与服务器保持连接 **传输(Transport)**:客户端和服务器之间的通信方式 **主机(Host)**:启动连接的应用程序,如Cherry Studio或Claude Desktop、Cline、Cursor、WindSurf  ### 使用Spring AI构建MCP Server 根据Spring AI官方文档<sup>`4`</sup>, 可以使用多种输出构建:WebFlux、WebMvc等。 同时依赖的 JDK17/21、Spring Boot 3.4.x+、Spring AI 1.0.0-M6+版本 项目搭建步骤: 1. 使用springboot搭建服务,依赖如下 ```xml <parent> <groupId>org.springframework.boot</groupId> <artifactId>spring-boot-starter-parent</artifactId> <version>3.5.0</version> <relativePath/> </parent> <groupId>com.yuan.mcp</groupId> <artifactId>growx-mcp-server</artifactId> <version>0.0.1-SNAPSHOT</version> <name>growx-mcp-server</name> <properties> <java.version>17</java.version> <spring-ai.version>1.0.0</spring-ai.version> </properties> <dependencies> <dependency> <groupId>org.springframework.ai</groupId> <artifactId>spring-ai-starter-mcp-server-webmvc</artifactId> <!--webflux --> </dependency> <dependency> <groupId>org.springframework.boot</groupId> <artifactId>spring-boot-starter-test</artifactId> <scope>test</scope> </dependency> </dependencies> <dependencyManagement> <dependencies> <dependency> <groupId>org.springframework.ai</groupId> <artifactId>spring-ai-bom</artifactId> <version>${spring-ai.version}</version> <type>pom</type> <scope>import</scope> </dependency> </dependencies> </dependencyManagement> <build> <plugins> <plugin> <groupId>org.springframework.boot</groupId> <artifactId>spring-boot-maven-plugin</artifactId> </plugin> </plugins> </build> ``` 2. 构建mcp服务(根据ip查询地址) ```java @Service public class IPServiceImpl implements IPService { Logger log = LoggerFactory.getLogger(IPServiceImpl.class); @Value("${ip-info.token}") private String token; @Autowired private ObjectMapper objectMapper; @Tool(description = "根据id查询地理位置相关信息(机名hostname/城市city/地区region/国家country/位置loc/公司org/邮政编码postal/时区timezone)") @Override public Address queryAddressByIp(@ToolParam(description = "ip地址") String ip) { if (ip == null || ip.isEmpty()) { log.warn("IP地址为空"); return null; } String requestUrl = String.format("https://ipinfo.io/%s?token=%s", ip, token); log.info("ip地址详情查询请求参数:{}", requestUrl); try { URL url = new URL(requestUrl); HttpURLConnection connection = (HttpURLConnection) url.openConnection(); connection.setRequestMethod("GET"); // connection.setRequestProperty("Authorization", "Bearer " + token); connection.setConnectTimeout(5000); connection.setReadTimeout(5000); int responseCode = connection.getResponseCode(); if (responseCode != HttpURLConnection.HTTP_OK) { log.error("请求失败,响应码: {}", responseCode); return null; } BufferedReader reader = new BufferedReader(new InputStreamReader(connection.getInputStream())); StringBuilder response = new StringBuilder(); String line; while ((line = reader.readLine()) != null) { response.append(line); } reader.close(); log.info("返回的数据:{}", response); return objectMapper.readValue(response.toString(), Address.class); } catch (IOException e) { log.error("查询 IP 地址信息时发生异常: {}", e.getMessage(), e); return null; } } } ``` 3. 定义返回的对象 ```java public class Address { /** * ip地址 */ private String ip; /** * 主机名 */ private String hostname; /** * 城市 */ private String city; /** * 地区 */ private String region; /** * 国家 */ private String country; /** * 位置 */ private String loc; /** * 公司 */ private String org; /** * 邮政编码 */ private String postal; /** * 时区 */ private String timezone; private Boolean anycast; //get/set方法 } ``` 4. 配置ToolCallbackProviderConfig ```java @Configuration public class ToolCallbackProviderConfig { @Bean public ToolCallbackProvider recommendTools(IPService service) { return MethodToolCallbackProvider.builder().toolObjects(service).build(); } } ``` 5. 编写测试类(WebFlux、WebMvc) ```java // WebMvc var transport = HttpClientSseClientTransport.builder("http://localhost:8080").build(); try (var client = McpClient.sync(transport).build()) { client.initialize(); McpSchema.ListToolsResult toolsList = client.listTools(); System.out.println("Available Tools = " + toolsList); McpSchema.CallToolResult currentTimResult = client.callTool(new McpSchema.CallToolRequest("queryAddressByIp", Map.of("ip", "8.8.8.8"))); System.out.println("current time Response = " + currentTimResult); } } // WebFlux var transport = new WebFluxSseClientTransport(WebClient.builder().baseUrl("http://localhost:8080")); var client = McpClient.sync(transport).build(); client.initialize(); client.ping(); // 列出并展示可用的工具 McpSchema.ListToolsResult toolsList = client.listTools(); System.out.println("可用工具 = " + toolsList); // 获取成都的天气 McpSchema.CallToolResult result = client.callTool(new McpSchema.CallToolRequest("queryAddressByIp", Map.of("ip", "8.8.8.8"))); System.out.println("返回结果: " + result.content()); client.closeGracefully(); ``` 客户端配置地址参考`McpServerProperties` ```java @ConfigurationProperties("spring.ai.mcp.server") public class McpServerProperties { public static final String CONFIG_PREFIX = "spring.ai.mcp.server"; private boolean enabled = true; private boolean stdio = false; private String name = "mcp-server"; private String version = "1.0.0"; private String instructions = null; private boolean resourceChangeNotification = true; private boolean toolChangeNotification = true; private boolean promptChangeNotification = true; private String baseUrl = ""; private String sseEndpoint = "/sse"; private String sseMessageEndpoint = "/mcp/message"; ``` 6. 配置文件application.yml配置参数 ```java spring: application: name: mcp-server ip-info: token: xx server: port: 8080 ``` ### Cherry Studio中配置连接MCP Server 选择MCP服务,新建服务,给服务取名称、描述,**类型选择:SSE**,**URL配置为: http://localhost:8080/sse** 再打开对话中,选中该MCP服务,然后就可以进行对话使用 参考: 1. Java 实现 MCP Server 以及常用 MCP 服务分享:https://cloud.tencent.com/developer/article/2515900 2. MCP:基于 Spring AI 实现 webmvc/webflux sse Mcp Server:https://juejin.cn/post/7484154732408274983 3. spring ai mcp server代码示例:https://zhuanlan.zhihu.com/p/1901799795745620964 4. SpringAI 参考:模型上下文协议 (MCP):https://docs.spring.io/spring-ai/reference/api/mcp/mcp-overview.html 5. IP Geolocation API:https://ipinfo.io/products/ip-geolocation-api 6. 如何为Spring AI MCP Server提供OAuth2认证:https://spring4all.com/forum-post/8595.html