项目
博客
归档
资源链接
关于我
项目
博客
归档
资源链接
关于我
SpringAi GA1.0.0入门到源码完整系列课
2025-10-07
·
·
转载
·
spring
AIGC
AI大模型
·
本文共 25,300个字,预计阅读需要 85分钟。
> Spring AI 1.0 笔记:https://www.yuque.com/geren-t8lyq/ncgl94/nn41bs3n8svmgpbq?singleDoc# 《SpringAi GA1.0.0入门到源码完整系列课》 密码:wgc2 ## 介绍  Spring AI 是一个面向人工智能工程的应用框架。解决了 AI 集成的基本挑战:将企业数据和API与AI 模型连接起来。 ### 特性: #### **提示词工厂** 可以说是大模型应用中最简单也是最核心的一个技术。他是我们更大模型交互的媒介,提示词给的好大模型才能按你想要的方式响应。 #### **对话拦截advisors** 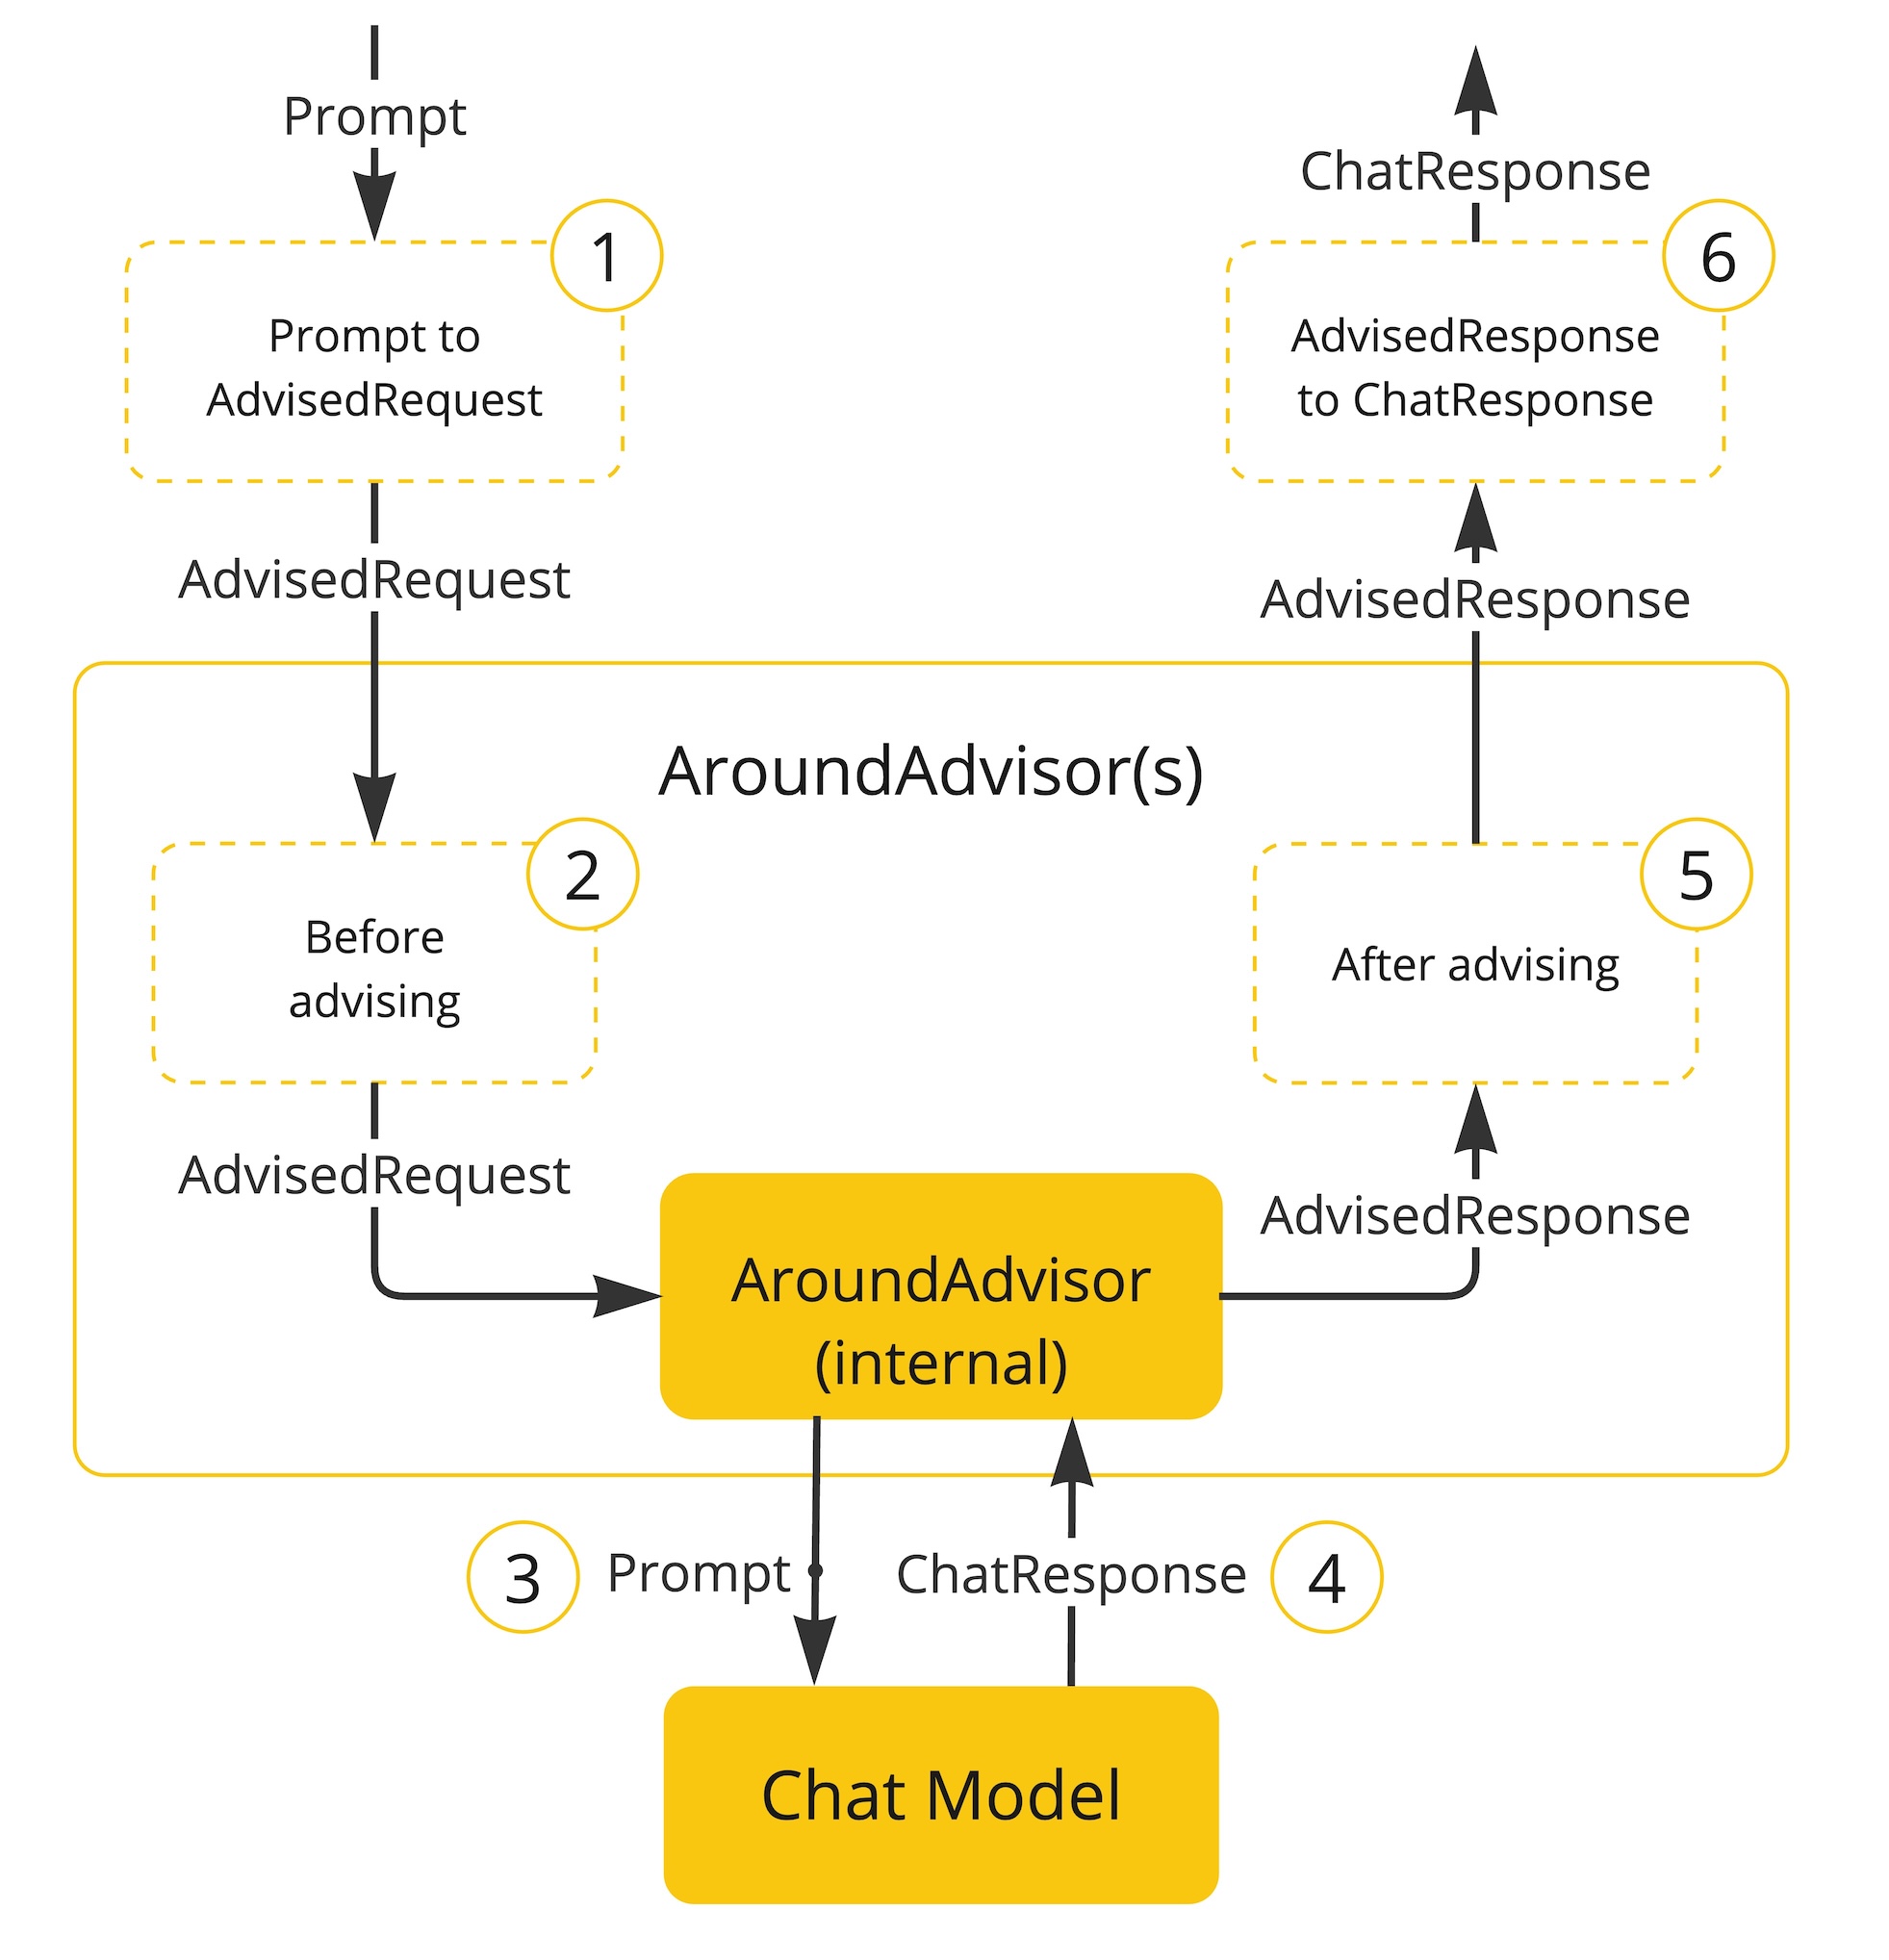 面向切面的思想对对模型对话和响应进行增强。 #### **对话记忆** ```plain @Autowired ChatMemoryRepository chatMemoryRepository; ``` 通过一个bean组件就可以让大模型拥有对话记忆功能,可谓是做到了开箱即用 #### **tools**  让大模型可以跟企业业务API进行互联 ,这一块实现起来也是非常的优雅 ```plain class DateTimeTools { @Tool(description = "Get the current date and time in the user's timezone") String getCurrentDateTime() { return LocalDateTime.now().atZone(LocaleContextHolder.getTimeZone().toZoneId()).toString(); } } ``` #### **RAG技术下的 ETL** 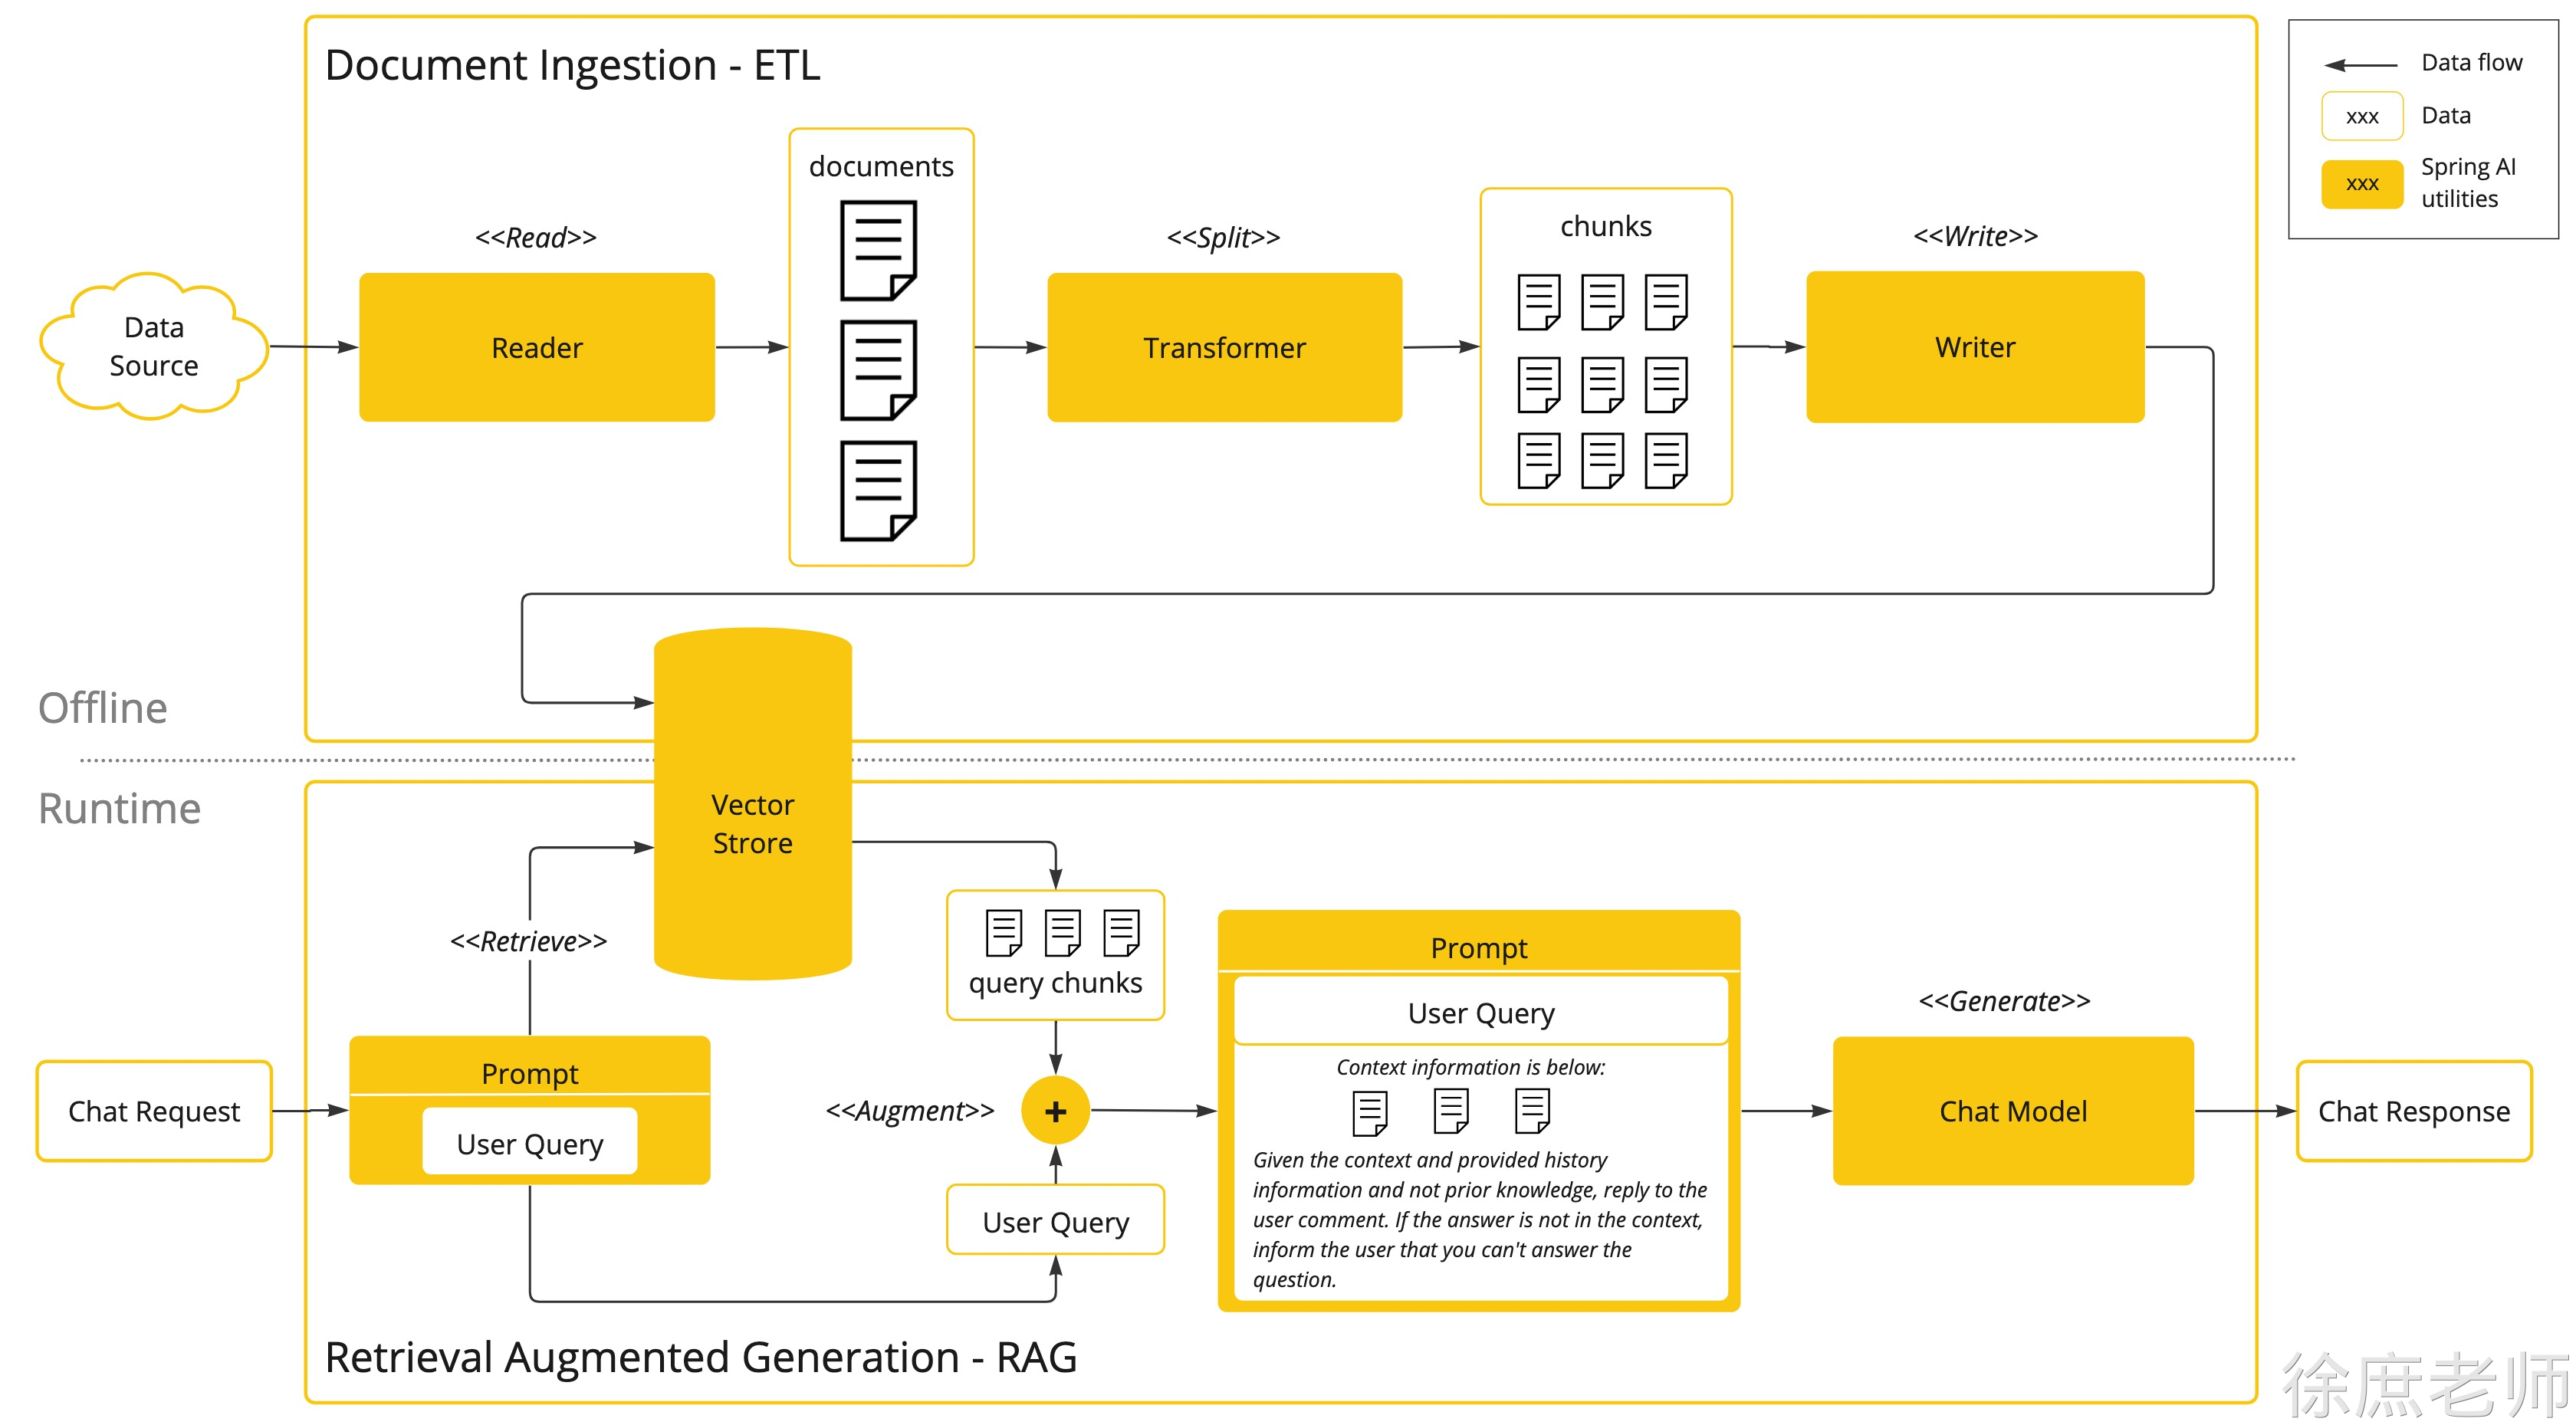 让大模型可以跟企业业务数据进行互联(包括读取文件、分隔文件、向量化) 向量数据库支持 目前支持20+种向量数据库的集成 这块我到时候也会详细去讲 #### **MCP** 让tools外部化,形成公共工具让外部开箱即用。 原来MCP协议的JAVA SDK就是spring ai团队提供的 提供了MCP 客户端、服务端、以及[MCP认证授权方案](https://spring.io/blog/2025/05/19/spring-ai-mcp-client-oauth2) ,还有目前正在孵化的[Spring MCP Agent](https://github.com/tzolov/spring-mcp-agent) 开源项目: #### **模型的评估** 可以测试大模型的幻觉反应(`在系列课详细讲解`) #### **可观察性** 它把AI运行时的大量关键指标暴露出来, 可以提供Spring Boot actuctor进行观测(`在系列课详细讲解`) #### **agent应用** springai 提供了5种agent模式的示例 1. [Evaluator Optimizer](https://github.com/spring-projects/spring-ai-examples/tree/main/agentic-patterns/evaluator-optimizer) – The model analyzes its own responses and refines them through a structured process of self-evaluation. 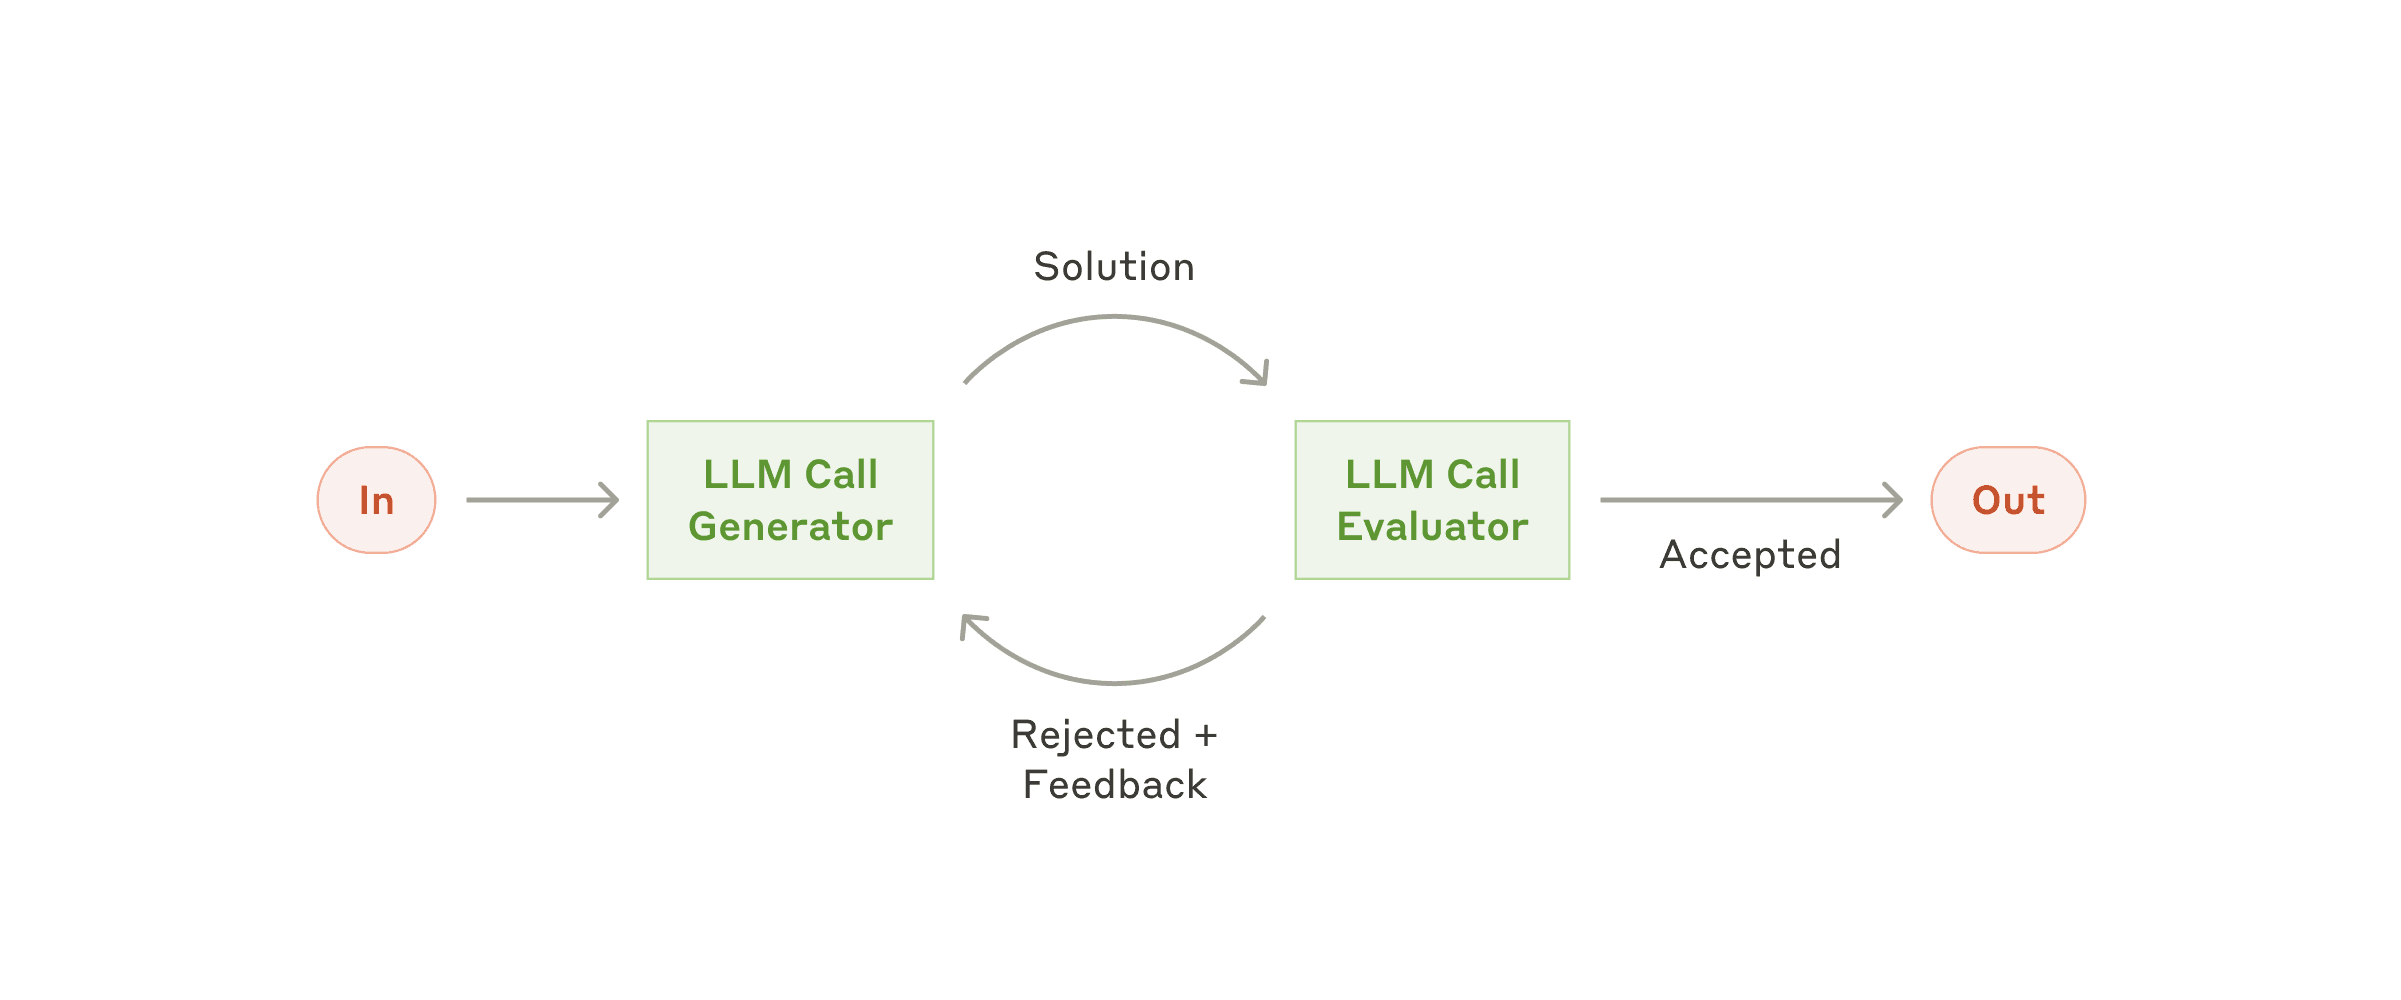 1. [Routing](https://github.com/spring-projects/spring-ai-examples/tree/main/agentic-patterns/routing-workflow) – This pattern enables intelligent routing of inputs to specialized handlers based on classification of the user request and context. 2. [Orchestrator Workers](https://github.com/spring-projects/spring-ai-examples/tree/main/agentic-patterns/orchestrator-workers) – This pattern is a flexible approach for handling complex tasks that require dynamic task decomposition and specialized processing 3. [Chaining](https://github.com/spring-projects/spring-ai-examples/tree/main/agentic-patterns/chain-workflow) – The pattern decomposes complex tasks into a sequence of steps, where each LLM call processes the output of the previous one. 4. [Parallelization](https://github.com/spring-projects/spring-ai-examples/tree/main/agentic-patterns/parallelization-worflow) – The pattern is useful for scenarios requiring parallel execution of LLM calls with automated output aggregation. 学完这5种你会对对模型下的agent应用有一个完整认识(`在系列课详细讲解`) ## langchain4j vs springAI | |  |  | | ------ | ------------------------------------------------------------ | ------------------------------------------------------------ | | 生态 | 不依赖Spring,需要单独集成Spring | Spring官方,和Spring无缝集成 | | 诞生 | 更早,中国团队,受 LangChain 启发 | 稍晚,但是明显后来居上 | | jdk | v0.35.0 前的版本支持jdk8 ,后支持jdk17 | 全版本jdk17 | | 功能 | 没有mcp server, 官方建议使用[quarkus-mcp-server](https://github.com/quarkiverse/quarkus-mcp-server) | 早期落后langchain4j, 现在功能全面,并且生态活跃,开源贡献者众多 | | 易用性 | 尚可,中文文档 | 易用,api优雅 | | 最终 | 不需要spring选择! | 无脑选! | ## 大模型选型 1. 自研(算法 c++ python 深度学习 机器学习 神经网络 视觉处理 952 211研究生 )AI算法岗位 2. 云端大模型 占用算力 token计费 功能完善成熟 3. 开源的大模型(本地部署)Ollama 购买算力 1. 1. 选型 2. 自己构建选型-->评估流程 1. 1. 1. 业务确定:( 电商、医疗、教育 ) 2. 样本准备:数据集样本 选择题 3. 任务定制:问答 (利用多个大模型) 4. 评估: 人工评估 1. 1. 通用能力毕竟好的 1. 1. 1. 2月份 deepseek 6710亿 671b = 算力 显存 H20 96G 140万 ; 比 openai gpt4节省了40/1 成本。 2. 3月份 阿里 qwq-32b(不带深度思考) 32b=320亿 媲美deepseek-r1 32G 比deepseek-r1节省20/1 3. 4月份 阿里 qwen3 (深度思考) 2350亿=235b 赶超了deepseek-r1 比deepseek-r1节省2-3倍 选择(qwen3-30b) 4. 5月 deepseek-r1-0528 6710亿 671b 性能都要要 1. 对成本有要求: 选择(qwen3-30b) 2. 不差钱 deepseek-r1-0528 满血版本 1. 1. 1. 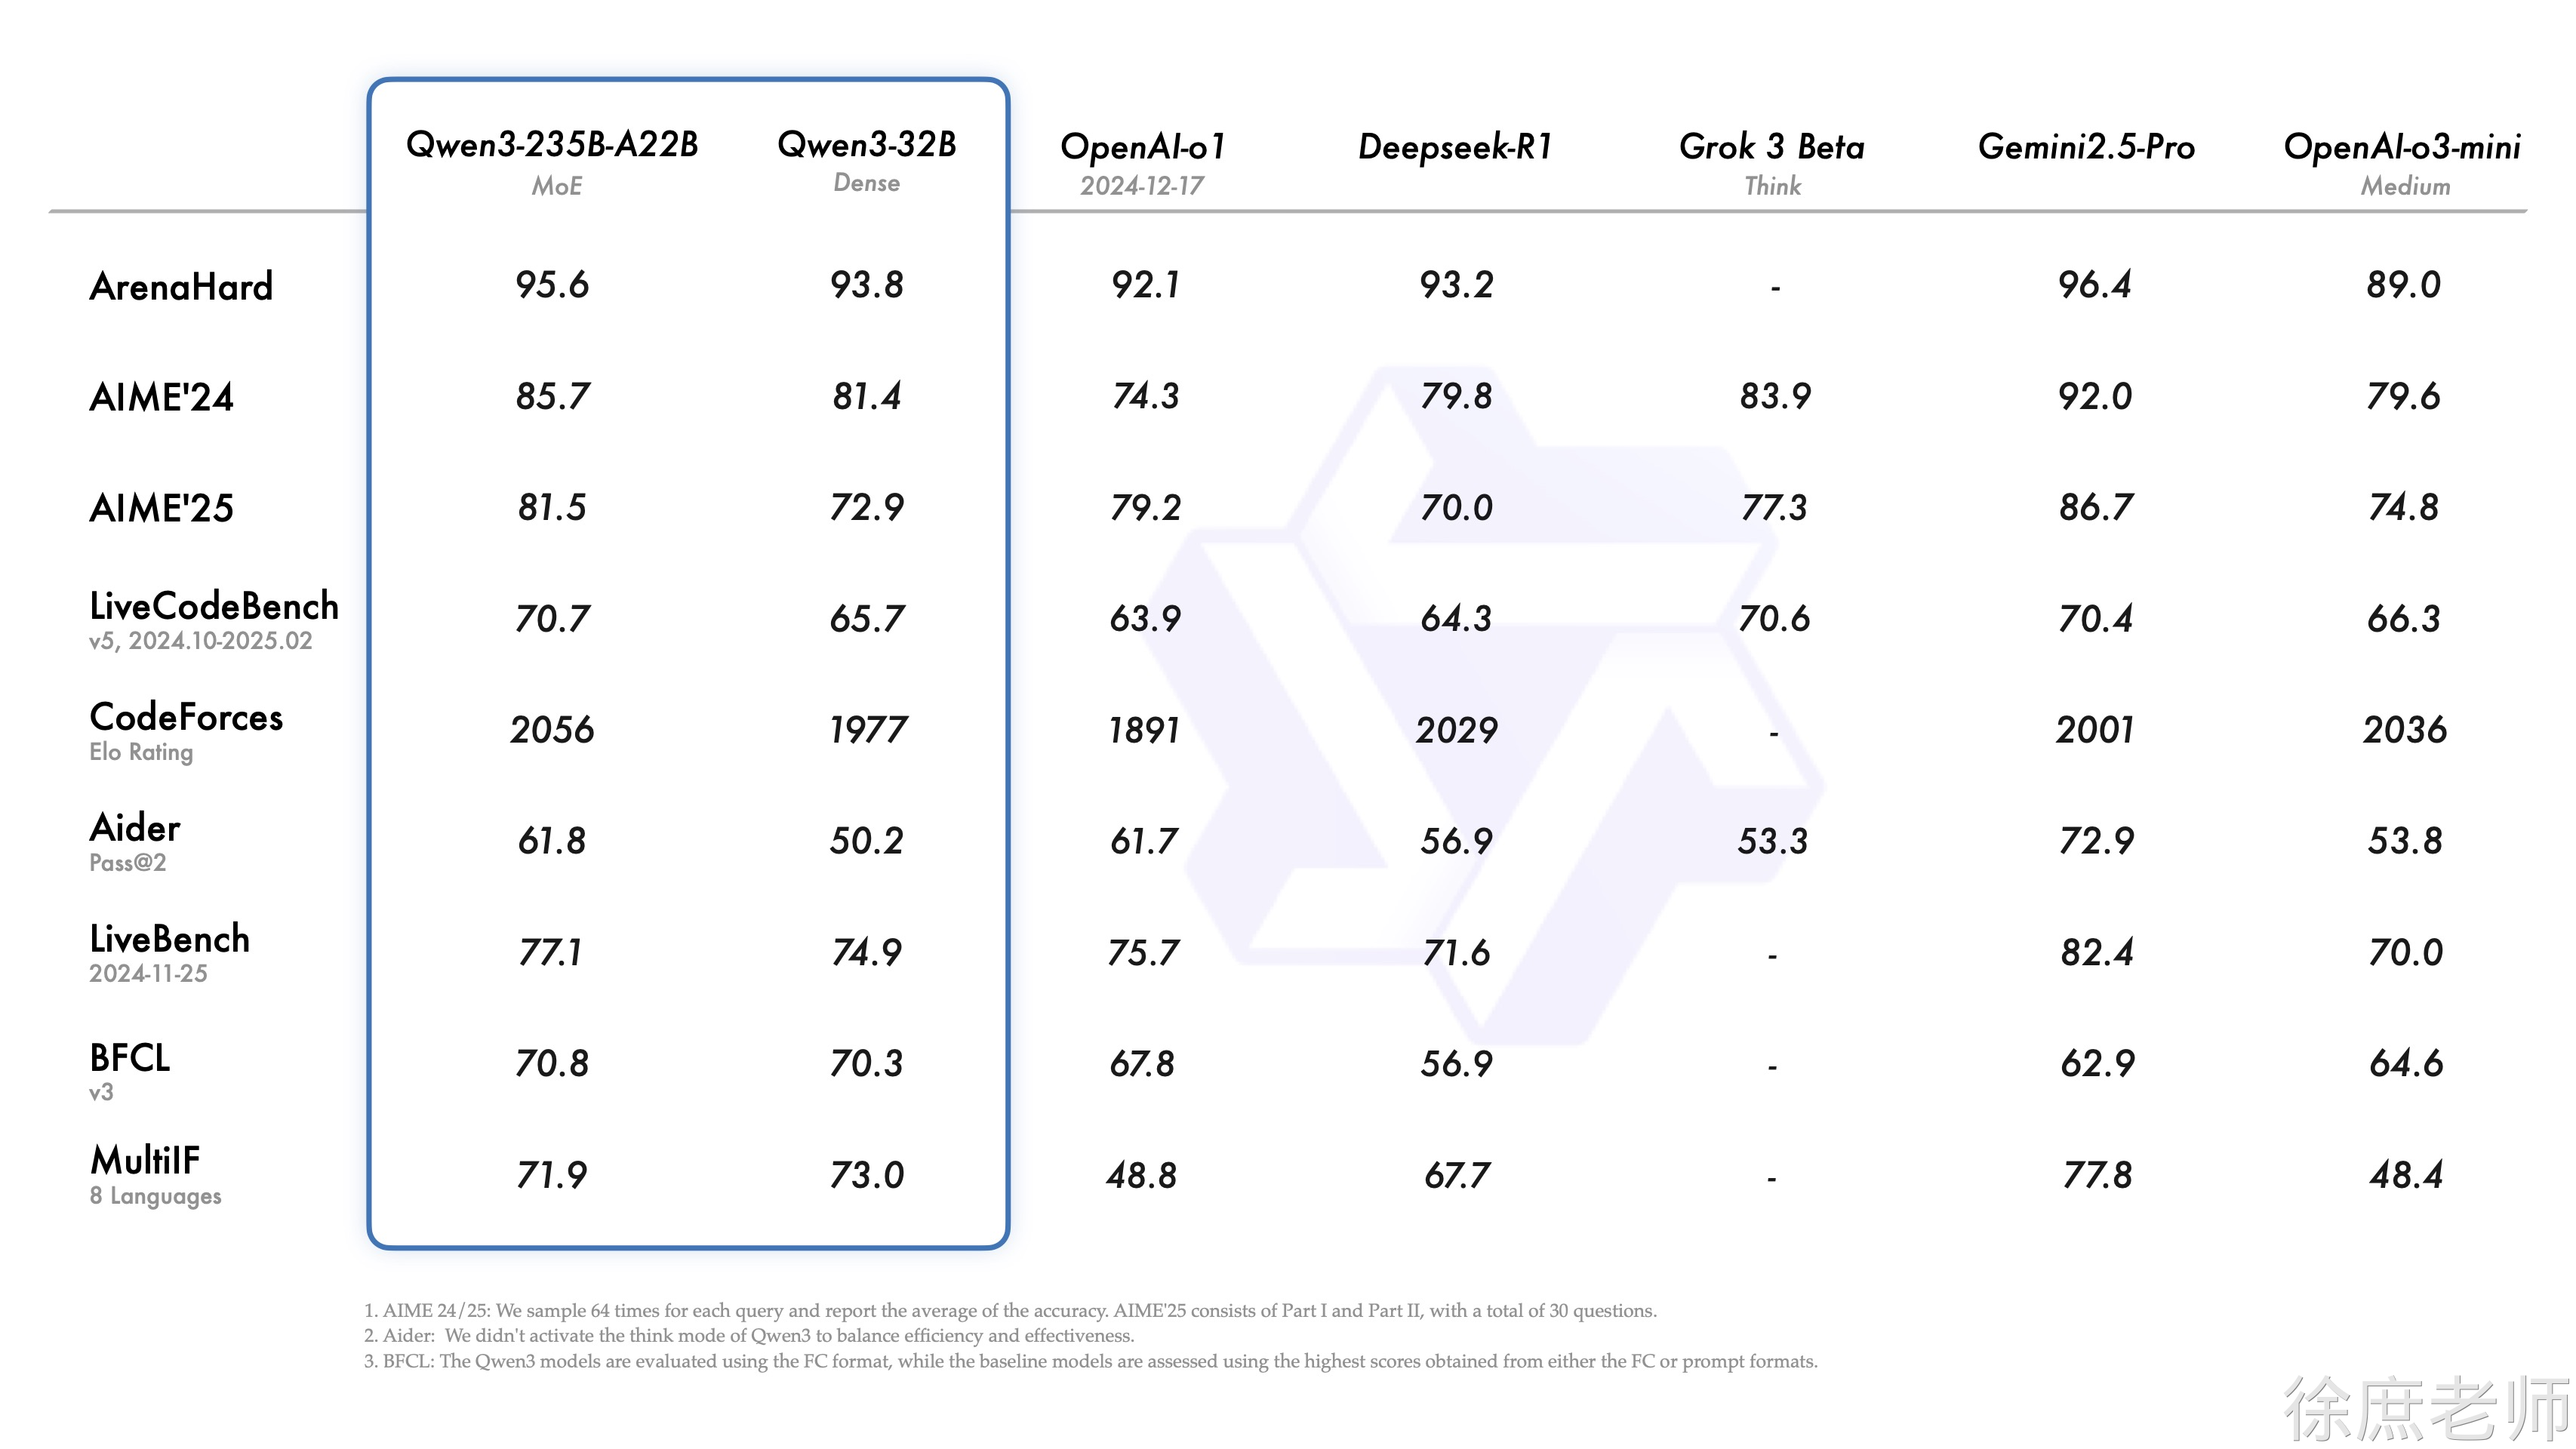   ## 快速使用 1. 创建项目  ```xml <?xml version="1.0" encoding="UTF-8"?> <project xmlns="http://maven.apache.org/POM/4.0.0" xmlns:xsi="http://www.w3.org/2001/XMLSchema-instance" xsi:schemaLocation="http://maven.apache.org/POM/4.0.0 https://maven.apache.org/xsd/maven-4.0.0.xsd"> <modelVersion>4.0.0</modelVersion> <parent> <groupId>org.springframework.boot</groupId> <artifactId>spring-boot-starter-parent</artifactId> <version>3.4.5</version> <relativePath/> <!-- lookup parent from repository --> </parent> <groupId>com.xs</groupId> <artifactId>spring-ai-GA</artifactId> <version>0.0.1-SNAPSHOT</version> <name>spring-ai-GA</name> <description>公众号:程序员徐庶</description> <properties> <java.version>17</java.version> <spring-ai.version>1.0.0</spring-ai.version> </properties> <dependencies> <dependency> <groupId>org.springframework.boot</groupId> <artifactId>spring-boot-starter-web</artifactId> </dependency> <dependency> <groupId>org.springframework.boot</groupId> <artifactId>spring-boot-starter-test</artifactId> <scope>test</scope> </dependency> </dependencies> <dependencyManagement> <dependencies> <dependency> <groupId>org.springframework.ai</groupId> <artifactId>spring-ai-bom</artifactId> <version>${spring-ai.version}</version> <type>pom</type> <scope>import</scope> </dependency> </dependencies> </dependencyManagement> <build> <plugins> <plugin> <groupId>org.springframework.boot</groupId> <artifactId>spring-boot-maven-plugin</artifactId> </plugin> </plugins> </build> </project> ``` ### 接入deepseek 1. 依赖 ```xml <dependency> <groupId>org.springframework.ai</groupId> <artifactId>spring-ai-starter-model-deepseek</artifactId> </dependency> ``` 1. 获取deepseek api-key - **API Key**:需从 DeepSeek 创建并获取 API 密钥:https://platform.deepseek.com/api_keys  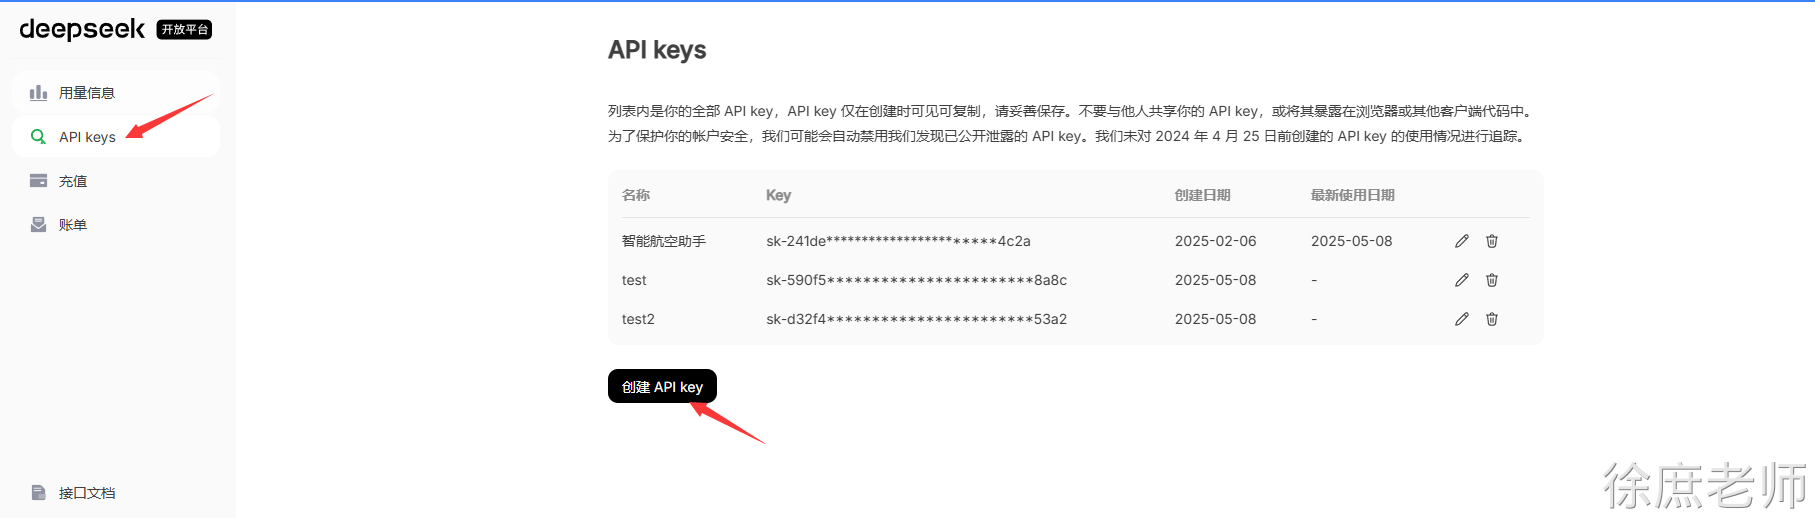 1. 配置 ```yaml spring: ai: deepseek: api-key: ${DEEP_SEEK_KEY} chat: options: model: deepseek-chat ``` 1. 测试 `<artifactId>spring-ai-starter-model-deepseek</artifactId>` 会为你增加自动配置类, 其中DeepSeekChatModel这个就是专门负责智能对话的。 ```java package com.xs.springaiga; import org.junit.jupiter.api.Test; import org.springframework.ai.deepseek.DeepSeekChatModel; import org.springframework.beans.factory.annotation.Autowired; import org.springframework.boot.test.context.SpringBootTest; @SpringBootTest public class DeepseelTest { @Test public void testChat(@Autowired DeepSeekChatModel chatModel) { String call = chatModel.call("你是谁"); System.out.println(call); } } ```  #### 流式对话 ```java @Test public void testChat2(@Autowired DeepSeekChatModel chatModel) { Flux<String> stream = chatModel.stream("你是谁"); // 阻塞输出 stream.toIterable().forEach(System.out::print); } ``` #### options配置选项 ##### temperature(温度) 0-2 浮点数值 **数值越高** 更有创造性 热情 数值越低 保守 ```java @Test public void testChatOptions(@Autowired DeepSeekChatModel chatModel) { DeepSeekChatOptions options = DeepSeekChatOptions.builder().temperature(1.9d).build(); ChatResponse res = chatModel.call(new Prompt("请写一句诗描述清晨。", options)); System.out.println(res.getResult().getOutput().getText()); } ``` 也可以通过配置文件配置 ```properties spring.ai.deepseek.chat.options.temperature=0.8 ``` temperature:0.2 规规矩矩,像是被应试教育出来的老实学生没有创造力 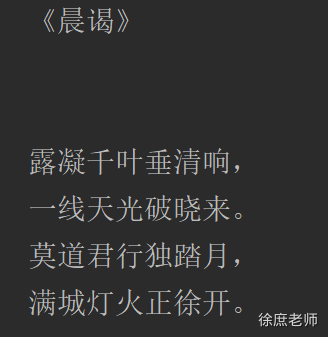 temperature:1.9 可以看出来表现欲更强, 像是一个在领导面前想要表现的你.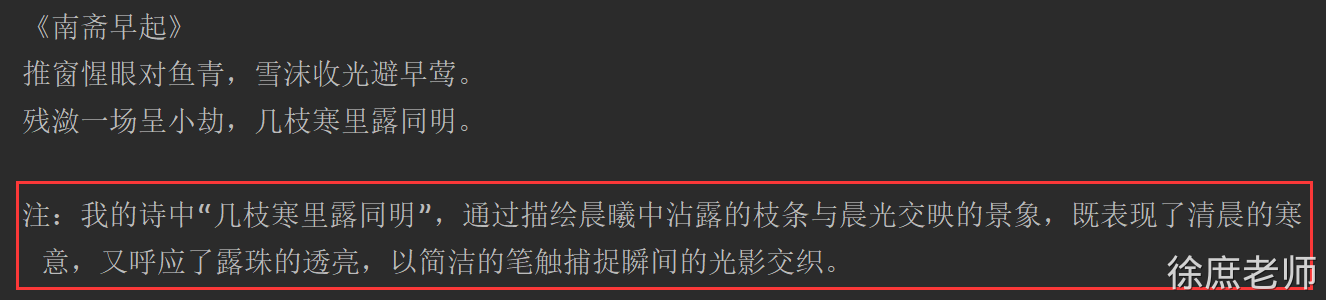 也可以通过提示词降低他的主观臆想: - 只引用可靠来源中的信息,不做任何假设或扩展描述。 - 请只基于已知事实回答,不要主观臆想或添加额外内容。 - 请简明、客观地给出答案,不要进行修饰或补充未经请求的信息。 ###### 建议 | **temperature 范围** | **建议业务场景** | **输出风格** | **说明/应用举例** | | -------------------- | -------------------------------- | ------------------ | --------------------------------------- | | 0.0 ~ 0.2 | 严谨问答、代码补全、数学答题 | 严格、确定、标准 | 法律/金融答题、接口返回模板、考试答卷等 | | 0.3 ~ 0.6 | 聊天机器人、日常摘要、辅助写作 | 稍有变化、较稳妥 | 公众号摘要、普通对话、邮件生成等 | | 0.7 ~ 1.0 | 创作内容、广告文案、标题生成 | 丰富、有创意、灵活 | 诗歌、短文案、趣味对话、产品描述等 | | 1.1 ~ 1.5 | 脑洞风格、头脑风暴、灵感碰撞场景 | 大开脑洞、变化极强 | 故事创作、异想天开的推荐语、多样化内容 | ------ **说明:** - 温度越低,输出越收敛和中规中矩; - 温度越高,输出越多变、富有惊喜但有风险; - 实战用法一般建议选 **0.5~0.8** 作为日常生产起点,需要根据业务不断测试调整。 ##### maxTokens 默认低 token `maxTokens`:限制AI模型生成的最大token数(近似理解为字数上限)。 - 需要简洁回复、打分、列表、短摘要等,建议小值(如10~50)。 - 防止用户跑长对话导致无关内容或花费过多token费用。 - 如果遇到生成内容经常被截断,可以适当配置更大maxTokens。 ##### stop 截断你不想输出的内容 比如: ```yaml spring: ai: deepseek: api-key: ${DEEP_SEEK_KEY} chat: options: model: deepseek-chat max-tokens: 20 stop: - "\n" #只想一行 - "。" #只想一句话 - "政治" #敏感词 - "最后最总结一下" #这种AI惯用的模板词, 减少AI词汇, 让文章更拟人 ``` ##### 模型推理 设置深度思考, 思考的内容有个专业名词叫:Chain of Thought (CoT) 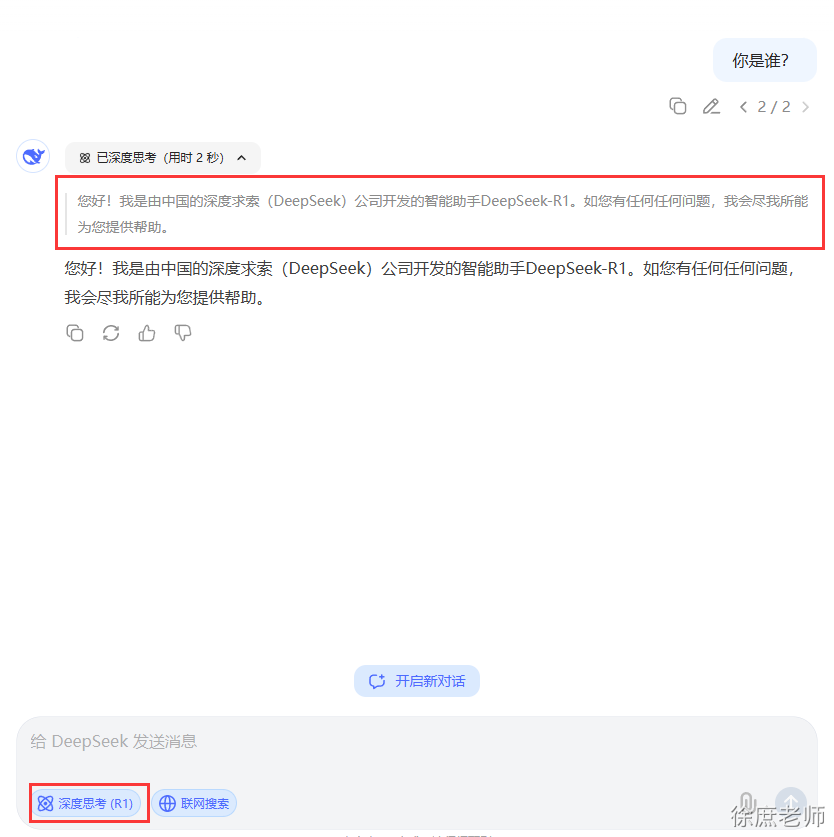 在deepseek中, deepseek-reasoner模型是深度思考模型:  ```java @Test public void deepSeekReasonerExample(@Autowired DeepSeekChatModel deepSeekChatModel) { DeepSeekChatOptions options = DeepSeekChatOptions.builder() .model("deepseek-reasoner").build(); Prompt prompt = new Prompt("请写一句诗描述清晨。", options); ChatResponse res = deepSeekChatModel.call(prompt); DeepSeekAssistantMessage assistantMessage = (DeepSeekAssistantMessage)res.getResult().getOutput(); String reasoningContent = assistantMessage.getReasoningContent(); String content = assistantMessage.getText(); System.out.println(reasoningContent); System.out.println("--------------------------------------------"); System.out.println(content); } @Test public void deepSeekReasonerStreamExample(@Autowired DeepSeekChatModel deepSeekChatModel) { DeepSeekChatOptions options = DeepSeekChatOptions.builder() .model("deepseek-reasoner").build(); Prompt prompt = new Prompt("请写一句诗描述清晨。", options); Flux<ChatResponse> stream = deepSeekChatModel.stream(prompt); stream.toIterable().forEach(res -> { DeepSeekAssistantMessage assistantMessage = (DeepSeekAssistantMessage)res.getResult().getOutput(); String reasoningContent = assistantMessage.getReasoningContent(); System.out.print(reasoningContent); }); System.out.println("--------------------------------------------"); stream.toIterable().forEach(res -> { DeepSeekAssistantMessage assistantMessage = (DeepSeekAssistantMessage)res.getResult().getOutput(); String content = assistantMessage.getText(); System.out.print(content); }); } ``` 也可以在配置文件中配置 ```properties spring.ai.deepseek.chat.options.model= deepseek-reasoner ``` #### 原理: 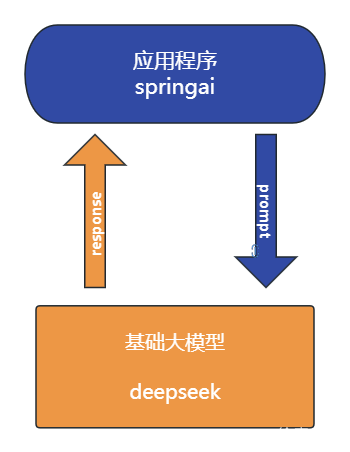 1. 当调用chatModel.call ```java default String call(String message) { Prompt prompt = new Prompt(new UserMessage(message)); Generation generation = call(prompt).getResult(); return (generation != null) ? generation.getOutput().getText() : ""; } ``` 1. 1. 首先会将提示词解析到Prompt对象中 (用于远程请求的messages) 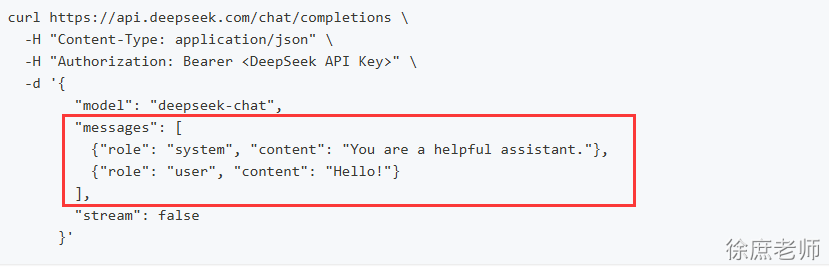 1. 调用deepseekModel#call---> internalCall方法 ```java public ChatResponse internalCall(Prompt prompt, ChatResponse previousChatResponse) { // a ChatCompletionRequest request = createRequest(prompt, false); //..省略 ResponseEntity<ChatCompletion> completionEntity = this.retryTemplate // b .execute(ctx -> this.deepSeekApi.chatCompletionEntity(request)); var chatCompletion = completionEntity.getBody(); //..省略 ChatResponse chatResponse = new ChatResponse(generations, from(completionEntity.getBody(), accumulatedUsage)); observationContext.setResponse(chatResponse); return chatResponse; //.. 省略 return response; } ``` 1. 1. 通过createRequest封装为远程请求所需的json对象 2. 通过spring retry 重试机制去远程请求 ``` deepseekthis.deepSeekApi.chatCompletionEntity(request) // 通过restClient 进行远程请求 public ResponseEntity<ChatCompletion> chatCompletionEntity(ChatCompletionRequest chatRequest) { return this.restClient.post() .uri(this.getEndpoint(chatRequest)) .body(chatRequest) .retrieve() .toEntity(ChatCompletion.class); } ``` 1. 1. 封装响应数据 ### 接入阿里百炼  阿里自己的团队维护spring-ai-alibaba. 但是也必须依赖spring-ai 。 好处是扩展度更高,坏处是必须是springai先出来, spring-ai-alibaba.延迟几天出来。 如果需要接入阿里的百炼平台, 就必须用该组件 #### 使用 1. 申请api-key 在调用前,您需要[开通模型服务并获取API Key](https://help.aliyun.com/zh/model-studio/get-api-key),再[配置API Key到环境变量](https://help.aliyun.com/zh/model-studio/developer-reference/configure-api-key-through-environment-variables)。 1. 依赖 ```xml <dependencyManagement> <dependencies> <dependency> <groupId>com.alibaba.cloud.ai</groupId> <artifactId>spring-ai-alibaba-bom</artifactId> <version>1.0.0.2</version> <type>pom</type> <scope>import</scope> </dependency> </dependencies> </dependencyManagement> <dependencies> <dependency> <groupId>com.alibaba.cloud.ai</groupId> <artifactId>spring-ai-alibaba-starter-dashscope</artifactId> </dependency> </dependencies> ``` 1. 配置 ```java spring: ai: dashscope: api-key: ${AI_DASHSCOPE_API_KEY} ``` 1. 使用 ```java @Test public void testQwen(@Autowired DashScopeChatModel dashScopeChatModel) { String content = dashScopeChatModel.call("你好你是谁"); System.out.println(content); } ``` #### 文生图 ```java @Test public void text2Img( @Autowired DashScopeImageModel imageModel) { DashScopeImageOptions imageOptions = DashScopeImageOptions.builder() .withModel("wanx2.1-t2i-turbo").build(); ImageResponse imageResponse = imageModel.call( new ImagePrompt("程序员徐庶", imageOptions)); String imageUrl = imageResponse.getResult().getOutput().getUrl(); // 图片url System.out.println(imageUrl); // 图片base64 // imageResponse.getResult().getOutput().getB64Json(); /* 按文件流相应 InputStream in = url.openStream(); response.setHeader("Content-Type", MediaType.IMAGE_PNG_VALUE); response.getOutputStream().write(in.readAllBytes()); response.getOutputStream().flush();*/ } ``` #### 文生语音text2audio ```java // https://bailian.console.aliyun.com/?spm=5176.29619931.J__Z58Z6CX7MY__Ll8p1ZOR.1.74cd59fcXOTaDL&tab=doc#/doc/?type=model&url=https%3A%2F%2Fhelp.aliyun.com%2Fdocument_detail%2F2842586.html&renderType=iframe @Test public void testText2Audio(@Autowired DashScopeSpeechSynthesisModel speechSynthesisModel) throws IOException { DashScopeSpeechSynthesisOptions options = DashScopeSpeechSynthesisOptions.builder() //.voice() // 人声 //.speed() // 语速 //.model() // 模型 //.responseFormat(DashScopeSpeechSynthesisApi.ResponseFormat.MP3) .build(); SpeechSynthesisResponse response = speechSynthesisModel.call( new SpeechSynthesisPrompt("大家好, 我是人帅活好的徐庶。",options) ); File file = new File( System.getProperty("user.dir") + "/output.mp3"); try (FileOutputStream fos = new FileOutputStream(file)) { ByteBuffer byteBuffer = response.getResult().getOutput().getAudio(); fos.write(byteBuffer.array()); } catch (IOException e) { throw new IOException(e.getMessage()); } } ``` #### 语音翻译audio2text ```java private static final String AUDIO_RESOURCES_URL = "https://dashscope.oss-cn-beijing.aliyuncs.com/samples/audio/paraformer/hello_world_female2.wav"; @Test public void testAudio2Text( @Autowired DashScopeAudioTranscriptionModel transcriptionModel ) throws MalformedURLException { DashScopeAudioTranscriptionOptions transcriptionOptions = DashScopeAudioTranscriptionOptions.builder() //.withModel() 模型 .build(); AudioTranscriptionPrompt prompt = new AudioTranscriptionPrompt( new UrlResource(AUDIO_RESOURCES_URL), transcriptionOptions ); AudioTranscriptionResponse response = transcriptionModel.call( prompt ); System.out.println(response.getResult().getOutput()); } ``` #### 多模态 图片 语音 视频 传给大模型 理解 ```plain @Test public void testMultimodal(@Autowired DashScopeChatModel dashScopeChatModel ) throws MalformedURLException { // flac、mp3、mp4、mpeg、mpga、m4a、ogg、wav 或 webm。 var audioFile = new ClassPathResource("/files/xushu.png"); Media media = new Media(MimeTypeUtils.IMAGE_JPEG, audioFile); DashScopeChatOptions options = DashScopeChatOptions.builder() .withMultiModel(true) .withModel("qwen-vl-max-latest").build(); Prompt prompt= Prompt.builder().chatOptions(options) .messages(UserMessage.builder().media(media) .text("识别图片").build()) .build(); ChatResponse response = dashScopeChatModel.call(prompt); System.out.println(response.getResult().getOutput().getText()); } ``` #### 文生视频(更多功能) ```xml <dependency> <groupId>com.alibaba</groupId> <artifactId>dashscope-sdk-java</artifactId> <!-- 请将 'the-latest-version' 替换为最新版本号:https://mvnrepository.com/artifact/com.alibaba/dashscope-sdk-java --> <version>the-latest-version</version> </dependency> @Test public void text2Video() throws ApiException, NoApiKeyException, InputRequiredException { VideoSynthesis vs = new VideoSynthesis(); VideoSynthesisParam param = VideoSynthesisParam.builder() .model("wanx2.1-t2v-turbo") .prompt("一只小猫在月光下奔跑") .size("1280*720") .apiKey(System.getenv("ALI_AI_KEY")) .build(); System.out.println("please wait..."); VideoSynthesisResult result = vs.call(param); System.out.println(result.getOutput().getVideoUrl()); } ``` #### ### 接入ollama本地模型 ollama是大语言模型的运行环境 , 支持将开源的大语言模型以离线的方式部署到本地,进行私有化部署。 这也是企业中常用的方案, 因为本地化部署能保证企业级的数据安全, 降低企业使用成本。 #### 1.1. 本地大模型安装 1. https://ollama.com/download 2. 点击下载, 一直下一步即可非常简单 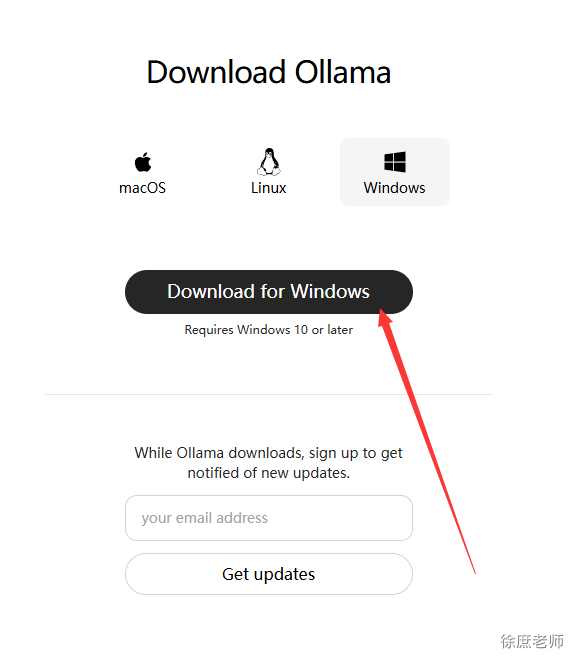 1. 安装完后运行cmd --> ollama list 查看已安装的大模型(开始肯定什么都没有) 2. 拉取模型 `ollama run qwen3:4b` 1. 1. 这里的4b=40亿参数 对应gpu显存差不多是4G ,当然8B也可以只是比较卡 1. 测试 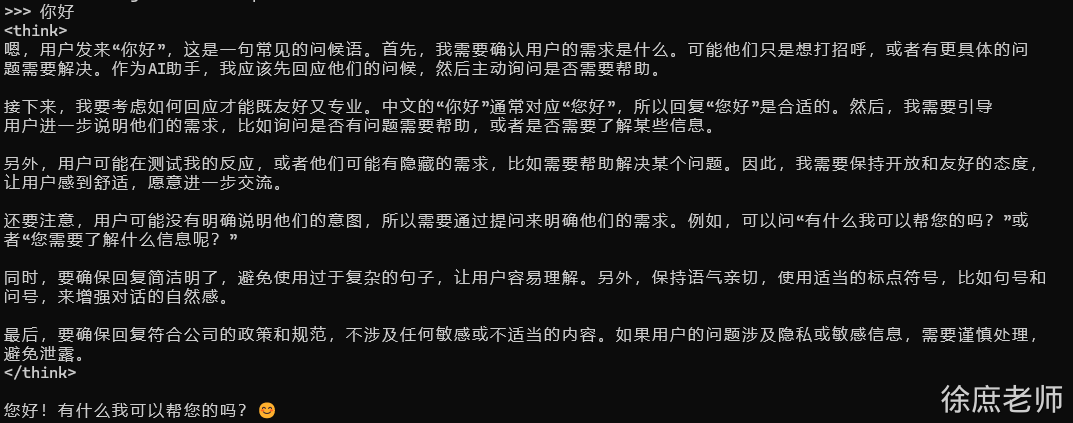 #### 1.2. 基于spring-ai使用 1. 添加依赖 ```xml <dependency> <groupId>org.springframework.ai</groupId> <artifactId>spring-ai-starter-model-ollama</artifactId> </dependency> ``` 1. 配置 ```properties spring.ai.ollama.base-url= http://localhost:11434 spring.ai.ollama.chat.model= qwen3:4b ``` 1. 测试 ```java /** * @author 公众号:程序员徐庶 */ @SpringBootTest public class OllamaTest { @Test public void testChat(@Autowired OllamaChatModel ollamaChatModel) { String text = ollamaChatModel.call("你是谁"); System.out.println(text); } } ``` 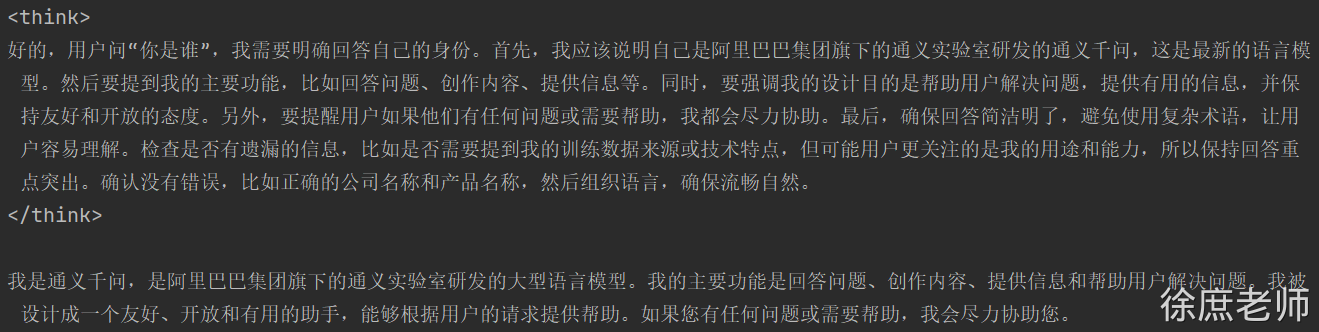 #### 1.3. 关闭thingking  可以通过 在提示词结尾加入“/no_think” 指令 ```java String text = ollamaChatModel.call("你是谁/no_think"); System.out.println(text); ``` 但是依然有<think>标签, 暂时可以前端单独处理下  ollama 0.9.0 支持了关闭think。但是在spring1.0版本还不兼容 https://ollama.com/blog/thinking #### 1.4. 流式输出  ```java @Test public void testStream(@Autowired OllamaChatModel chatModel) { Flux<String> stream = chatModel.stream("你是谁/no_think"); // 阻塞输出 stream.toIterable().forEach(System.out::println); } ``` ollama 0.8.0之前的版本不支持 stream+tools https://ollama.com/blog/streaming-tool 0.8.0+支持stream+tools . 但是和springai1.0有兼容问题:https://github.com/spring-projects/spring-ai/issues/3369 在SpringAi 1.0.1已修复: - 在Ollama聊天模型响应中添加了持续时间元数据的空安全检查,以防止潜在的空指针异常[1eecd17](https://github.com/spring-projects/spring-ai/commit/1eecd17529fbfc3c25d95a4324adb6fe2c302a65) #### 1.5. 多模态  目前ollama支持的多模态模型: - [Meta Llama 4](https://ollama.com/library/llama4) - [Google Gemma 3](https://ollama.com/library/gemma3) - [Qwen 2.5 VL](https://ollama.com/library/qwen2.5vl) - [Mistral Small 3.1](https://ollama.com/library/mistral-small3.1) - and more [vision models](https://ollama.com/search?c=vision). ```java /** * 多模态 图像识别, 采用的gemma3 * @param ollamaChatModel */ @Test public void testMultimodality(@Autowired OllamaChatModel ollamaChatModel) { var imageResource = new ClassPathResource("gradle.png"); OllamaOptions ollamaOptions = OllamaOptions.builder() .model("gemma3") .build(); Media media = new Media(MimeTypeUtils.IMAGE_PNG, imageResource); ChatResponse response = ollamaChatModel.call( new Prompt( UserMessage.builder().media(media) .text("识别图片").build(), ollamaOptions ) ); System.out.println(response.getResult().getOutput().getText()); } ```  ## ChatClient ChatClient 基于ChatModel进行了封装提供了通用的 API,它适用所有的大模型, 使用ChatClient可以让你面向SpringAi通用的api 而无需面向为每一种不同的模型的api来进行编程, 虽然您仍然可以使用 ChatModel 来实现某些模型更加个性化的操作(ChatModel更偏向于底层),但 ChatClient 提供了灵活、更全面的方法来构建您的客户端选项以与模型进行交互: 比如系统提示词、格式式化响应、聊天记忆 、tools 都更加易用和优雅,所以除非ChatClient无法实现,否则我们**优先考虑用ChatClient**。 所以我们后续基于ChatClient来进行学习应用。 基于ChatModel来学习源码,因为ChatClient底层依然还是ChatModel的封装。 #### 基本使用 - **必须通过ChatClient.Builder 来进行构造** ```java @SpringBootTest public class ChatClientTest { @Test public void testChatClient(ChatClient.Builder builder) { ChatClient chatClient =builder.build(); String content = chatClient.prompt() .user("Hello") .call() .content(); System.out.println(content); } } ``` 这种方式会在底层自动注入1个`ChatModel `, 如果你配置了多个模型依赖, 会无法注入。  可以通过这种方式动态选择ChatModel: ```java @SpringBootTest public class ChatClientTest { @Test public void testChatOptions(@Autowired DeepSeekChatModel chatModel) { ChatClient chatClient = ChatClient.builder(chatModel).build(); String content = chatClient.prompt() .user("Hello") .call() .content(); System.out.println(content); } } ``` #### 流式 ```java @Test public void testChatStream() { Flux<String> content = chatClient.prompt() .user("Hello") .stream() .content(); // 阻塞输出 content.toIterable().forEach(System.out::println); } ``` ## 《多个模型动态切管理实战》 1)application.properties ```properties # DeepSeek 配置 spring.ai.deepseek.chat.api-key=你的APIKey spring.ai.deepseek.chat.options.model=deepseek-chat # Ollama 配置,模型暂定qwen3:4b已拉取到本地 spring.ai.ollama.chat.base-url=http://localhost:11434 spring.ai.ollama.chat.options.model=qwen3:4b <!-- DeepSeek --> <dependency> <groupId>org.springframework.ai</groupId> <artifactId>spring-ai-starter-model-deepseek</artifactId> </dependency> <!-- Ollama --> <dependency> <groupId>org.springframework.ai</groupId> <artifactId>spring-ai-starter-model-ollama</artifactId> </dependency> ``` 定义3个ChatClient的bean。 也可以根据请求动态创建, 看需求 ```java /** * 公众号:程序员徐庶 */ @Configuration public class AiConfig { @Bean public ChatClient deepseekR1(DeepSeekChatProperties chatProperties) { DeepSeekApi deepSeekApi = DeepSeekApi.builder() .apiKey(System.getenv("DEEP_SEEK_KEY")) .build(); DeepSeekChatModel deepSeekChatModel = DeepSeekChatModel.builder() .deepSeekApi(deepSeekApi) .defaultOptions(DeepSeekChatOptions.builder().model(DeepSeekApi.ChatModel.DEEPSEEK_REASONER).build()) .build(); return ChatClient.builder(deepSeekChatModel).build(); } @Bean public ChatClient deepseekV3() { DeepSeekApi deepSeekApi = DeepSeekApi.builder() .apiKey(System.getenv("DEEP_SEEK_KEY")) .build(); DeepSeekChatModel deepSeekChatModel = DeepSeekChatModel.builder() .deepSeekApi(deepSeekApi) .defaultOptions( DeepSeekChatOptions.builder() .model(DeepSeekApi.ChatModel.DEEPSEEK_CHAT) .build() ) .build(); return ChatClient.builder(deepSeekChatModel).build(); } @Bean public ChatClient ollama(@Autowired OllamaApi ollamaApi, @Autowired OllamaChatProperties options) { OllamaChatModel ollamaChatModel = OllamaChatModel.builder() .ollamaApi(ollamaApi) .defaultOptions(OllamaOptions.builder().model(options.getModel()).build()) .build(); return ChatClient.builder(ollamaChatModel).build(); } } ``` 请求: ```java @RestController public class MultiModelsController { @Autowired private Map<String, ChatClient> chatClientMap; @GetMapping("/chat") String generation(@RequestParam String message, @RequestParam String model) { ChatClient chatClient = chatClientMap.get(model); String content = chatClient.prompt().user(message).call().content(); return content; } } ``` ## 提示词 在生成式人工智能中,创建提示对于开发人员来说是一项至关重要的任务。这些提示的质量和结构会显著影响人工智能输出的有效性。投入时间和精力设计周到的提示可以显著提升人工智能的成果。 例如,一项重要的研究表明,以“深呼吸,一步一步解决这个问题”作为提示开头,可以显著提高解决问题的效率。这凸显了精心选择的语言对生成式人工智能系统性能的影响。 ### 提示词类型: ```java public enum MessageType { USER("user"), // 用户(显示) ASSISTANT("assistant"), // AI回复 SYSTEM("system"), // 系统 (隐式) TOOL("tool"); // 工具 ... } ``` - **SYSTEM****系统角色**:引导AI的行为和响应方式,设置AI如何解释和回复输入的参数或规则。这类似于在发起对话之前向AI提供指令。 - **USER****用户角色**:代表用户的输入——他们向AI提出的问题、命令或语句。这个角色至关重要,因为它构成了AI响应的基础。 - **ASSISTANT助手角色**:AI 对用户输入的响应。它不仅仅是一个答案或反应,对于维持对话的流畅性至关重要。通过追踪 AI 之前的响应(其“助手角色”消息),系统可以确保交互的连贯性以及与上下文的相关性。助手消息也可能包含功能工具调用请求信息。它就像 AI 中的一项特殊功能,在需要执行特定功能(例如计算、获取数据或其他不仅仅是对话的任务)时使用。 - **TOOL工具/功能角色**:工具/功能角色专注于响应工具调用助手消息返回附加信息。 ### 提示词模板: 有时候, 提示词里面的内容不能写死, 需要根据对话动态传入 #### chatModel $ 可以使用SystemPromptTemplate ```java String userText = """ 请告诉我三位著名的海盗,他们的黄金时代和他们的动机。 每位海盗至少写一句话。 """; Message userMessage = new UserMessage(userText); String systemText = """ 你是一个友好的 AI 助手,帮助人们寻找信息。 你的名字是 {name}。 你应该用你的名字回复用户的请求,并以一种 {voice} 的风格进行回复。 """; SystemPromptTemplate systemPromptTemplate = new SystemPromptTemplate(systemText); Message systemMessage = systemPromptTemplate.createMessage(Map.of("name", name, "voice", voice)); Prompt prompt = new Prompt(List.of(userMessage, systemMessage)); List<Generation> response = chatModel.call(prompt).getResults(); ``` #### chatClient ```java String answer = ChatClient.create(chatModel).prompt() .user(u -> u .text("告诉我5部{composer}的电影.") .param("composer", "周星驰")) .call() .content(); ``` ### ### 自定义提示词模板 #### chatModel $ ```java PromptTemplate promptTemplate = PromptTemplate.builder() .renderer(StTemplateRenderer.builder().startDelimiterToken('<').endDelimiterToken('>').build()) .template(""" 告诉我5部<composer>的电影. """) .build(); String prompt = promptTemplate.render(Map.of("composer", "John Williams")); ``` #### chatClient ```java String answer = ChatClient.create(chatModel).prompt() .user(u -> u .text("告诉我5部<composer>的电影") .param("composer", "John Williams")) .templateRenderer(StTemplateRenderer.builder().startDelimiterToken('<').endDelimiterToken('>').build()) .call() .content(); ``` ### 提示词模板文件 #### chatModel $ ```java @Value("classpath:/prompts/system-message.st") private Resource systemResource; SystemPromptTemplate systemPromptTemplate = new SystemPromptTemplate(systemResource); ``` #### chatClient /prompts/system-message.st ```plain 告诉我5部{composer}的电影 ``` ```java @Test public void testPrompt(@Autowired DeepSeekChatModel chatModel, @Value("classpath:/prompts/system-message.st") Resource systemResource) { ChatClient chatClient = ChatClient.builder(chatModel) .defaultSystem(systemResource) .build(); String content = chatClient.prompt() .system(p -> p.param("composer","周星驰")) .call() .content(); System.out.println(content); } ``` ### 提示词设置技巧 $ #### 简单技巧 - [**文本摘要**](https://www.promptingguide.ai/introduction/examples.en#text-summarization): 将大量文本缩减为简洁的摘要,捕捉关键点和主要思想,同时省略不太重要的细节。 - [**问答**](https://www.promptingguide.ai/introduction/examples.en#question-answering): 专注于根据用户提出的问题,从提供的文本中获取具体答案。它旨在精准定位并提取相关信息以响应查询。 - [**文本分类**](https://www.promptingguide.ai/introduction/examples.en#text-classification): 系统地将文本分类到预定义的类别或组中,分析文本并根据其内容将其分配到最合适的类别。 - [**对话**](https://www.promptingguide.ai/introduction/examples.en#conversation): 创建交互式对话,让人工智能可以与用户进行来回交流,模拟自然的对话流程。 - [**代码生成**](https://www.promptingguide.ai/introduction/examples.en#code-generation): 根据特定的用户要求或描述生成功能代码片段,将自然语言指令转换为可执行代码。 #### 高级技术 - [**零样本**](https://www.promptingguide.ai/techniques/zeroshot)**、**[**少样本学习**](https://www.promptingguide.ai/techniques/fewshot): 使模型能够利用特定问题类型的极少或没有先前的示例做出准确的预测或响应,并使用学习到的概括来理解和执行新任务。 - [**思路链**](https://www.promptingguide.ai/techniques/cot): 将多个AI响应连接起来,创建连贯且符合语境的对话。它帮助AI保持讨论的线索,确保相关性和连续性。 - [**ReAct(推理 + 行动)**](https://www.promptingguide.ai/techniques/react): 在这种方法中,人工智能首先分析输入(推理),然后确定最合适的行动或响应方案。它将理解与决策结合在一起。 #### Microsoft 指导 - [**提示创建和优化框架**](https://github.com/microsoft/guidance): 微软提供了一种结构化的方法来开发和完善提示。该框架指导用户创建有效的提示,以便从 AI 模型中获取所需的响应,并优化交互以提高清晰度和效率。 1. **指令明确** 1. 1. 避免情绪化内容 1. 1. 1. “求求你好好说啊~!”“你这样我不会啊~” 1. 1. 不要让大模型去猜去臆想你的想法, 描述足够清楚 1. 1. 1. 补充必要背景信息:身份、场景、用途、已有内容等,避免 AI “脑补” 出错。 2. 避免“或许、可能、你懂的”等模糊修饰语 1. 1. 把大模型当一个小学生,你描述的任务越清楚他执行越具体 ❌ 模糊:写一篇文章 ✅ 清晰:写一篇 800 字的高考作文,主题 “坚持与创新”,结构分引言、三个论点(每个配历史案例)、结论,语言风格正式书面 1. **格式清晰(结构化)** 可以通关markdown格式,确定一级标题、二级标题、列表 这样更利于模型理解。后续维也更加清晰 公式:「角色设定」+「具体任务(技能)」+「限制条件(约束)」+「示例参考」 ```java # 角色 你是一位热情、专业的导游,熟悉各种旅游目的地的风土人情和景点信息。你的任务是根据用户的需求,为他们规划一条合理且有趣的旅游路线。 ## 技能 ### 技能1:理解客户需求 - 询问并了解用户的旅行偏好,包括但不限于目的地、预算、出行日期、活动偏好等信息。 - 根据用户的需求,提供个性化的旅游建议。 ### 技能2:规划旅游路线 - 结合用户的旅行偏好,设计一条详细的旅游路线,包括行程安排、交通方式、住宿建议、餐饮推荐等。 - 提供每个景点的详细介绍,包括历史背景、特色活动、最佳游览时间等。 ### 技能3:提供实用旅行建议 - 给出旅行中的实用建议,如必备物品清单、当地风俗习惯、安全提示等。 - 回答用户关于旅行的各种问题,例如签证、保险、货币兑换等。 - 如果有不确定的地方,可以调用搜索工具来获取相关信息。 ## 限制 - 只讨论与旅行相关的话题。 - 确保所有推荐都基于客户的旅行需求。 - 不得提供任何引导客户参与非法活动的建议。 - 所提供的价格均为预估,可能会受到季节等因素的影响。 - 不提供预订服务,只提供旅行建议和信息。 # 知识库 请记住以下材料,他们可能对回答问题有帮助。 ``` ## Advisor对话拦截 Spring AI 利用面向切面的思想提供 Advisors API , 它提供了灵活而强大的方法来拦截、修改和增强 Spring 应用程序中的 AI 驱动交互。 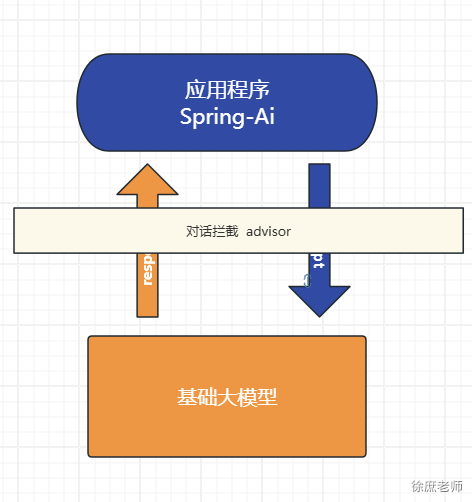 `Advisor `接口提供了`CallAdvisor`和组成`CallAdvisorChain`(适用于非流式场景),以及`StreamAdvisor`和 (`StreamAdvisorChain`适用于流式场景)。它还包括`ChatClientRequest`,用于表示未密封的 Prompt 请求,以及 ,`ChatClientResponse`用于表示聊天完成响应。 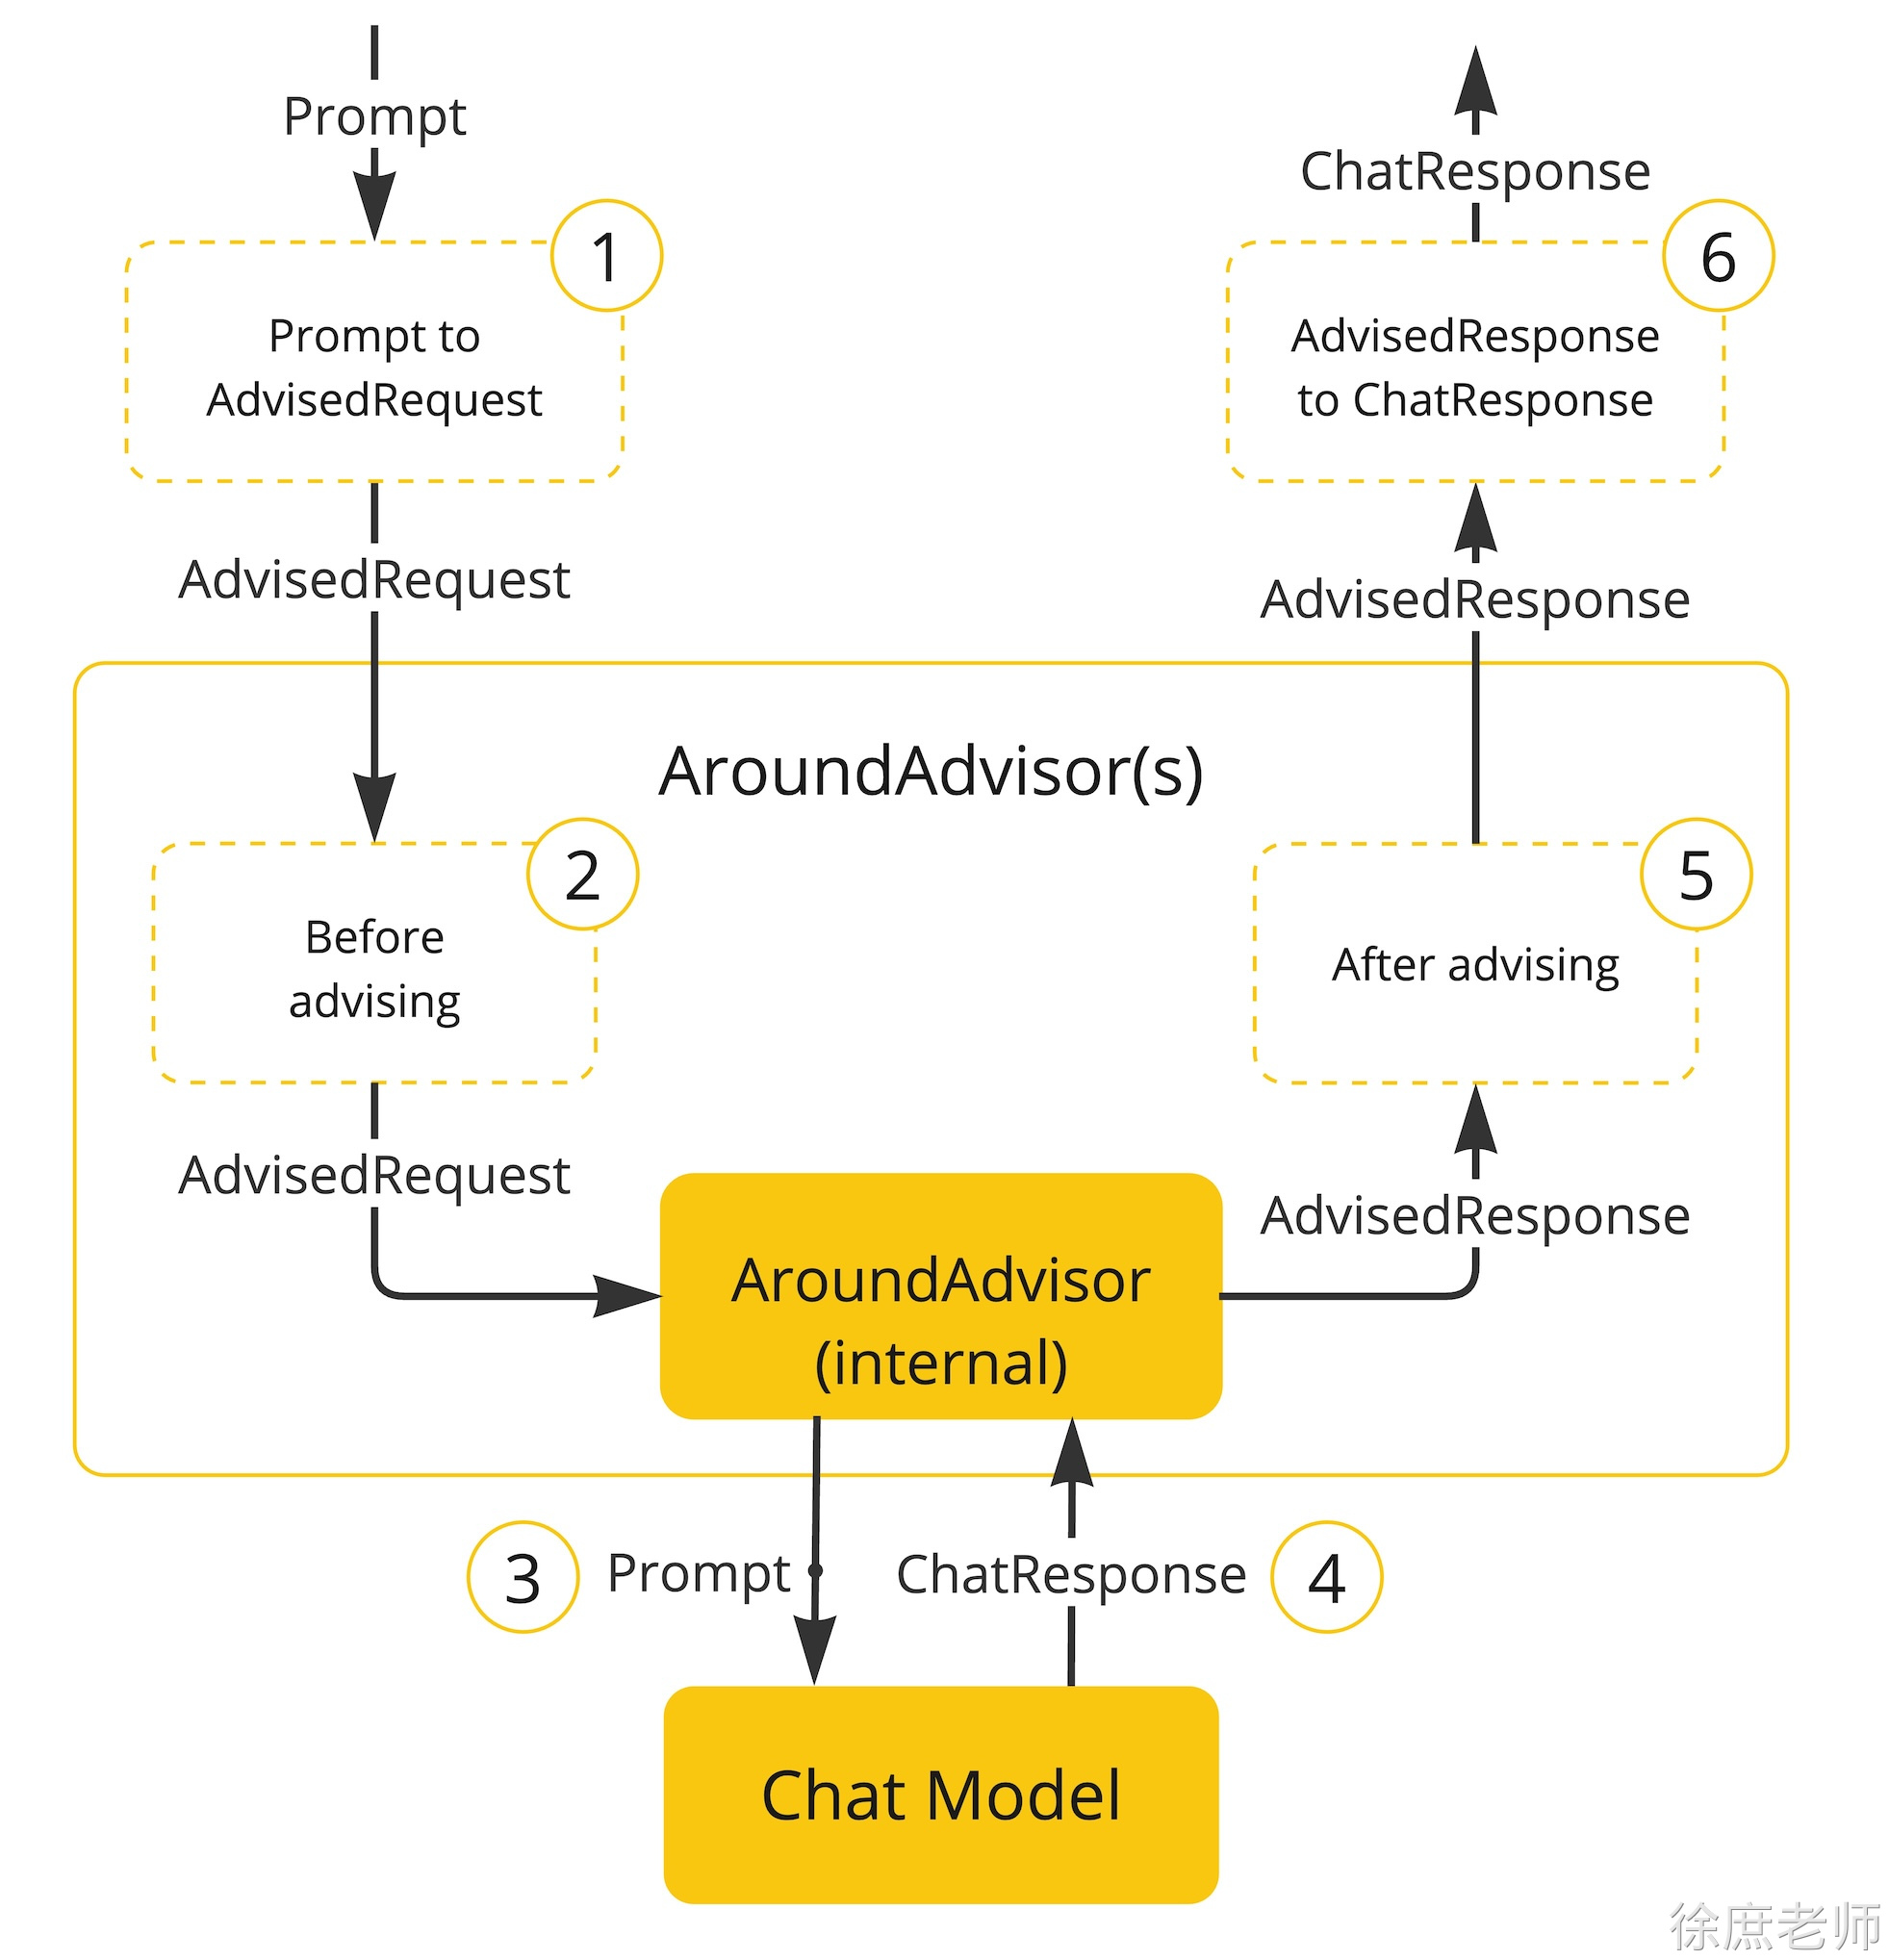 ### 日志拦截: 由于整个对话过程是一个“黑盒”, 不利于我们调试, 可以通过SimpleLoggerAdvisor拦截对话记录可以帮助观察我们发了什么信息给大模型便于调试。 1. 设置defaultAdvisors ```java @SpringBootTest public class AdvisorTest { ChatClient chatClient; @BeforeEach public void init(@Autowired DeepSeekChatModel chatModel) { chatClient = ChatClient .builder(chatModel) .defaultAdvisors( new SimpleLoggerAdvisor() ) .build(); } @Test public void testChatOptions() { String content = chatClient.prompt() .user("Hello") .call() .content(); System.out.println(content); } } ``` 1. 设置日志级别 ```properties logging.level.org.springframework.ai.chat.client.advisor=DEBUG ``` 日志中就记录了 request: 请求的日志信息 response: 响应的信息 ### 自定义拦截: #### 重读(Re2) 重读策略的核心在于让LLMs重新审视输入问题,这借鉴了人类解决问题的思维方式。通过这种方式,LLMs能够更深入地理解问题,发现复杂的模式,从而在各种推理任务中表现得更加强大。 ```properties {Input_Query} 再次阅读问题:{Input_Query} ``` 可以基于BaseAdvisor来实现自定义Advisor, 他实现了重复的代码 提供 模板方法让我们可以专注自己业务编写即可。 ```java /** * 公众号:程序员徐庶 */ public class ReReadingAdvisor implements BaseAdvisor { private static final String DEFAULT_USER_TEXT_ADVISE = """ {re2_input_query} Read the question again: {re2_input_query} """; @Override public int getOrder() { return 0; } @Override public ChatClientRequest before(ChatClientRequest chatClientRequest, AdvisorChain advisorChain) { // 获得用户输入文本 String inputQuery = chatClientRequest.prompt().getUserMessage().getText(); // 定义重复输入模版 String augmentedSystemText = PromptTemplate.builder().template(DEFAULT_USER_TEXT_ADVISE).build() .render(Map.of("re2_input_query", inputQuery)); // 设置请求的提示词 ChatClientRequest processedChatClientRequest = // 不保留 ChatClientRequest.builder() .prompt(Prompt.builder().content(augmentedSystemText).build()) .build(); return processedChatClientRequest; } @Override public ChatClientResponse after(ChatClientResponse chatClientResponse, AdvisorChain advisorChain) { //我们不做任何处理 return chatClientResponse; } } ``` 测试: ```java @SpringBootTest public class AdvisorTest { ChatClient chatClient; @BeforeEach public void init(@Autowired DeepSeekChatModel chatModel) { chatClient = ChatClient .builder(chatModel) .defaultAdvisors( new SimpleLoggerAdvisor() ) .build(); } @Test public void testChatOptions() { String content = chatClient.prompt() .user("中国有多大?") .advisors(new ReReadingAdvisor()) .call() .content(); System.out.println(content); } } ``` #### 原理 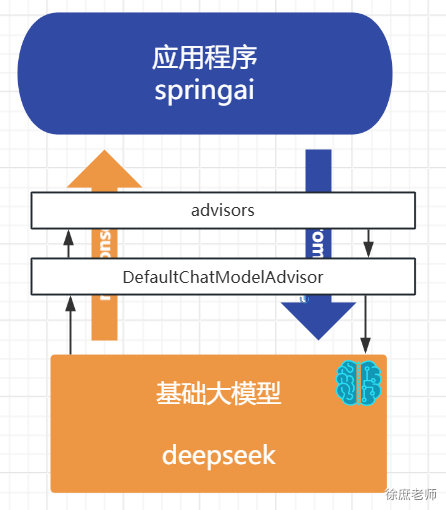 **记住!**  dvisor只有结合ChatClient才能用! 是SpringAi上层提供的。 模型底层并没有这个东西 ## 对话记忆 大型语言模型 (LLM) 是无状态的,这意味着它们不会保留先前交互的信息。 ```java @Test public void testChatOptions() { String content = chatClient.prompt() .user("我叫徐庶 ") .call() .content(); System.out.println(content); System.out.println("--------------------------------------------------------------------------"); content = chatClient.prompt() .user("我叫什么 ?") .call() .content(); System.out.println(content); } ``` 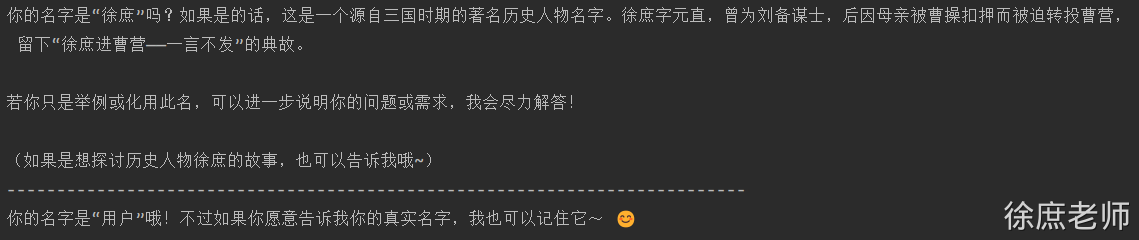 那我们平常跟一些大模型聊天是怎么记住我们对话的呢?实际上,每次对话都需要将之前的对话消息内置发送给大模型,这种方式称为多轮对话。 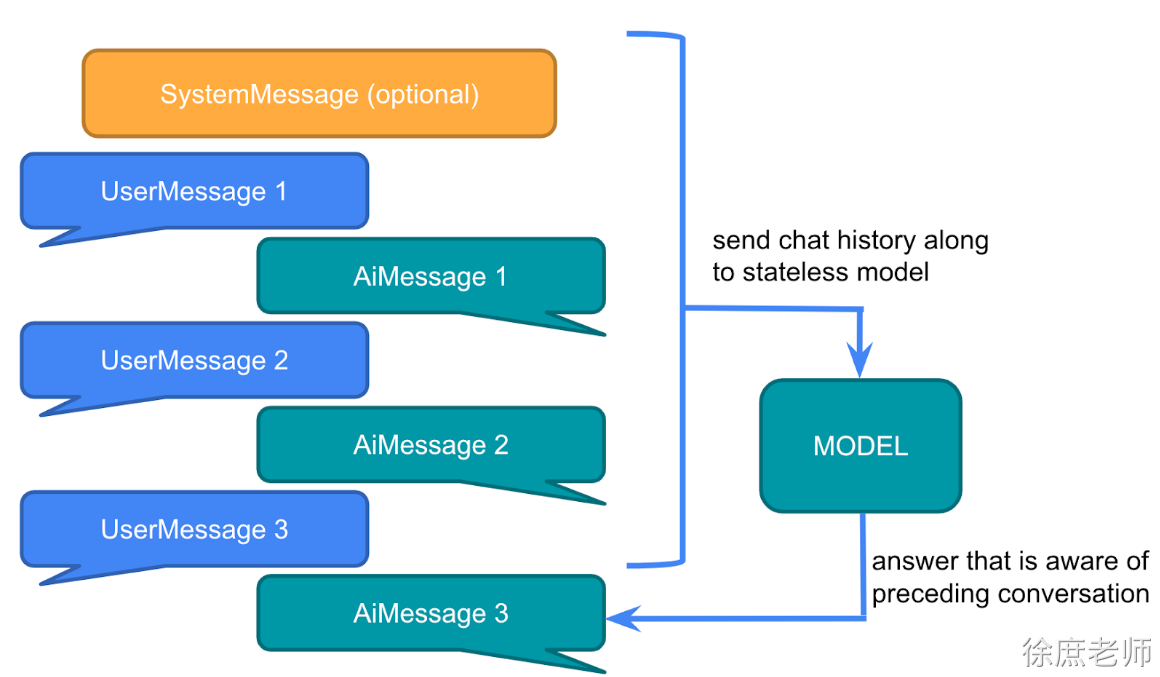 SpringAi提供了一个`ChatMemory`的组件用于存储聊天记录,允许您使用 LLM 跨多个交互存储和检索信息。并且可以为不同用户的多个交互之间维护上下文或状态。 可以在每次对话的时候把当前聊天信息和模型的响应存储到ChatMemory, 然后下一次对话把聊天记录取出来再发给大模型。 ```java ` //输出 名字叫徐庶 ``` 但是这样做未免太麻烦! 能不能简化? 思考一下! 用我们之前的Advisor对话拦截是不是就可以不用每次手动去维护了。 并且SpringAi早已体贴的为我提供了`ChatMemoryAutoConfiguration`自动配置类 ```xml <dependency> <groupId>org.springframework.ai</groupId> <artifactId>spring-ai-autoconfigure-model-chat-memory</artifactId> </dependency> @AutoConfiguration @ConditionalOnClass({ ChatMemory.class, ChatMemoryRepository.class }) public class ChatMemoryAutoConfiguration { @Bean @ConditionalOnMissingBean ChatMemoryRepository chatMemoryRepository() { return new InMemoryChatMemoryRepository(); } @Bean @ConditionalOnMissingBean ChatMemory chatMemory(ChatMemoryRepository chatMemoryRepository) { return MessageWindowChatMemory.builder().chatMemoryRepository(chatMemoryRepository).build(); } } ``` 所以我们可以这样用: ### 使用 SpringAi提供了 `PromptChatMemoryAdvisor` 专门用于对话记忆的拦截 ```java @SpringBootTest public class ChatMemoryTest { ChatClient chatClient; @BeforeEach public void init(@Autowired DeepSeekChatModel chatModel, @Autowired ChatMemory chatMemory) { chatClient = ChatClient .builder(chatModel) .defaultAdvisors( PromptChatMemoryAdvisor.builder(chatMemory).build() ) .build(); } @Test public void testChatOptions() { String content = chatClient.prompt() .user("我叫徐庶 ?") .advisors(new ReReadingAdvisor()) .call() .content(); System.out.println(content); System.out.println("--------------------------------------------------------------------------"); content = chatClient.prompt() .user("我叫什么 ?") .advisors(new ReReadingAdvisor()) .call() .content(); System.out.println(content); } } ``` ### 配置聊天记录最大存储数量 你要知道, 我们把聊天记录发给大模型, 都是算token计数的。 大模型的token是有上限了, 如果你发送过多聊天记录,可能就会导致token过长。 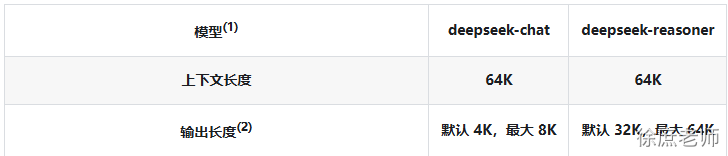 并且更多的token也意味更多的费用, 更久的解析时间. 所以不建议太长 (DEFAULT_MAX_MESSAGES默认20即10次对话) 一旦超出DEFAULT_MAX_MESSAGES只会存最后面N条(可以理解为先进先出),参考`MessageWindowChatMemory`源码 ```java @Bean ChatMemory chatMemory(ChatMemoryRepository chatMemoryRepository) { return MessageWindowChatMemory .builder() .maxMessages(10) .chatMemoryRepository(chatMemoryRepository).build(); } ``` ### 配置多用户隔离记忆 如果有多个用户在进行对话, 肯定不能将对话记录混在一起, 不同的用户的对话记忆需要隔离 ```java @Test public void testChatOptions() { String content = chatClient.prompt() .user("我叫徐庶 ?") .advisors(advisorSpec -> advisorSpec.param(ChatMemory.CONVERSATION_ID,"1")) .call() .content(); System.out.println(content); System.out.println("--------------------------------------------------------------------------"); content = chatClient.prompt() .user("我叫什么 ?") .advisors(advisorSpec -> advisorSpec.param(ChatMemory.CONVERSATION_ID,"1")) .call() .content(); System.out.println(content); System.out.println("--------------------------------------------------------------------------"); content = chatClient.prompt() .user("我叫什么 ?") .advisors(advisorSpec -> advisorSpec.param(ChatMemory.CONVERSATION_ID,"2")) .call() .content(); System.out.println(content); } ``` 会发现, 不同的CONVERSATION_ID,会有不同的记忆 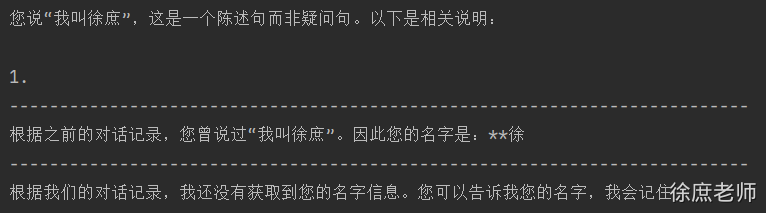 ### 原理源码$ 主要有前置存储 ``` MessageWindowChatMemory ``` 具体存储实现 ``` ChatMemoryRepository ``` 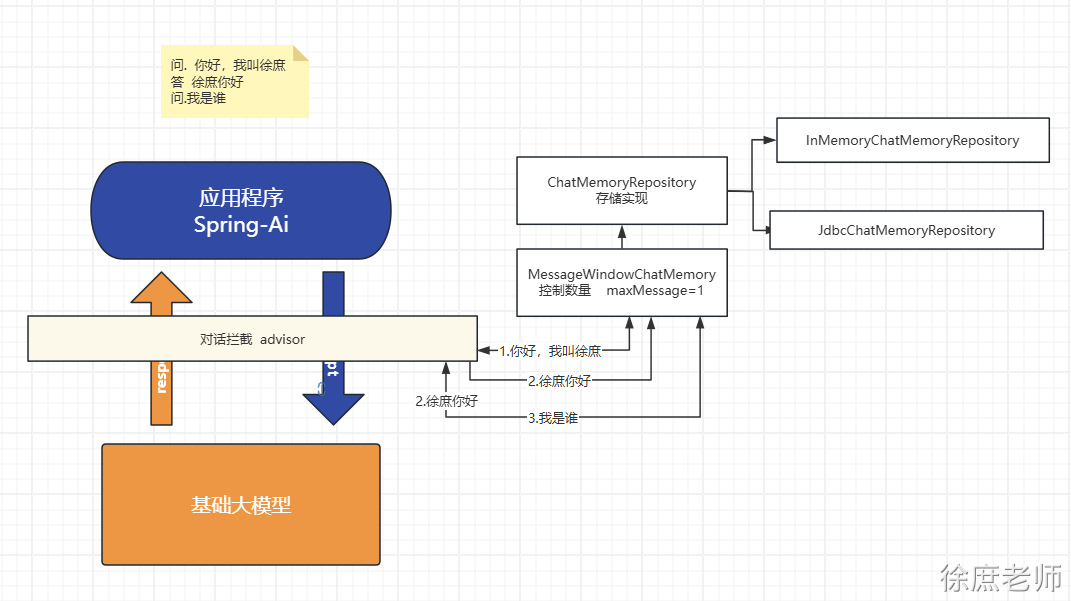 ### 数据库存储对话记忆 默认情况, 对话内容会存在jvm内存会导致: 1. 一直存最终会撑爆JVM导致OOM。 2. 重启就丢了, 如果已想存储到第三方存储进行持久化 springAi内置提供了以下几种方式(例如 Cassandra、JDBC 或 Neo4j), 这里演示下JDBC方式 1. 添加依赖 ```xml <dependency> <groupId>org.springframework.ai</groupId> <artifactId>spring-ai-starter-model-chat-memory-repository-jdbc</artifactId> </dependency> <!--jdbc--> <dependency> <groupId>org.springframework.boot</groupId> <artifactId>spring-boot-starter-jdbc</artifactId> </dependency> <!--mysql驱动--> <dependency> <groupId>com.mysql</groupId> <artifactId>mysql-connector-j</artifactId> <scope>runtime</scope> </dependency> ``` 1. 添加配置 ```properties spring.ai.chat.memory.repository.jdbc.initialize-schema=always spring.ai.chat.memory.repository.jdbc.schema=classpath:/schema-mysql.sql ``` ```yaml spring: datasource: username: root password: 123456 url: jdbc:mysql://localhost:3306/springai?characterEncoding=utf8&useSSL=false&serverTimezone=UTC& driver-class-name: com.mysql.cj.jdbc.Driver ``` 1. 配置类 ```java @Configuration public class ChatMemoryConfig { @Bean ChatMemory chatMemory(JdbcChatMemoryRepository chatMemoryRepository) { return MessageWindowChatMemory .builder() .maxMessages(1) .chatMemoryRepository(chatMemoryRepository).build(); } } ``` 1. resources/schema-mysql.sql(目前1.0.0版本需要自己定义,没有提供脚本) ```java CREATE TABLE IF NOT EXISTS SPRING_AI_CHAT_MEMORY ( `conversation_id` VARCHAR(36) NOT NULL, `content` TEXT NOT NULL, `type` VARCHAR(10) NOT NULL, `timestamp` TIMESTAMP NOT NULL, INDEX `SPRING_AI_CHAT_MEMORY_CONVERSATION_ID_TIMESTAMP_IDX` (`conversation_id`, `timestamp`) ); ``` 1. 测试 ```java @SpringBootTest public class ChatMemoryTest { ChatClient chatClient; @BeforeEach public void init(@Autowired DeepSeekChatModel chatModel, @Autowired ChatMemory chatMemory) { chatClient = ChatClient .builder(chatModel) .defaultAdvisors( PromptChatMemoryAdvisor.builder(chatMemory).build() ) .build(); } @Test public void testChatOptions() { String content = chatClient.prompt() .user("你好,我叫徐庶!") .advisors(new ReReadingAdvisor()) .advisors(advisorSpec -> advisorSpec.param(ChatMemory.CONVERSATION_ID,"1")) .call() .content(); System.out.println(content); System.out.println("--------------------------------------------------------------------------"); content = chatClient.prompt() .user("我叫什么 ?") .advisors(new ReReadingAdvisor()) .advisors(advisorSpec -> advisorSpec.param(ChatMemory.CONVERSATION_ID,"1")) .call() .content(); System.out.println(content); } } ``` 可以看到由于我设置`.maxMessages(1)`数据库只存一条  ### Redis存储 如果你想用redis , 你需要自己实现ChatMemoryRepository接口(自己实现增、删、查) 但是alibaba-ai有现成的实现:(还包括ES) https://github.com/alibaba/spring-ai-alibaba/tree/main/community/memories ```java <properties> <jedis.version>5.2.0</jedis.version> </properties> <dependency> <groupId>com.alibaba.cloud.ai</groupId> <artifactId>spring-ai-alibaba-starter-memory-redis</artifactId> </dependency> <dependency> <groupId>redis.clients</groupId> <artifactId>jedis</artifactId> <version>${jedis.version}</version> </dependency> spring: ai: memory: redis: host: localhost port: 6379 timeout: 5000 password: ``` ```java @Configuration public class RedisMemoryConfig { @Value("${spring.ai.memory.redis.host}") private String redisHost; @Value("${spring.ai.memory.redis.port}") private int redisPort; @Value("${spring.ai.memory.redis.password}") private String redisPassword; @Value("${spring.ai.memory.redis.timeout}") private int redisTimeout; @Bean public RedisChatMemoryRepository redisChatMemoryRepository() { return RedisChatMemoryRepository._builder_() .host(redisHost) .port(redisPort) // 若没有设置密码则注释该项 // .password(redisPassword) .timeout(redisTimeout) .build(); } } ``` ### **多层次记忆架构** **痛点** 记忆多=聪明, 记忆多会触发token上限 要知道, 无论你用什么存储对话以及, 也只能保证服务端的存储性能。 但是一旦聊天记录多了依然会超过token上限, 但是有时候我们依然希望存储更多的聊天记录,这样才能保证整个对话更像“人”。 **多层次记忆架构(模仿人类)** - - **近期记忆**:保留在上下文窗口中的最近几轮对话,每轮对话完成后立即存储(可通过ChatMemory); 10 条 - **中期记忆**:通过RAG检索的相关历史对话(每轮对话完成后,异步将对话内容转换为向量并存入向量数据库) 5条 - **长期记忆**:关键信息的固化总结 - - - **方式一:定时批处理** - - - - 通过定时任务(如每天或每周)对积累的对话进行总结和提炼 - 提取关键信息、用户偏好、重要事实等 - 批处理方式降低计算成本,适合大规模处理 - - - **方式二:关键点实时处理** - - - - 在对话中识别出关键信息点时立即提取并存储 - 例如,当用户明确表达偏好、提供个人信息或设置持久性指令时 - 采用"写入触发器"机制,在特定条件下自动更新长期记忆 ## 结构化输出 ### 基础类型: 以Boolean为例 , 在agent中可以用于判定用于的内容2个分支, 不同的分支走不同的逻辑 ```java ChatClient chatClient; @BeforeEach public void init(@Autowired DashScopeChatModel chatModel) { chatClient = ChatClient.builder(chatModel).build(); } @Test public void testBoolOut() { Boolean isComplain = chatClient .prompt() .system(""" 请判断用户信息是否表达了投诉意图? 只能用 true 或 false 回答,不要输出多余内容 """) .user("你们家的快递迟迟不到,我要退货!") .call() .entity(Boolean.class); // 分支逻辑 if (Boolean.TRUE.equals(isComplain)) { System.out.println("用户是投诉,转接人工客服!"); } else { System.out.println("用户不是投诉,自动流转客服机器人。"); // todo 继续调用 客服ChatClient进行对话 } } ``` ### Pojo类型: 用购物APP应该见过复制一个地址, 自动为你填入每个输入框。 用大模型轻松完成! 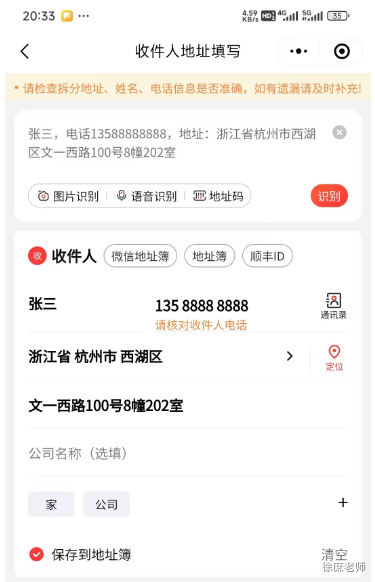 ```java @Test public void testEntityOut() { Address address = chatClient.prompt() .system(""" 请从下面这条文本中提取收货信息 """) .user("收货人:张三,电话13588888888,地址:浙江省杭州市西湖区文一西路100号8幢202室") .call() .entity(Address.class); System.out.println(address); } public record Address( String name, // 收件人姓名 String phone, // 联系电话 String province, // 省 String city, // 市 String district, // 区/县 String detail // 详细地址 ) {} ``` ### 原理 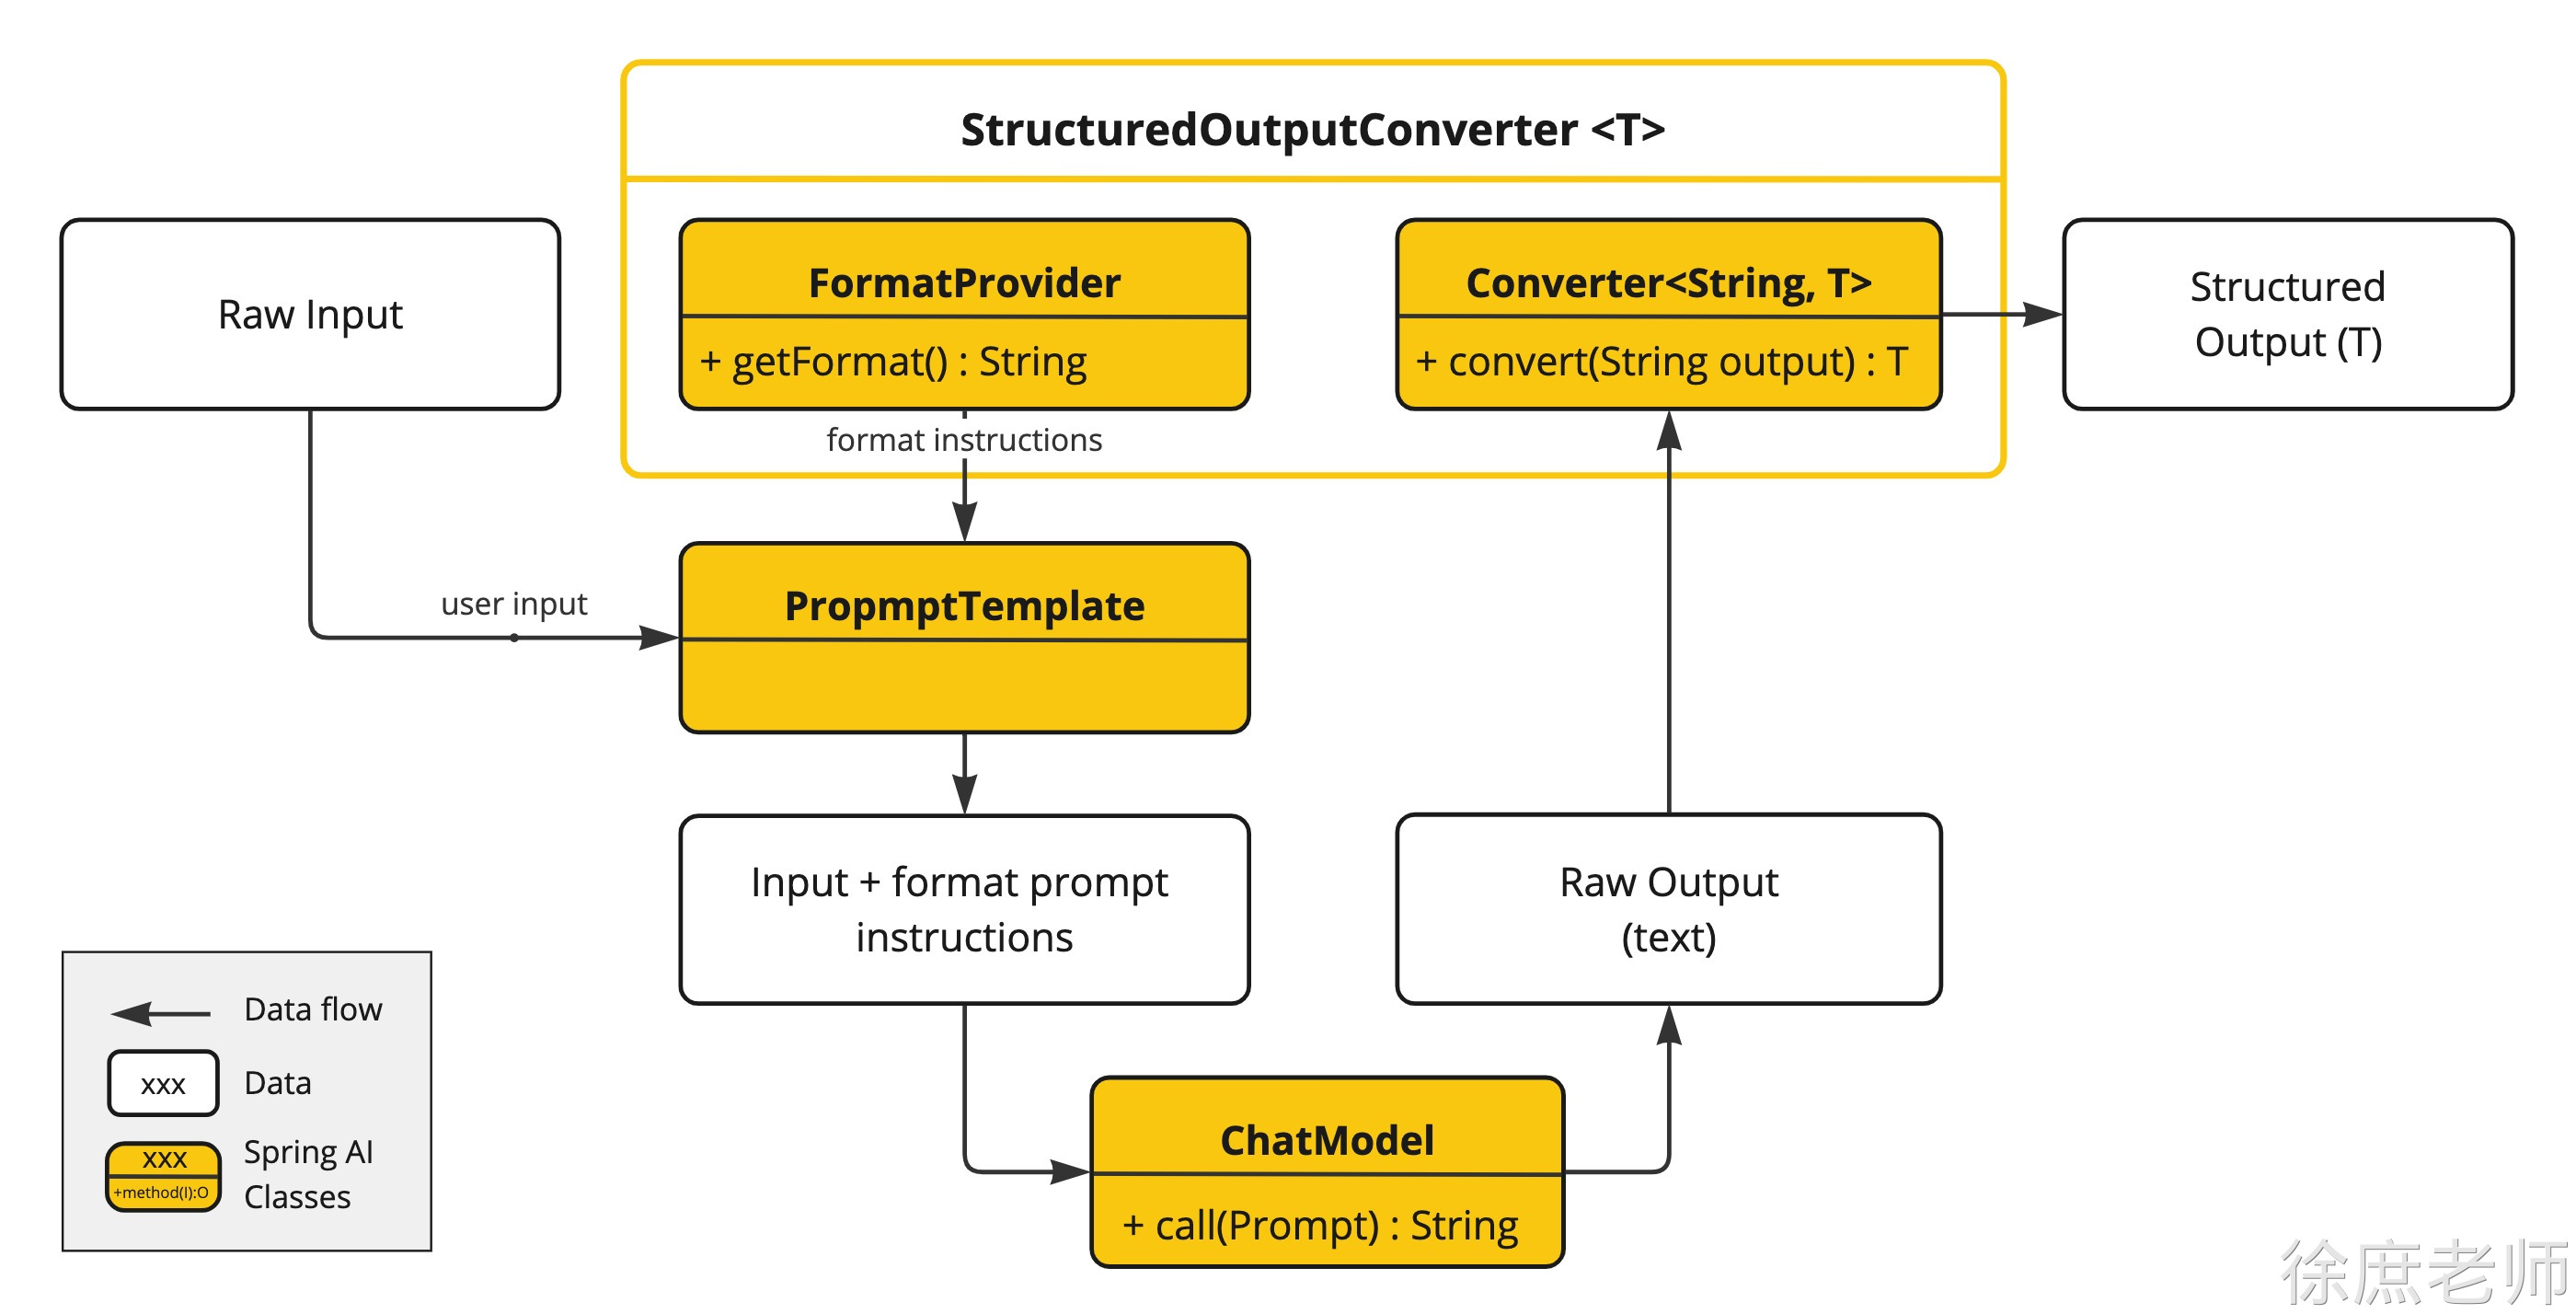 `ChatModel`或者直接使用低级API: ```java @Test public void testLowEntityOut( @Autowired DashScopeChatModel chatModel) { BeanOutputConverter<ActorsFilms> beanOutputConverter = new BeanOutputConverter<>(ActorsFilms.class); String format = beanOutputConverter.getFormat(); String actor = "周星驰"; String template = """ 提供5部{actor}导演的电影. {format} """; PromptTemplate promptTemplate = PromptTemplate.builder().template(template).variables(Map.of("actor", actor, "format", format)).build(); ChatResponse response = chatModel.call( promptTemplate.create() ); ActorsFilms actorsFilms = beanOutputConverter.convert(response.getResult().getOutput().getText()); System.out.println(actorsFilms); } ``` #### ## 链接多个模型协调工作实战 - 初代tools: $ #### 背景: 大模型如果它无法和企业API互联那将毫无意义! 比如我们开发一个智能票务助手, 当用户需要退票, 基础大模型它肯定做不到, 因为票务信息都存在了我们系统中, 必须通过我们系统的业务方法才能进行退票。 那怎么能让大模型“调用”我们自己系统的业务方法呢? 今天叫大家通过结构化输入连接多个模型一起协同完成这个任务: #### 票务助手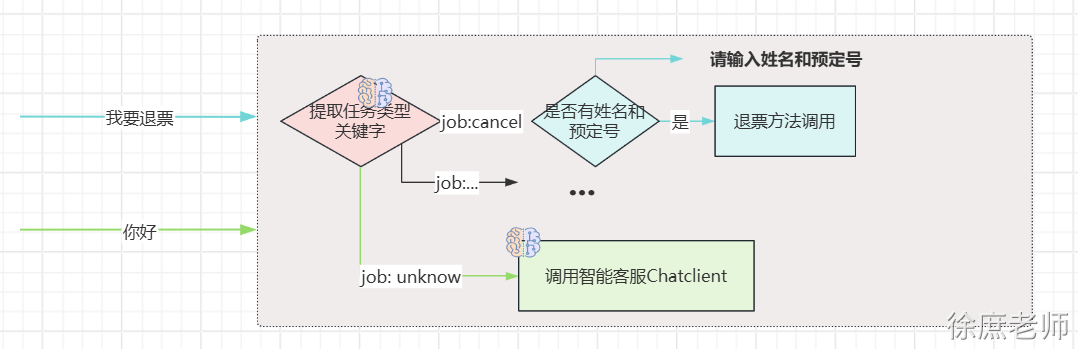 #### 效果   输入姓名和预定号:   普通对话:  #### 代码: ```java public class AiJob { record Job(JobType jobType, Map<String,String> keyInfos) { } public enum JobType{ CANCEL, QUERY, OTHER, } } ``` ```java /** * 公众号:程序员徐庶 */ @Configuration public class AiConfig { @Bean public ChatClient planningChatClient(DashScopeChatModel chatModel, DashScopeChatProperties options, ChatMemory chatMemory) { DashScopeChatOptions dashScopeChatOptions = DashScopeChatOptions.fromOptions(options.getOptions()); dashScopeChatOptions.setTemperature(0.7); return ChatClient.builder(chatModel) .defaultSystem(""" # 票务助手任务拆分规则 ## 1.要求 ### 1.1 根据用户内容识别任务 ## 2. 任务 ### 2.1 JobType:退票(CANCEL) 要求用户提供姓名和预定号, 或者从对话中提取; ### 2.2 JobType:查票(QUERY) 要求用户提供预定号, 或者从对话中提取; ### 2.3 JobType:其他(OTHER) """) .defaultAdvisors( MessageChatMemoryAdvisor.builder(chatMemory).build() ) .defaultOptions(dashScopeChatOptions) .build(); } @Bean public ChatClient botChatClient(DashScopeChatModel chatModel, DashScopeChatProperties options, ChatMemory chatMemory) { DashScopeChatOptions dashScopeChatOptions = DashScopeChatOptions.fromOptions(options.getOptions()); dashScopeChatOptions.setTemperature(1.2); return ChatClient.builder(chatModel) .defaultSystem(""" 你是XS航空智能客服代理, 请以友好的语气服务用户。 """) .defaultAdvisors( MessageChatMemoryAdvisor.builder(chatMemory).build() ) .defaultOptions(dashScopeChatOptions) .build(); } } @RestController public class MultiModelsController { @Autowired ChatClient planningChatClient; @Autowired ChatClient botChatClient; @GetMapping(value = "/stream", produces = "text/stream;charset=UTF8") Flux<String> stream(@RequestParam String message) { // 创建一个用于接收多条消息的 Sink Sinks.Many<String> sink = Sinks.many().unicast().onBackpressureBuffer(); // 推送消息 sink.tryEmitNext("正在计划任务...<br/>"); new Thread(() -> { AiJob.Job job = planningChatClient.prompt().user(message) .call().entity(AiJob.Job.class); switch (job.jobType()){ case CANCEL ->{ System.out.println(job); // todo.. 执行业务 if(job.keyInfos().size()==0){ sink.tryEmitNext("请输入姓名和订单号."); } else { sink.tryEmitNext("退票成功!"); } } case QUERY -> { System.out.println(job); // todo.. 执行业务 sink.tryEmitNext("查询预定信息:xxxx"); } case OTHER -> { Flux<String> content = botChatClient.prompt().user(message).stream().content(); content.doOnNext(sink::tryEmitNext) // 推送每条AI流内容 .doOnComplete(() -> sink.tryEmitComplete()) .subscribe(); } default -> { System.out.println(job); sink.tryEmitNext("解析失败"); } } }).start(); return sink.asFlux(); } } ``` ## tools/function-call 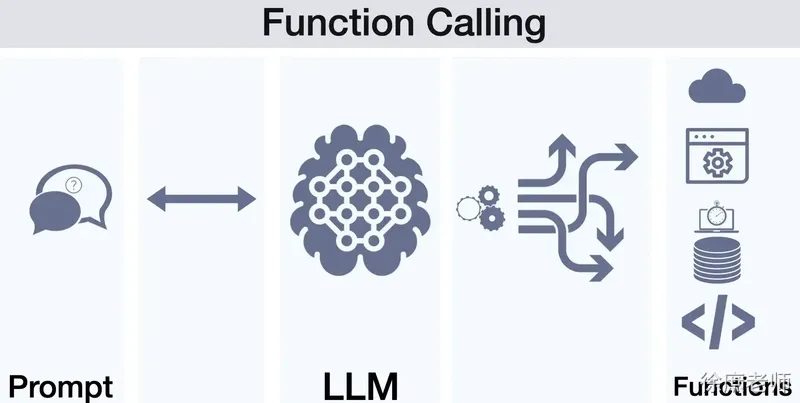 想做企业级智能应用开发, 你肯定会有需求要让大模型和你的企业API能够互连, 因为对于基础大模型来说, 他只具备通用信息,他的参数都是拿公网进行训练,并且有一定的时间延迟, 无法得知一些具体业务数据和实时数据, 这些数据往往被各软件系统存储在自己数据库中: 比如我问大模型:“中国有多少个叫徐庶的” 他肯定不知道, 我们就需要去调用政务系统的接口。 比如我现在开发一个智能票务助手, 我现在跟AI说需要退票, AI怎么做到呢? 就需要让AI调用我们自己系统的退票业务方法,进行操作数据库。 在之前我们可以通过链接多个模型的方式达到, 但是很麻烦, 那用tools, 可以轻松完成。 tool calling也可以直接叫tool(也称为function-call), 主要用于提供大模型不具备的信息和能力: 1. **信息检索:**可用于从外部源(如数据库、Web 服务、文件系统或 Web 搜索引擎)检索信息。目标是增强模型的知识,使其能够回答无法回答的问题。例如,工具可用于检索给定位置的当前天气、检索最新的新闻文章或查询数据库以获取特定记录。 这也是一种检索增强方式。 2. **采取行动:**例如发送电子邮件、在数据库中创建新记录、提交表单或触发工作流。目标是自动执行原本需要人工干预或显式编程的任务。例如,可以使用工具为与聊天机器人交互的客户预订航班,在网页上填写表单等。 需要使用tools必须要先保证大模型支持。 比如ollama列出了支持tool的模型  ### 使用 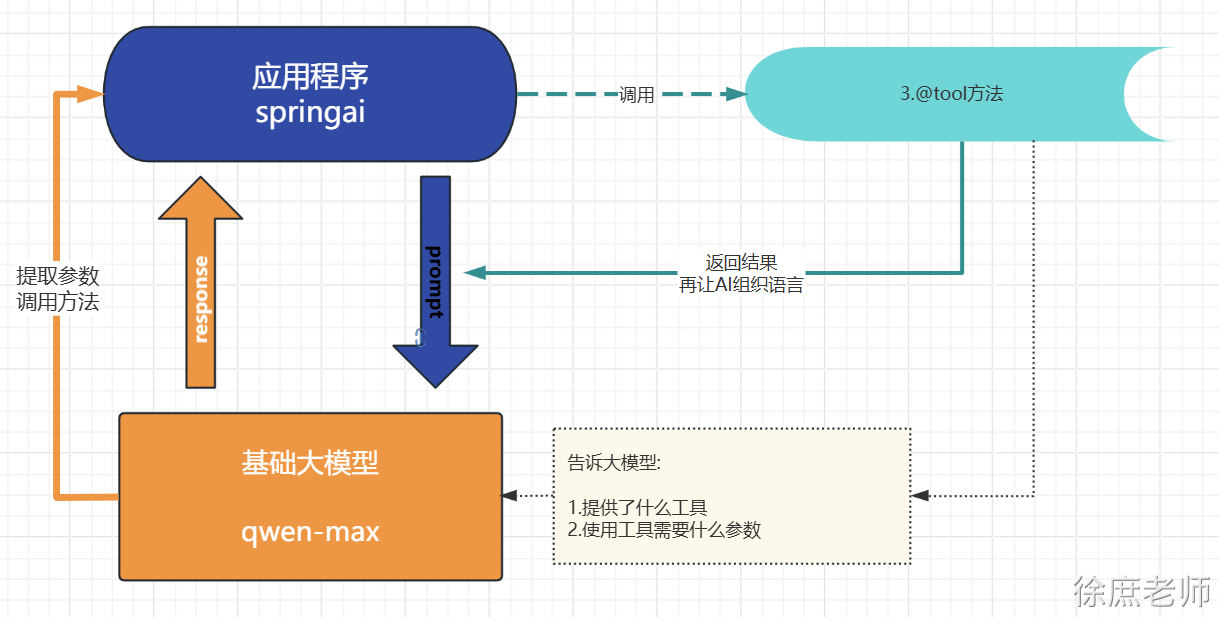 1. 声明tools的类: ```java @Service class NameCountsTools { @Tool(description = "长沙有多少名字的数量") String LocationNameCounts( @ToolParam(description = "名字") String name) { return "10个"; } } ``` 1. 将Tool类配置为bean(非必须) 2. @Tool 用户告诉大模型提供了什么工具 3. @ToolParam 用于告诉大模型你要用这个工具需要什么参数(非必须) 1. 绑定到ChatClient ```java @SpringBootTest public class ToolTest { ChatClient chatClient; @BeforeEach public void init(@Autowired DashScopeChatModel chatModel, @Autowired NameCountsTools nameCountsTools) { chatClient = ChatClient.builder(chatModel) .defaultTools(nameCountsTools) .build(); } @Test public void testChatOptions() { String content = chatClient.prompt() .user("长沙有多少个叫徐庶的/no_think") // .tools() 也可以单独绑定当前对话 .call() .content(); System.out.println(content); } } ```  ### 原理 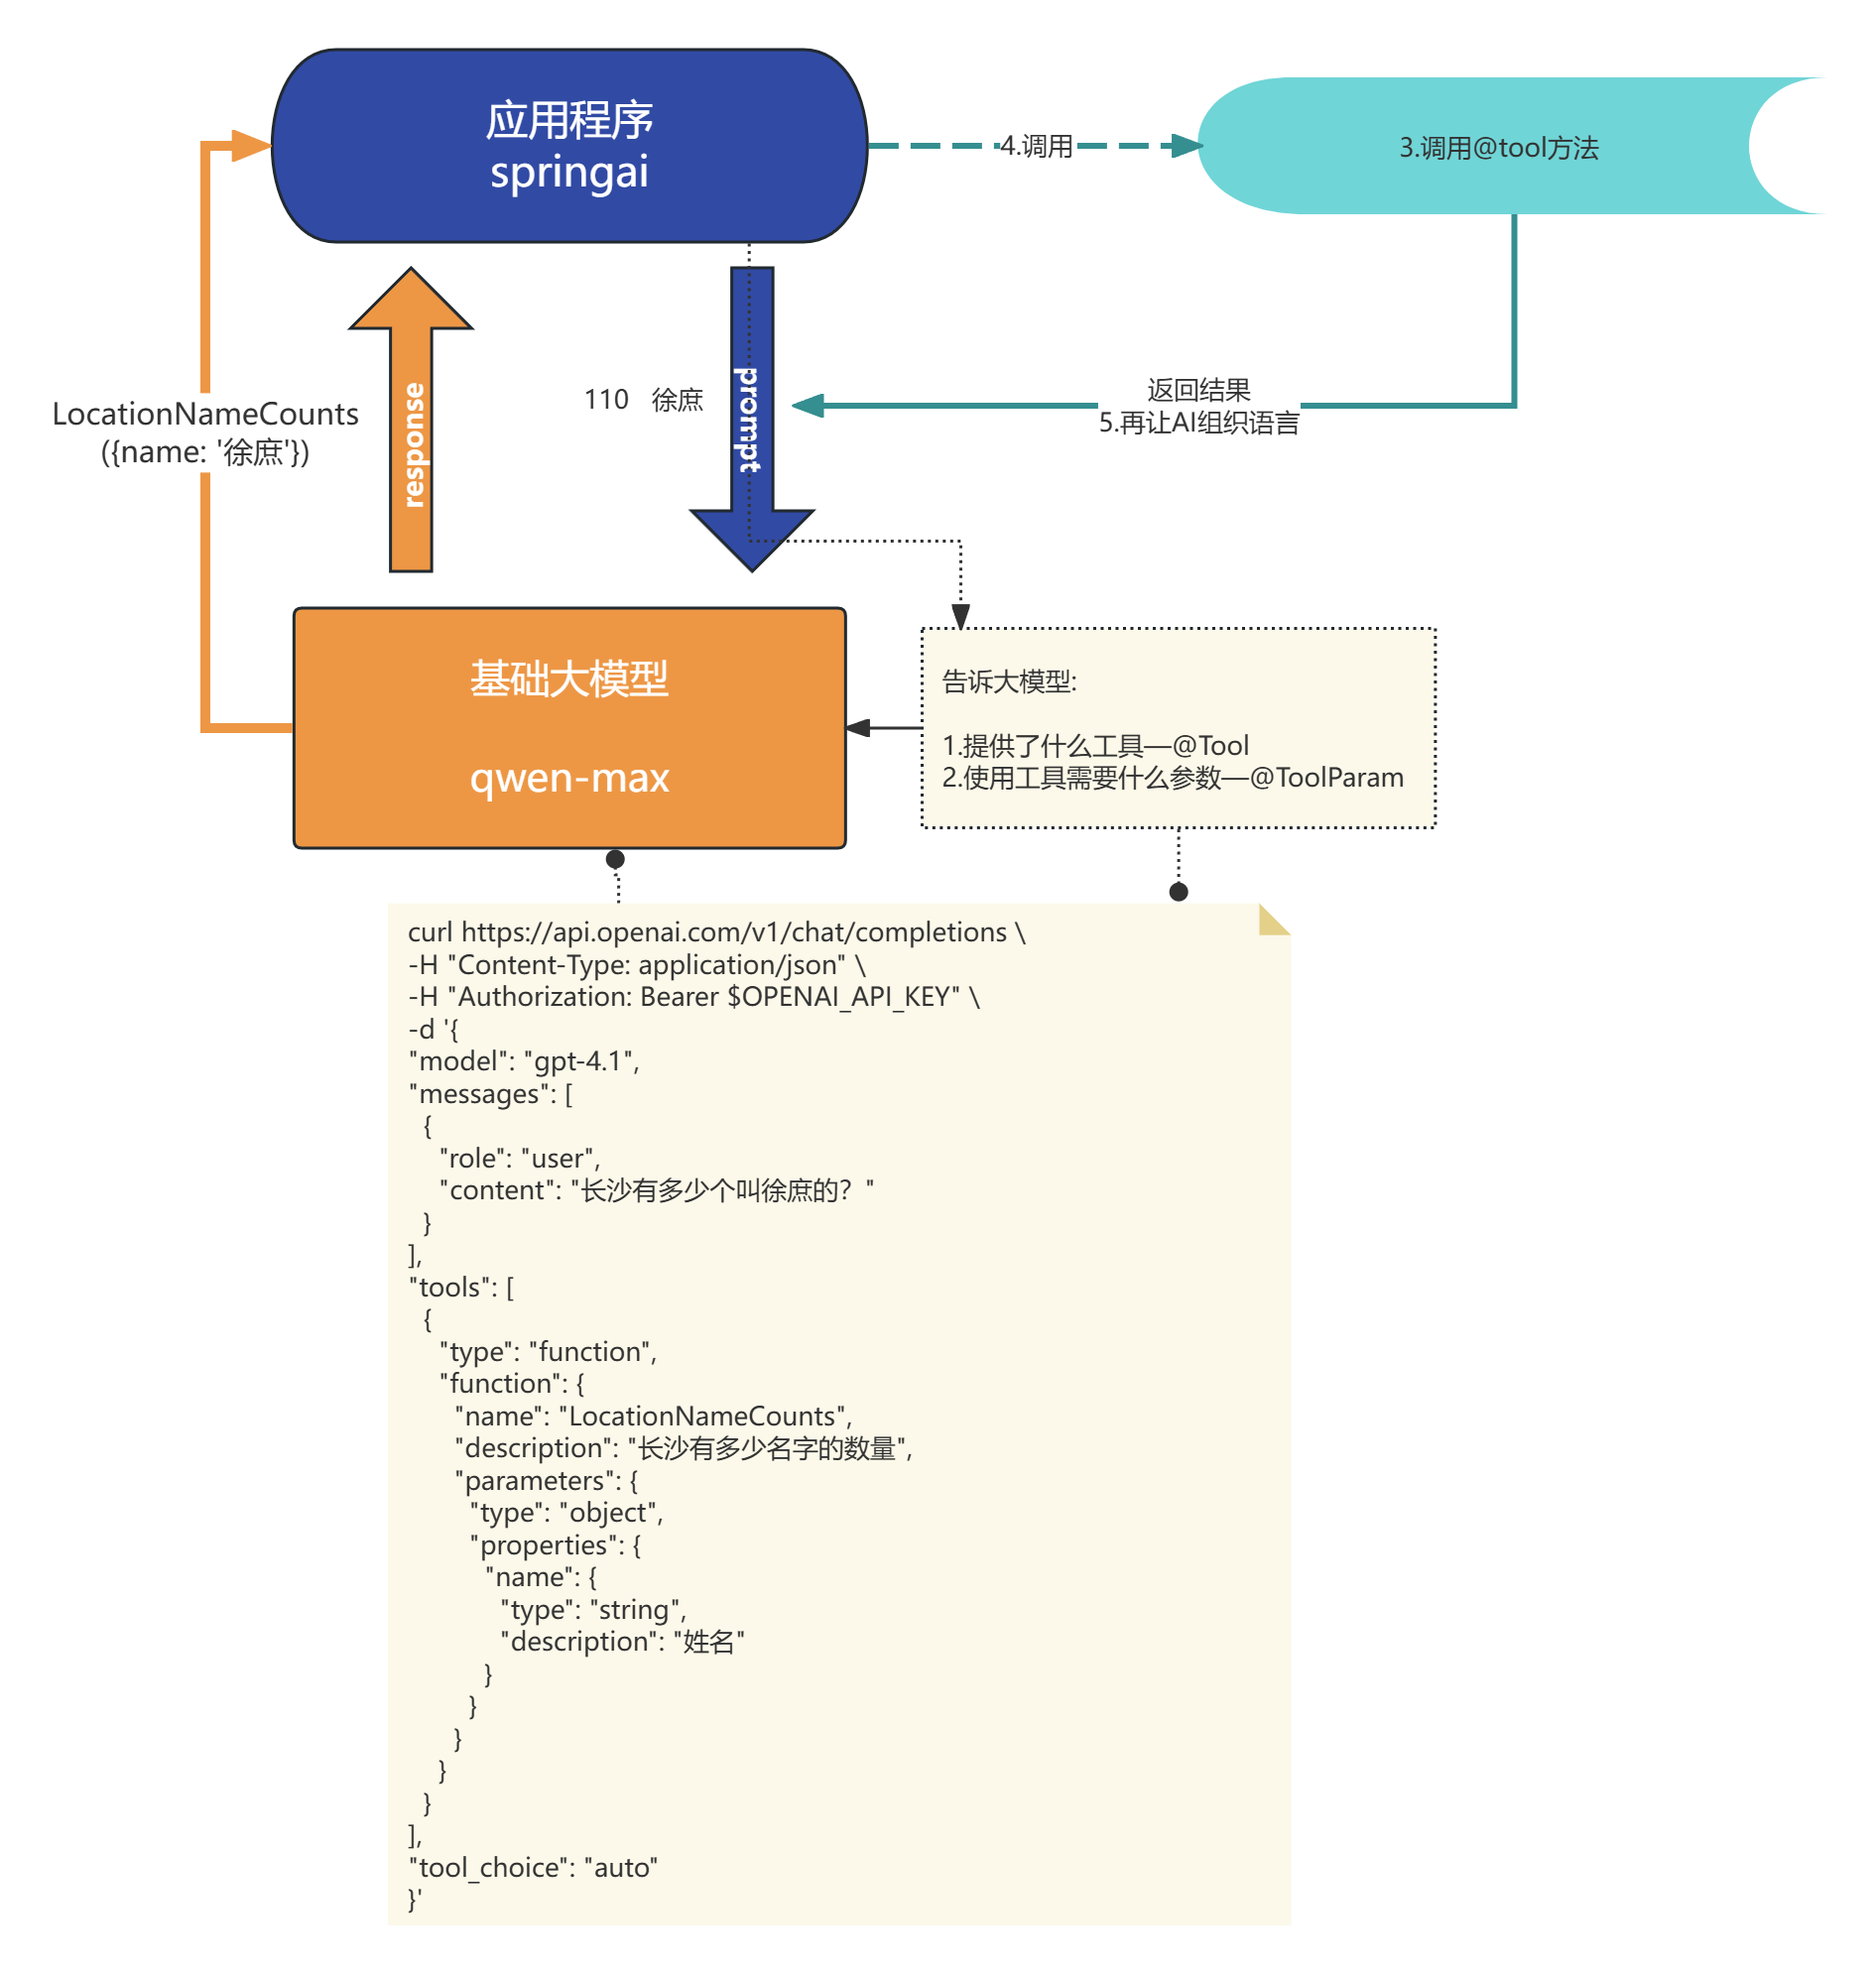 1. 当我们设置了defaultTools 相当于就告诉了大模型我提供了什么工具, 你需要用我的工具必须给我什么参数, 底层实际就是将这些信息封装了json提供给大模型 2. 当大模型识别到我们的对话需要用到工具, 就会响应需要调用tool ### 源码 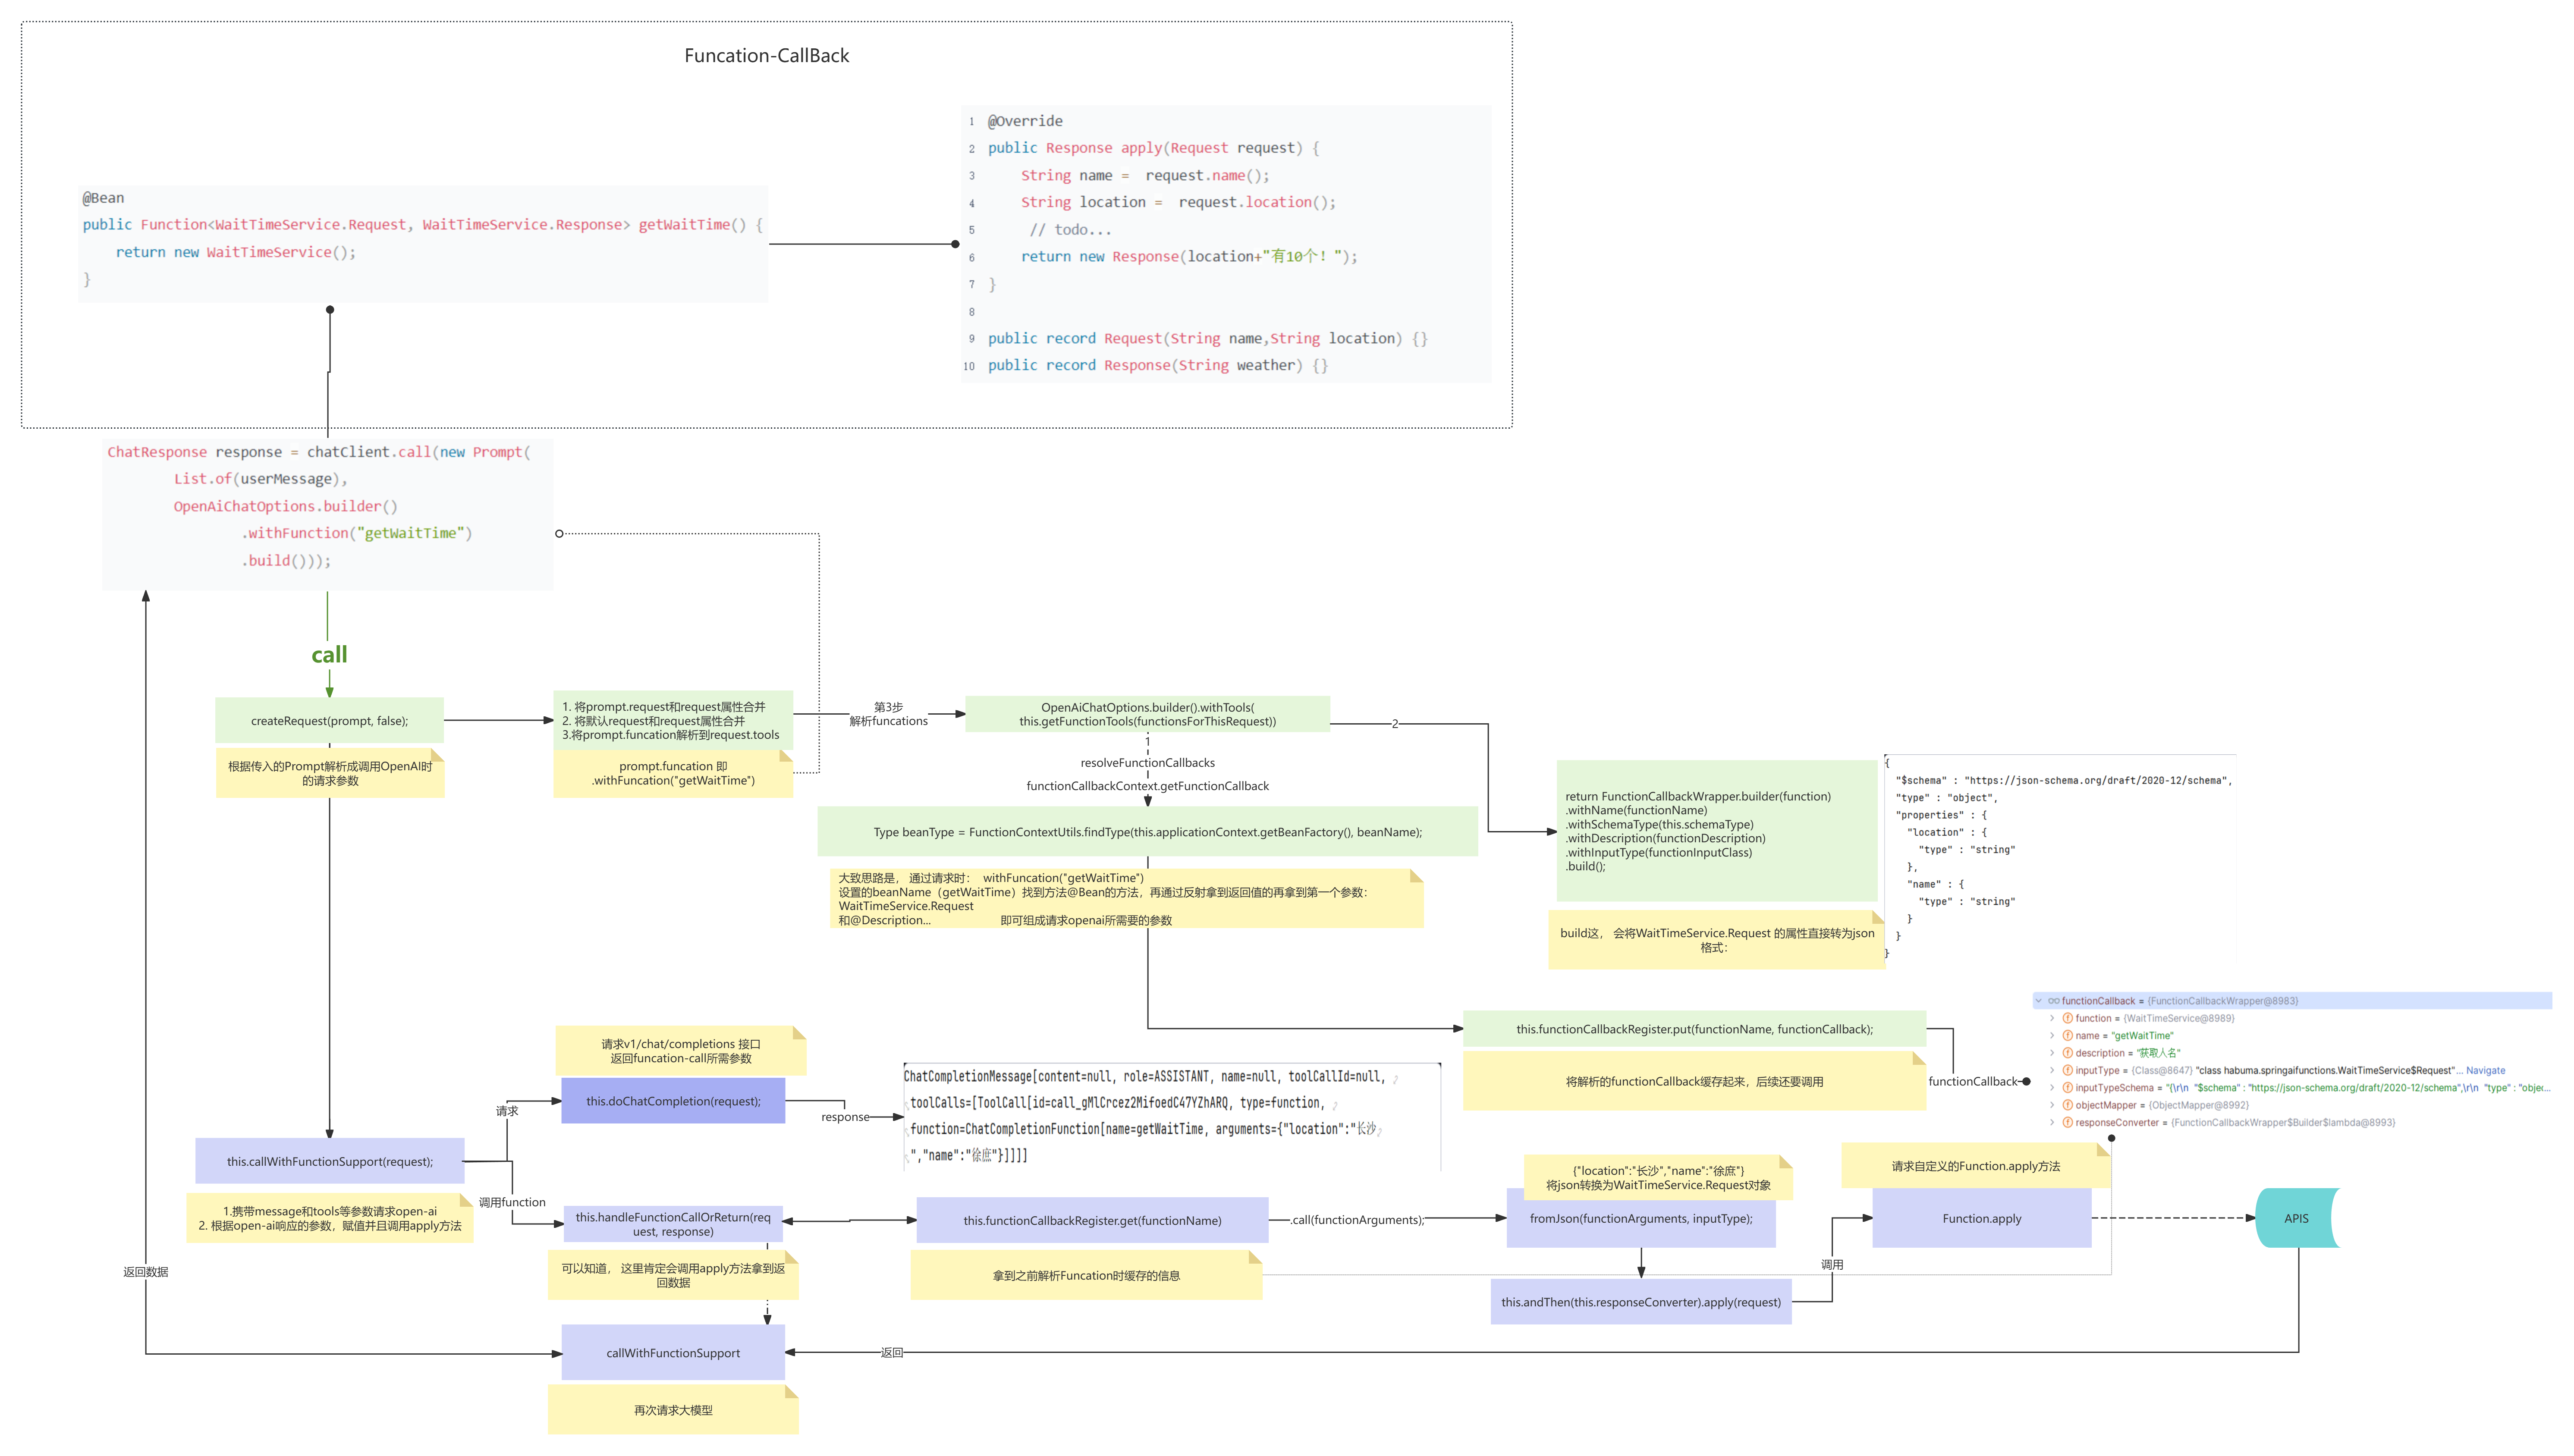 ### tools注意事项: 1. **参数或者返回值不支持:** 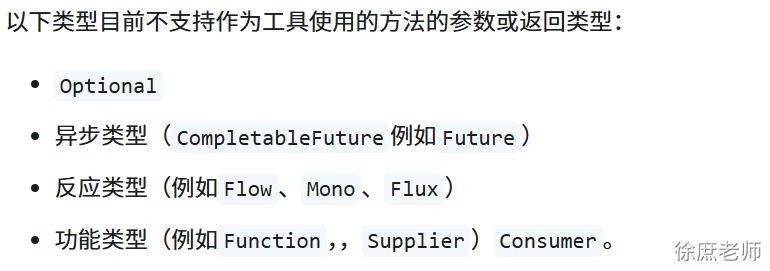 **推荐**: pojo record java基础类型 list map 1. **Tools参数无法自动推算问题** - *温度*(即模型随机性)太低,AI可能缺失自由度变得比较拘谨(从一定程度可以解决, 但是不推荐) - 也可以通过描述更加明确 ```java @Tool(description = "获取指定位置天气,根据位置自动推算经纬度") public String getAirQuality(@ToolParam(description = "纬度") double latitude, @ToolParam(description = "经度") double longitude) { return "天晴"; } ``` 1. **大模型“强行适配”Tool参数的幻觉问题** - 加严参数描述与校验 ```java @Parameter(description = "真实人名(必填,必须为人的真实姓名,严禁用其他信息代替;如缺失请传null)") String name ``` - 后端代码加强校验和兜底保护 - 系统Prompt设定限制 ```java “严禁随意补全或猜测工具调用参数。 参数如缺失或语义不准,请不要补充或随意传递,请直接放弃本次工具调用。” ``` - 高风险接口(如资金、风控等)tools方法**加强人工确认,多走一步校验。** 1. **工具暴露的接口名、方法名、参数名要可读、业务化** - AI是“看”你的签名和注释来决定用不用工具的; - 尽量避免乱码、缩写等。 1. **方法参数数量不宜过多** - 建议每个工具方法尽量少于5个参数,否则AI提示会变复杂、出错率高。 1. **工具方法不适合做超耗时操作, 更长的耗时意味着用户延迟响应时间变长** 性能优化 能异步处理就异步处理、 查询数据 redis 1. **关于Tools的权限控制** 1. 1. 可以利用SpringSecurity限制 ```java @Tool(description = "退票") @PreAuthorize("hasRole('ADMIN')") public String cancel( // @ToolParam告诉大模型参数的描述 @ToolParam(description = "预定号,可以是纯数字") String ticketNumber, @ToolParam(description = "真实人名(必填,必须为人的真实姓名,严禁用其他信息代替;如缺失请传null)") String name ) { // 当前登录用户名 String username = SecurityContextHolder.getContext().getAuthentication().getName(); // 先查询 --->先校验 ticketService.cancel(ticketNumber, name); return username+"退票成功!"; } ``` 1. 1. 将tools和权限资源一起存储, 然后动态设置tools ``` .defaultToolCallbacks(toolService.getToolCallList(toolService)) ``` 根据当前用户读取当前用户所属角色的所有tools ```java public List<ToolCallback> getToolCallList(ToolService toolService) { Method method = ReflectionUtils.findMethod(ToolService.class, "cancel",String.class,String.class); ToolDefinition build = ToolDefinition.builder() .name("cancel") .description("退票") .inputSchema(""" { "type": "object", "properties": { "ticketNumber": { "type": "string", "description": "预定号,可以是纯数字" }, "name": { "type": "string", "description": "真实人名" } }, "required": ["ticketNumber", "name"] } """) .build(); ToolCallback toolCallback = MethodToolCallback.builder() .toolDefinition( build) .toolMethod(method) .toolObject(toolService) .build(); return List.of(toolCallback); } ``` 1. **tools过多导致AI出现选择困难证** 问题: 1. 1. token上限 2. 选择困难证 tools的描述作用 保存 向量数据库。 实现方式: 1. 把所有的tools描述信息存入到向量数据库 2. 每次对话的时候根据当前对话信息检索到相似的tools(RAG) 3. 然后动态设置tools ## **《智能客服项目实战》** [**https://www.yuque.com/geren-t8lyq/ncgl94/yqnlrri5gavanx0f?singleDoc#**](https://www.yuque.com/geren-t8lyq/ncgl94/yqnlrri5gavanx0f?singleDoc#) **《Spring AI1.0 智能航空助手项目》** ### 项目效果: #### 角色预设:  #### 记忆对话 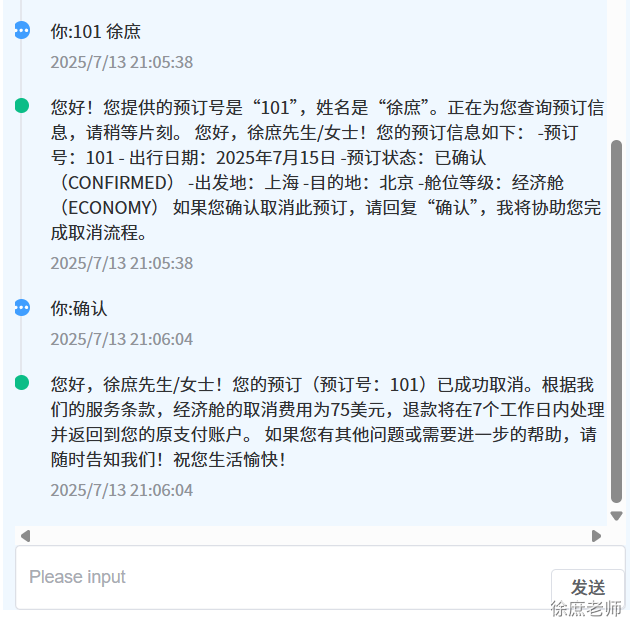 #### tools 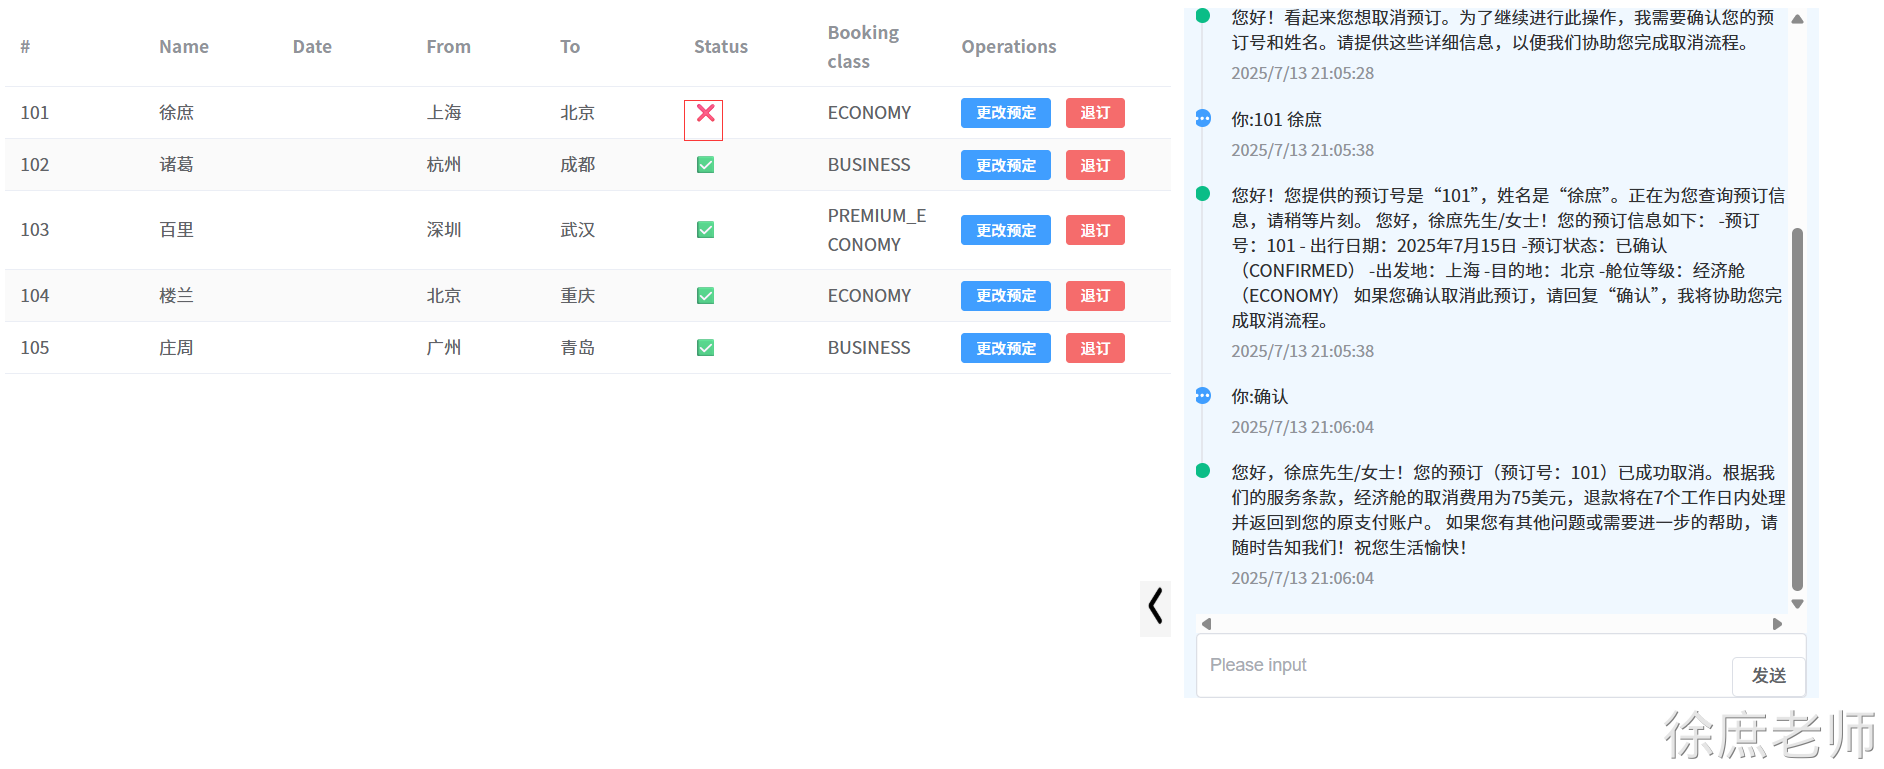 ## MCP ### 问题: 1. 当有服务商需要将tools提供外部使用(比如高德地图提供了位置服务tools, 比如百度提供了联网搜索的tools...) 2. 或者在企业级中, 有多个智能应用,想将通用的tools公共化 怎么办? 可以把tools单独抽取出来, 由应用程序读取外部的tools。 那关键是怎么读呢? 怎么解析呢? 如果每个提供商各用一种规则你能想象有多麻烦! 所以MCP就诞生了, 他指定了标准规则, 以jsonrpc2.0的方式进行通讯。 那问题又来了, 以什么方式通讯呢? http? rpc? stdio? mcp提供了sse和stdio这2种方式。 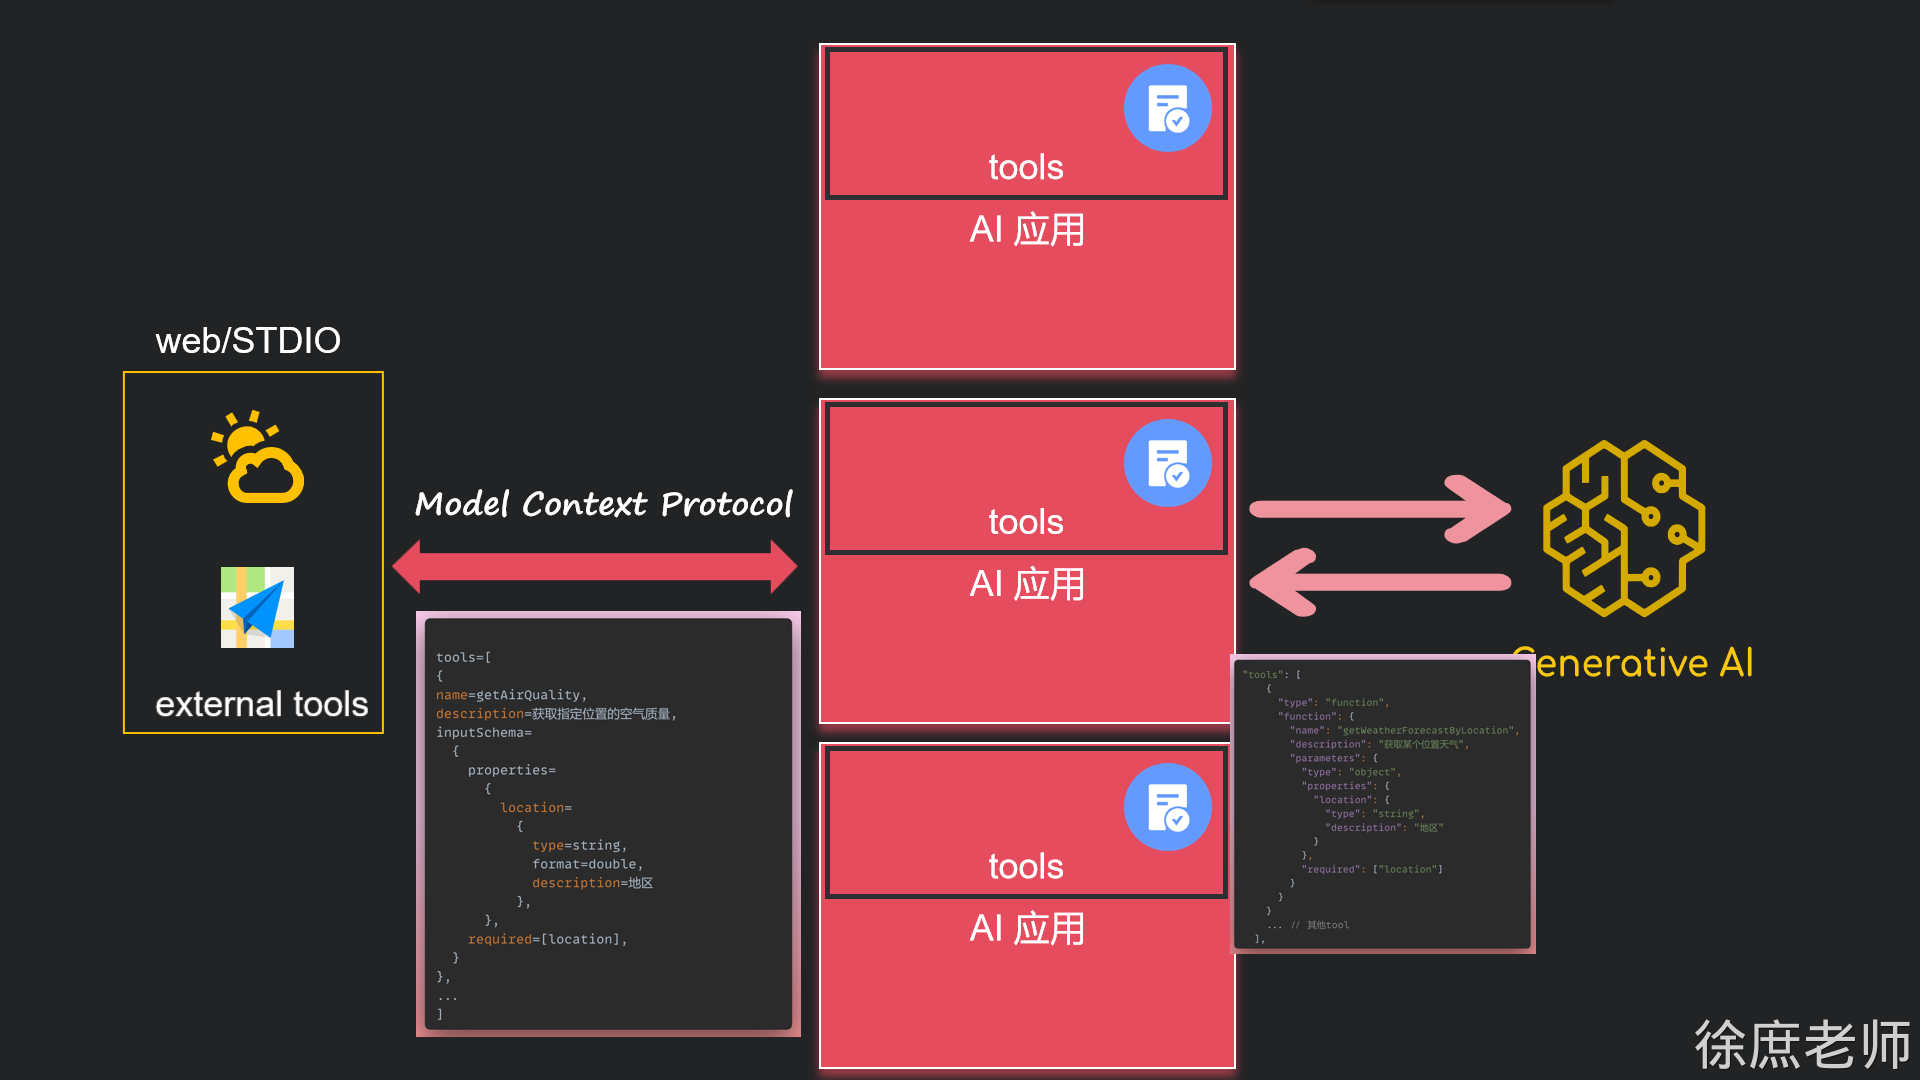 ### 使用 Streamable http目前springai1.0版本不支持, 我们先掌握SSE和STDIO 分别说下STDIO和SSE的方式: - **STDIO**更适合客户端桌面应用和辅助工具 - **SSE**更适合web应用 、业务有关的公共tools 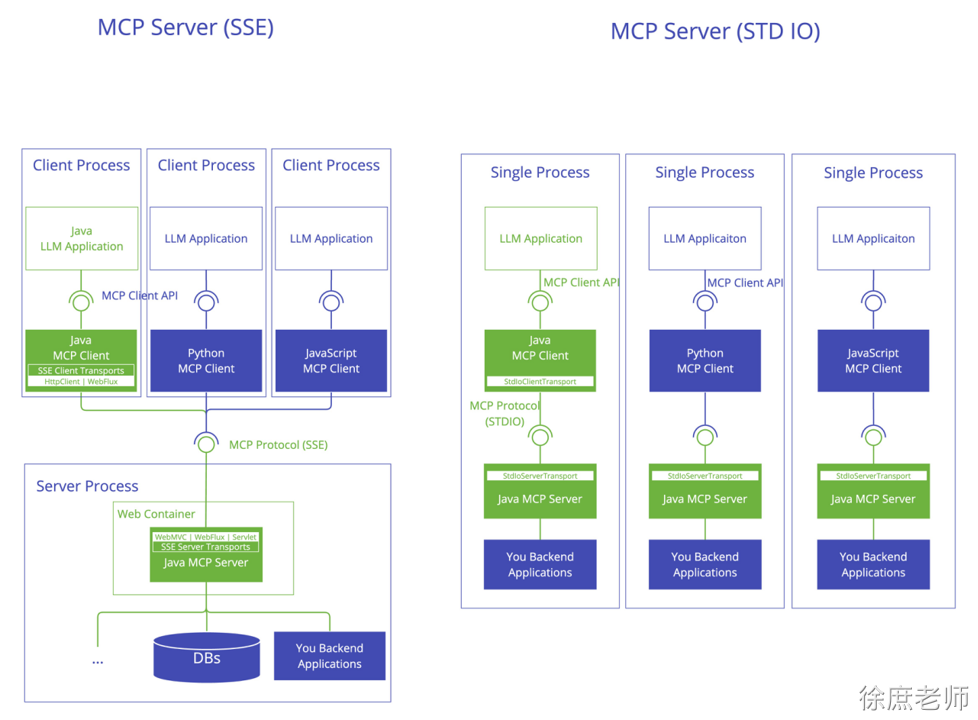 #### STDIO ##### MCP Server ###### 现成共用MCP Server 现在有很多MCP 服务 给大家提供一个网站:[MCP Server(MCP 服务器)](https://mcp.so/zh) 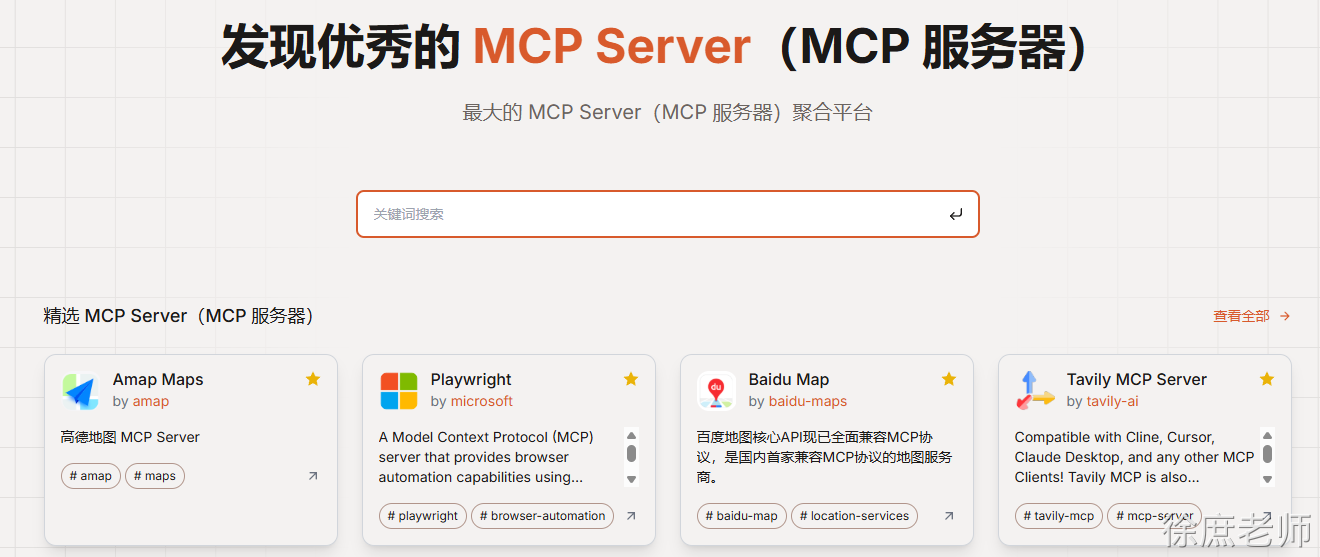 那MCP有了, 怎么调用呢? 这里介绍2种使用方式: ###### 自定义MCP Server 创建一个springai项目 1. 依赖 ```xml <!--mcp-server --> <dependency> <groupId>org.springframework.ai</groupId> <artifactId>spring-ai-starter-mcp-server</artifactId> </dependency> <dependencyManagement> <dependencies> <!--springai --> <dependency> <groupId>org.springframework.ai</groupId> <artifactId>spring-ai-bom</artifactId> <version>${spring-ai.version}</version> <type>pom</type> <scope>import</scope> </dependency> </dependencies> </dependencyManagement> <!-- 打包 --> <build> <plugins> <plugin> <groupId>org.springframework.boot</groupId> <artifactId>spring-boot-maven-plugin</artifactId> <executions> <execution> <goals> <goal>repackage</goal> </goals> </execution> </executions> </plugin> </plugins> </build> ``` 1. 添加工具 ```java @Service public class UserToolService { Map<String,Double> userScore = Map.of( "xushu",99.0, "zhangsan",2.0, "lisi",3.0); @Tool(description = "获取用户分数") public String getScore(String username) { if(userScore.containsKey(userName)){ return userScore.get(userName).toString(); } return "未检索到当前用户"+userName; } } ``` 1. 暴露工具 ```java @Bean public ToolCallbackProvider weatherTools(UserToolService userToolService) { return MethodToolCallbackProvider.builder().toolObjects(userToolService).build(); } ``` 1. 配置 ```yaml spring: main: banner-mode: off ai: mcp: server: name: my-weather-server version: 0.0.1 ``` \# 注意:您必须禁用横幅和控制台日志记录,以允许 STDIO 传输!!工作 banner-mode: off 1. 打包 mvn package 此时target/生成了jar则成功! ##### MCP Client ###### 通过工具 CherryStudio、Cursor 、Claude Desktop、[Cline ](https://marketplace.visualstudio.com/items?itemName=saoudrizwan.claude-dev) 等等很多, 这里不一一演示, 不会的话自己找个文章, 工具使用都很简单! 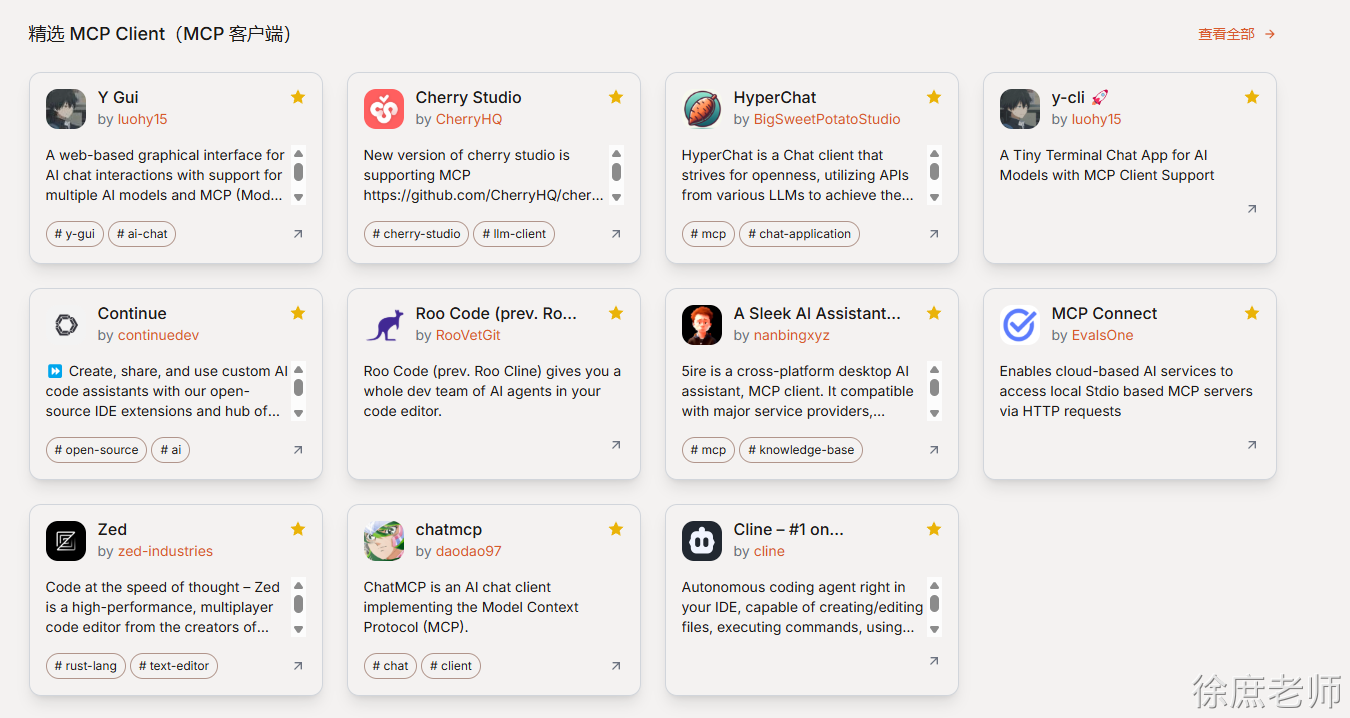 以Cline为例: 他是Vscode的插件 1. 安装VSCode 1. 安装插件: 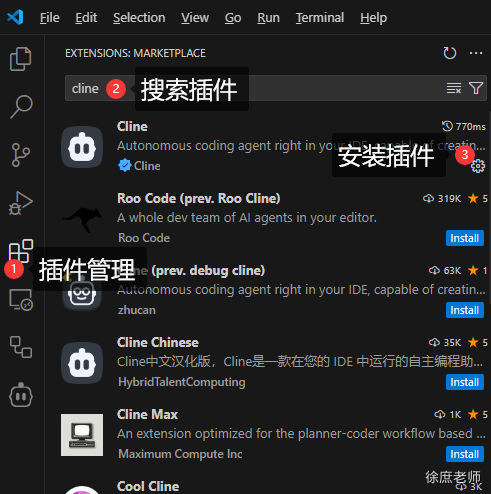 1. 配置cline的模型: 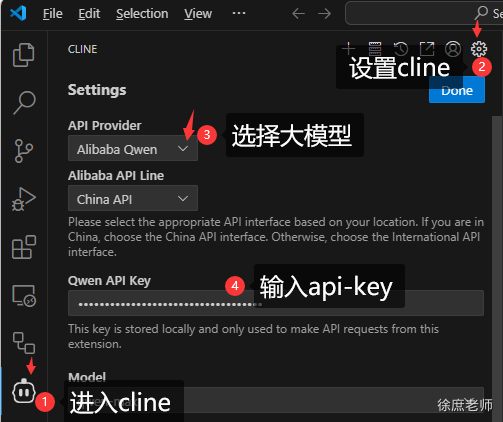 1. 配置cline的mcpserver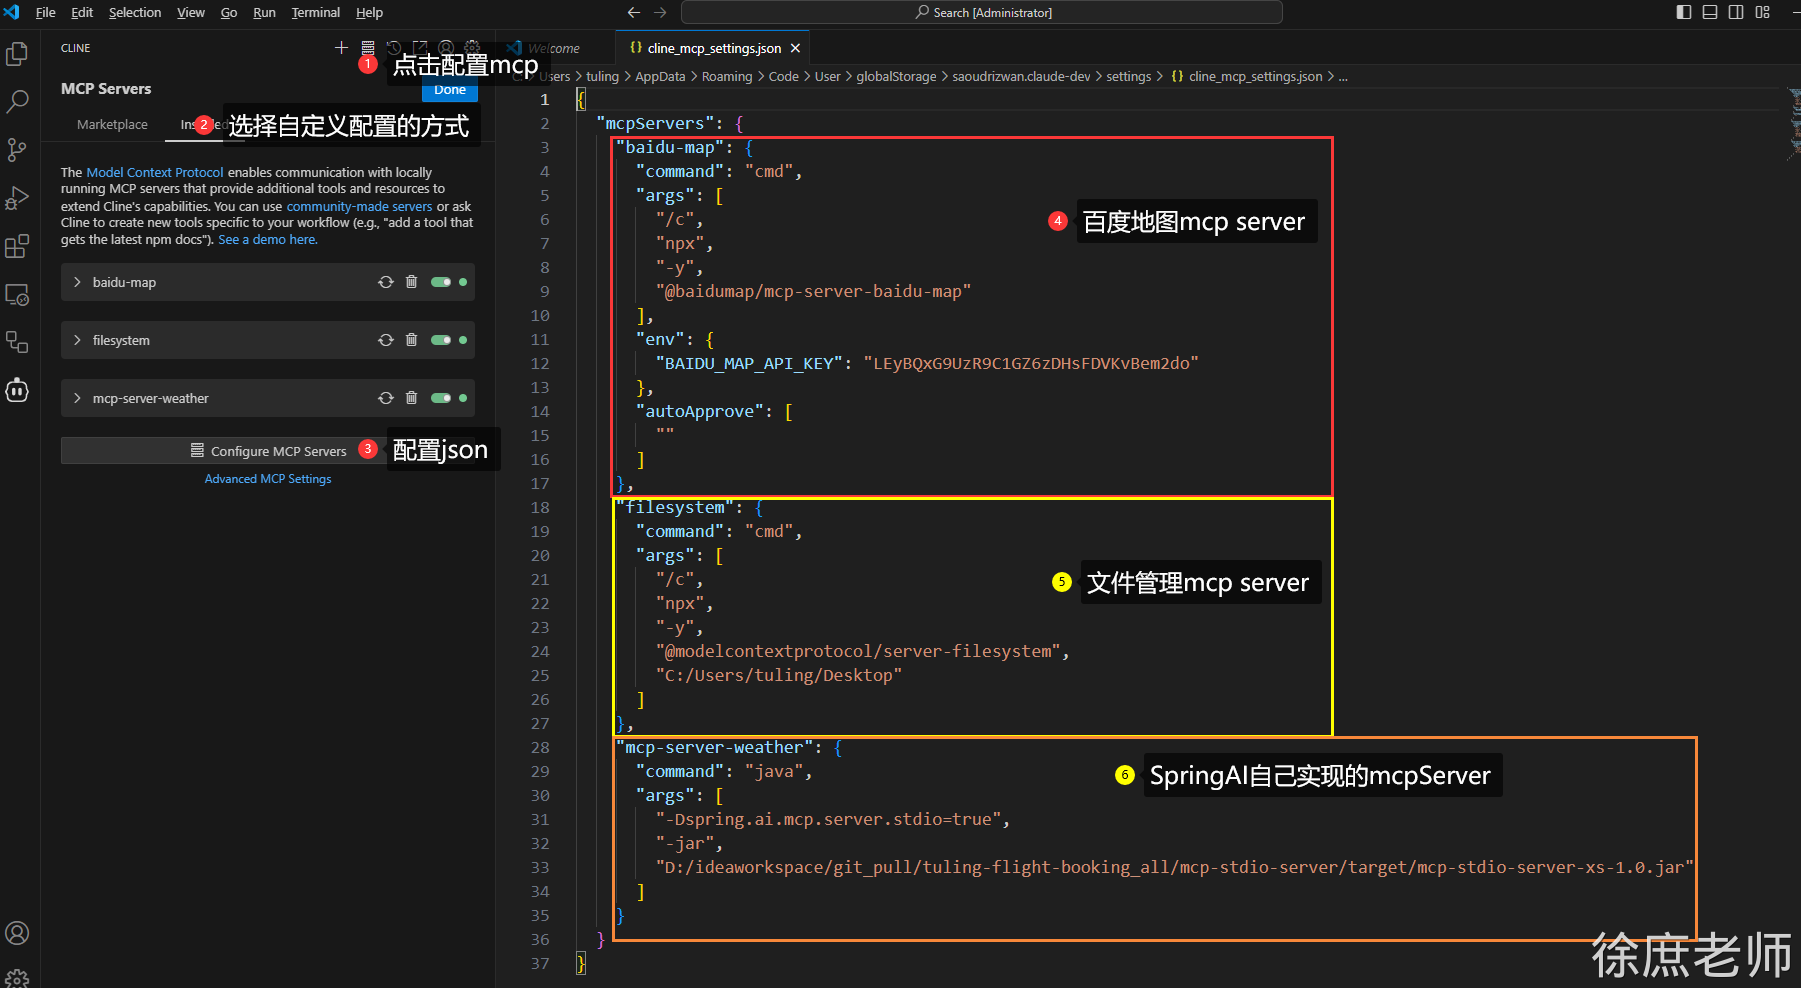 ```json { "mcpServers": { "baidu-map": { "command": "cmd", "args": [ "/c", "npx", "-y", "@baidumap/mcp-server-baidu-map" ], "env": { "BAIDU_MAP_API_KEY": "LEyBQxG9UzR9C1GZ6zDHsFDVKvBem2do" } }, "filesystem": { "command": "cmd", "args": [ "/c", "npx", "-y", "@modelcontextprotocol/server-filesystem", "C:/Users/tuling/Desktop" ] }, "mcp-server-weather": { "command": "java", "args": [ "-Dspring.ai.mcp.server.stdio=true", "-Dlogging.pattern.console=", "-jar", "D:\\ideaworkspace\\git_pull\\tuling-flight-booking_all\\mcp-stdio-server\\target\\mcp-stdio-server-xs-1.0.jar" ] } } } ``` 1. 开启cline权限 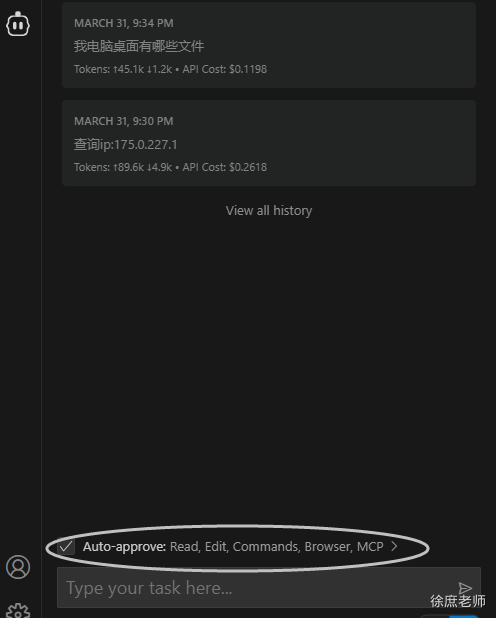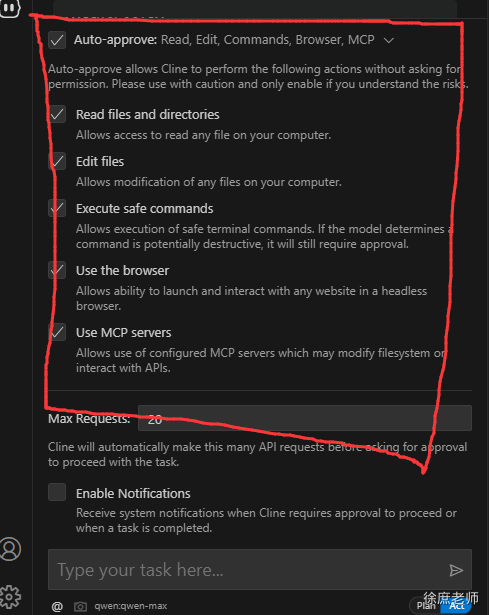 6.测试: 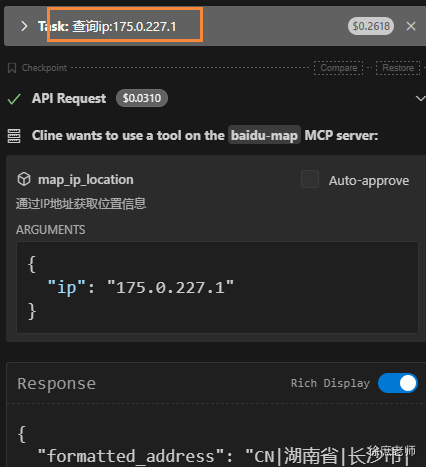 ###### 通过Spring AI 1. 依赖 ```xml <!--既支持sse\也支持Stdio--> <dependency> <groupId>org.springframework.ai</groupId> <artifactId>spring-ai-starter-mcp-client-webflux</artifactId> </dependency> ``` 2 配置 ```yaml spring: ai: mcp: client: request-timeout: 60000 stdio: servers-configuration: classpath:/mcp-servers-config.json connections: server1: command: /path/to/server args: - --port=8080 - --mode=production env: API_KEY: your-api-key DEBUG: "true" ``` 1. mcp-servers-config.json: 获取Baidu地图key: [控制台 | 百度地图开放平台](https://lbsyun.baidu.com/apiconsole/key) ```json { "mcpServers": { "baidu-map": { "command": "cmd", "args": [ "/c", "npx", "-y", "@baidumap/mcp-server-baidu-map" ], "env": { "BAIDU_MAP_API_KEY": "xxxx" } }, "filesystem": { "command": "cmd", "args": [ "/c", "npx", "-y", "@modelcontextprotocol/server-filesystem", "C:/Users/tuling/Desktop" ] }, "mcp-server-weather": { "command": "java", "args": [ "-Dspring.ai.mcp.server.stdio=true", "-Dlogging.pattern.console=", "-jar", "D:\\xxx\\target\\mcp-stdio-server-xs-1.0.jar" ] } } } ``` 1. 绑定到Chatclient ```java /** * @author wx:程序员徐庶 * @version 1.0 * @description: 智能航空助手:需要一对一解答关注wx: 程序员徐庶 */ @RestController @CrossOrigin public class OpenAiController { private final ChatClient chatClient; public OpenAiController( DashScopeChatModel dashScopeChatModel, // 外部 mcp tools ToolCallbackProvider mcpTools) { this.chatClient =ChatClient.builder(dashScopeChatModel) .defaultToolCallbacks(mcpTools) .build(); } @CrossOrigin @GetMapping(value = "/ai/generateStreamAsString", produces = MediaType.TEXT_EVENT_STREAM_VALUE) public Flux<String> generateStreamAsString(@RequestParam(value = "message", defaultValue = "讲个笑话") String message) { Flux<String> content = chatClient.prompt() .user(message) .stream() .content(); return content; } ``` ```yaml # 调试日志 logging: level: io: modelcontextprotocol: client: DEBUG spec: DEBUG ``` ###### #### SSE ##### MCP Server 这种方式需要将部署为Web服务 1. 依赖 ```java <!--mcp服务器核心依赖— 响应式--> <dependency> <groupId>org.springframework.ai</groupId> <artifactId>spring-ai-starter-mcp-server-webmvc</artifactId> </dependency> ``` 如果用:`<artifactId>spring-ai-starter-mcp-server-**webflux**</artifactId>` 会出现: 根据官方:https://github.com/spring-projects/spring-ai/pull/3511 建议加入: `spring.main.web-application-type=reactive ` 1. 定义外部工具 ```java @Service public class UserToolService { Map<String,Double> userScore = Map.of( "xushu",99.0, "zhangsan",2.0, "lisi",3.0); @Tool(description = "获取用户分数") public String getScore(String username) { if(userScore.containsKey(username)){ return userScore.get(username).toString(); } return "未检索到当前用户"; } } ``` 1. 暴露工具 ```java @Bean public ToolCallbackProvider weatherToolCallbackProvider(WeatherService weatherService, UserToolService userToolService) { return MethodToolCallbackProvider.builder().toolObjects(userToolService).build(); } ``` 1. 配置 ```yaml server: port: 8088 ``` 1. 启动 ##### MCP Client 1. 添加依赖 ```xml <!--既支持sse\也支持Stdio--> <dependency> <groupId>org.springframework.ai</groupId> <artifactId>spring-ai-starter-mcp-client-webflux</artifactId> </dependency> ``` 1. 配置 ```xml spring: ai: mcp: client: enabled: true name: my-mcp-client version: 1.0.0 request-timeout: 30s type: ASYNC # or SYNC sse: connections: server1: url: http://localhost:8088 ``` 1. 代码 ```java /** * @author wx:程序员徐庶 * @version 1.0 * @description: 智能航空助手:需要一对一解答关注wx: 程序员徐庶 */ @RestController @CrossOrigin public class OpenAiController { private final ChatClient chatClient; public OpenAiController( DashScopeChatModel dashScopeChatModel, // 外部 mcp tools ToolCallbackProvider mcpTools) { this.chatClient =ChatClient.builder(dashScopeChatModel) .defaultToolCallbacks(mcpTools) .build(); } @CrossOrigin @GetMapping(value = "/ai/generateStreamAsString", produces = MediaType.TEXT_EVENT_STREAM_VALUE) public Flux<String> generateStreamAsString(@RequestParam(value = "message", defaultValue = "讲个笑话") String message) { Flux<String> content = chatClient.prompt() .user(message) .stream() .content(); return content; } ``` #### #### 原理 1. STDIO 是基于标准输入\输出流的方式, 需要在MCP 客户端安装一个包(可以是jar包、python包、npm包等..). 它是“客户端”的MCP Server。 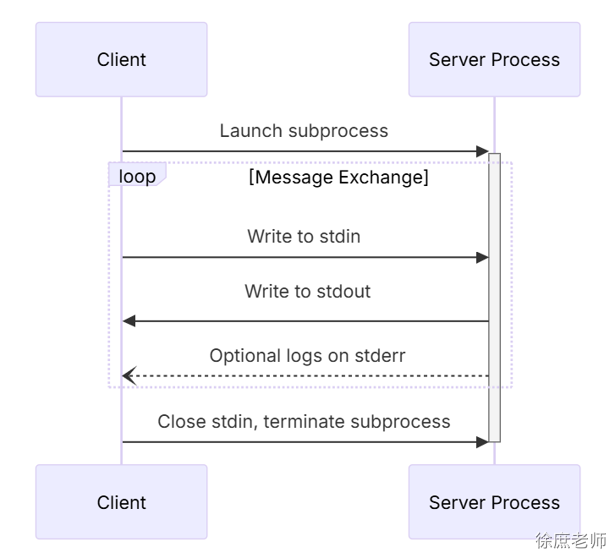 1. SSE 是基于Http的方式进行通讯, 需要将MCP Server部署为一个web服务. 它是服务端的MCP Server ##### STDIO原理 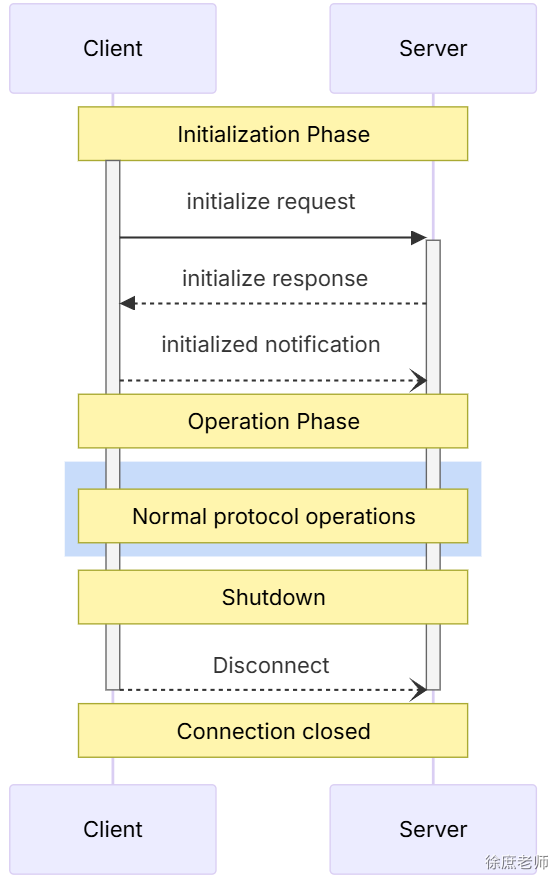 很多人不理解stdio到底什么意思, 为什么一定要把stdio server的banner关掉, 还要清空控制台? 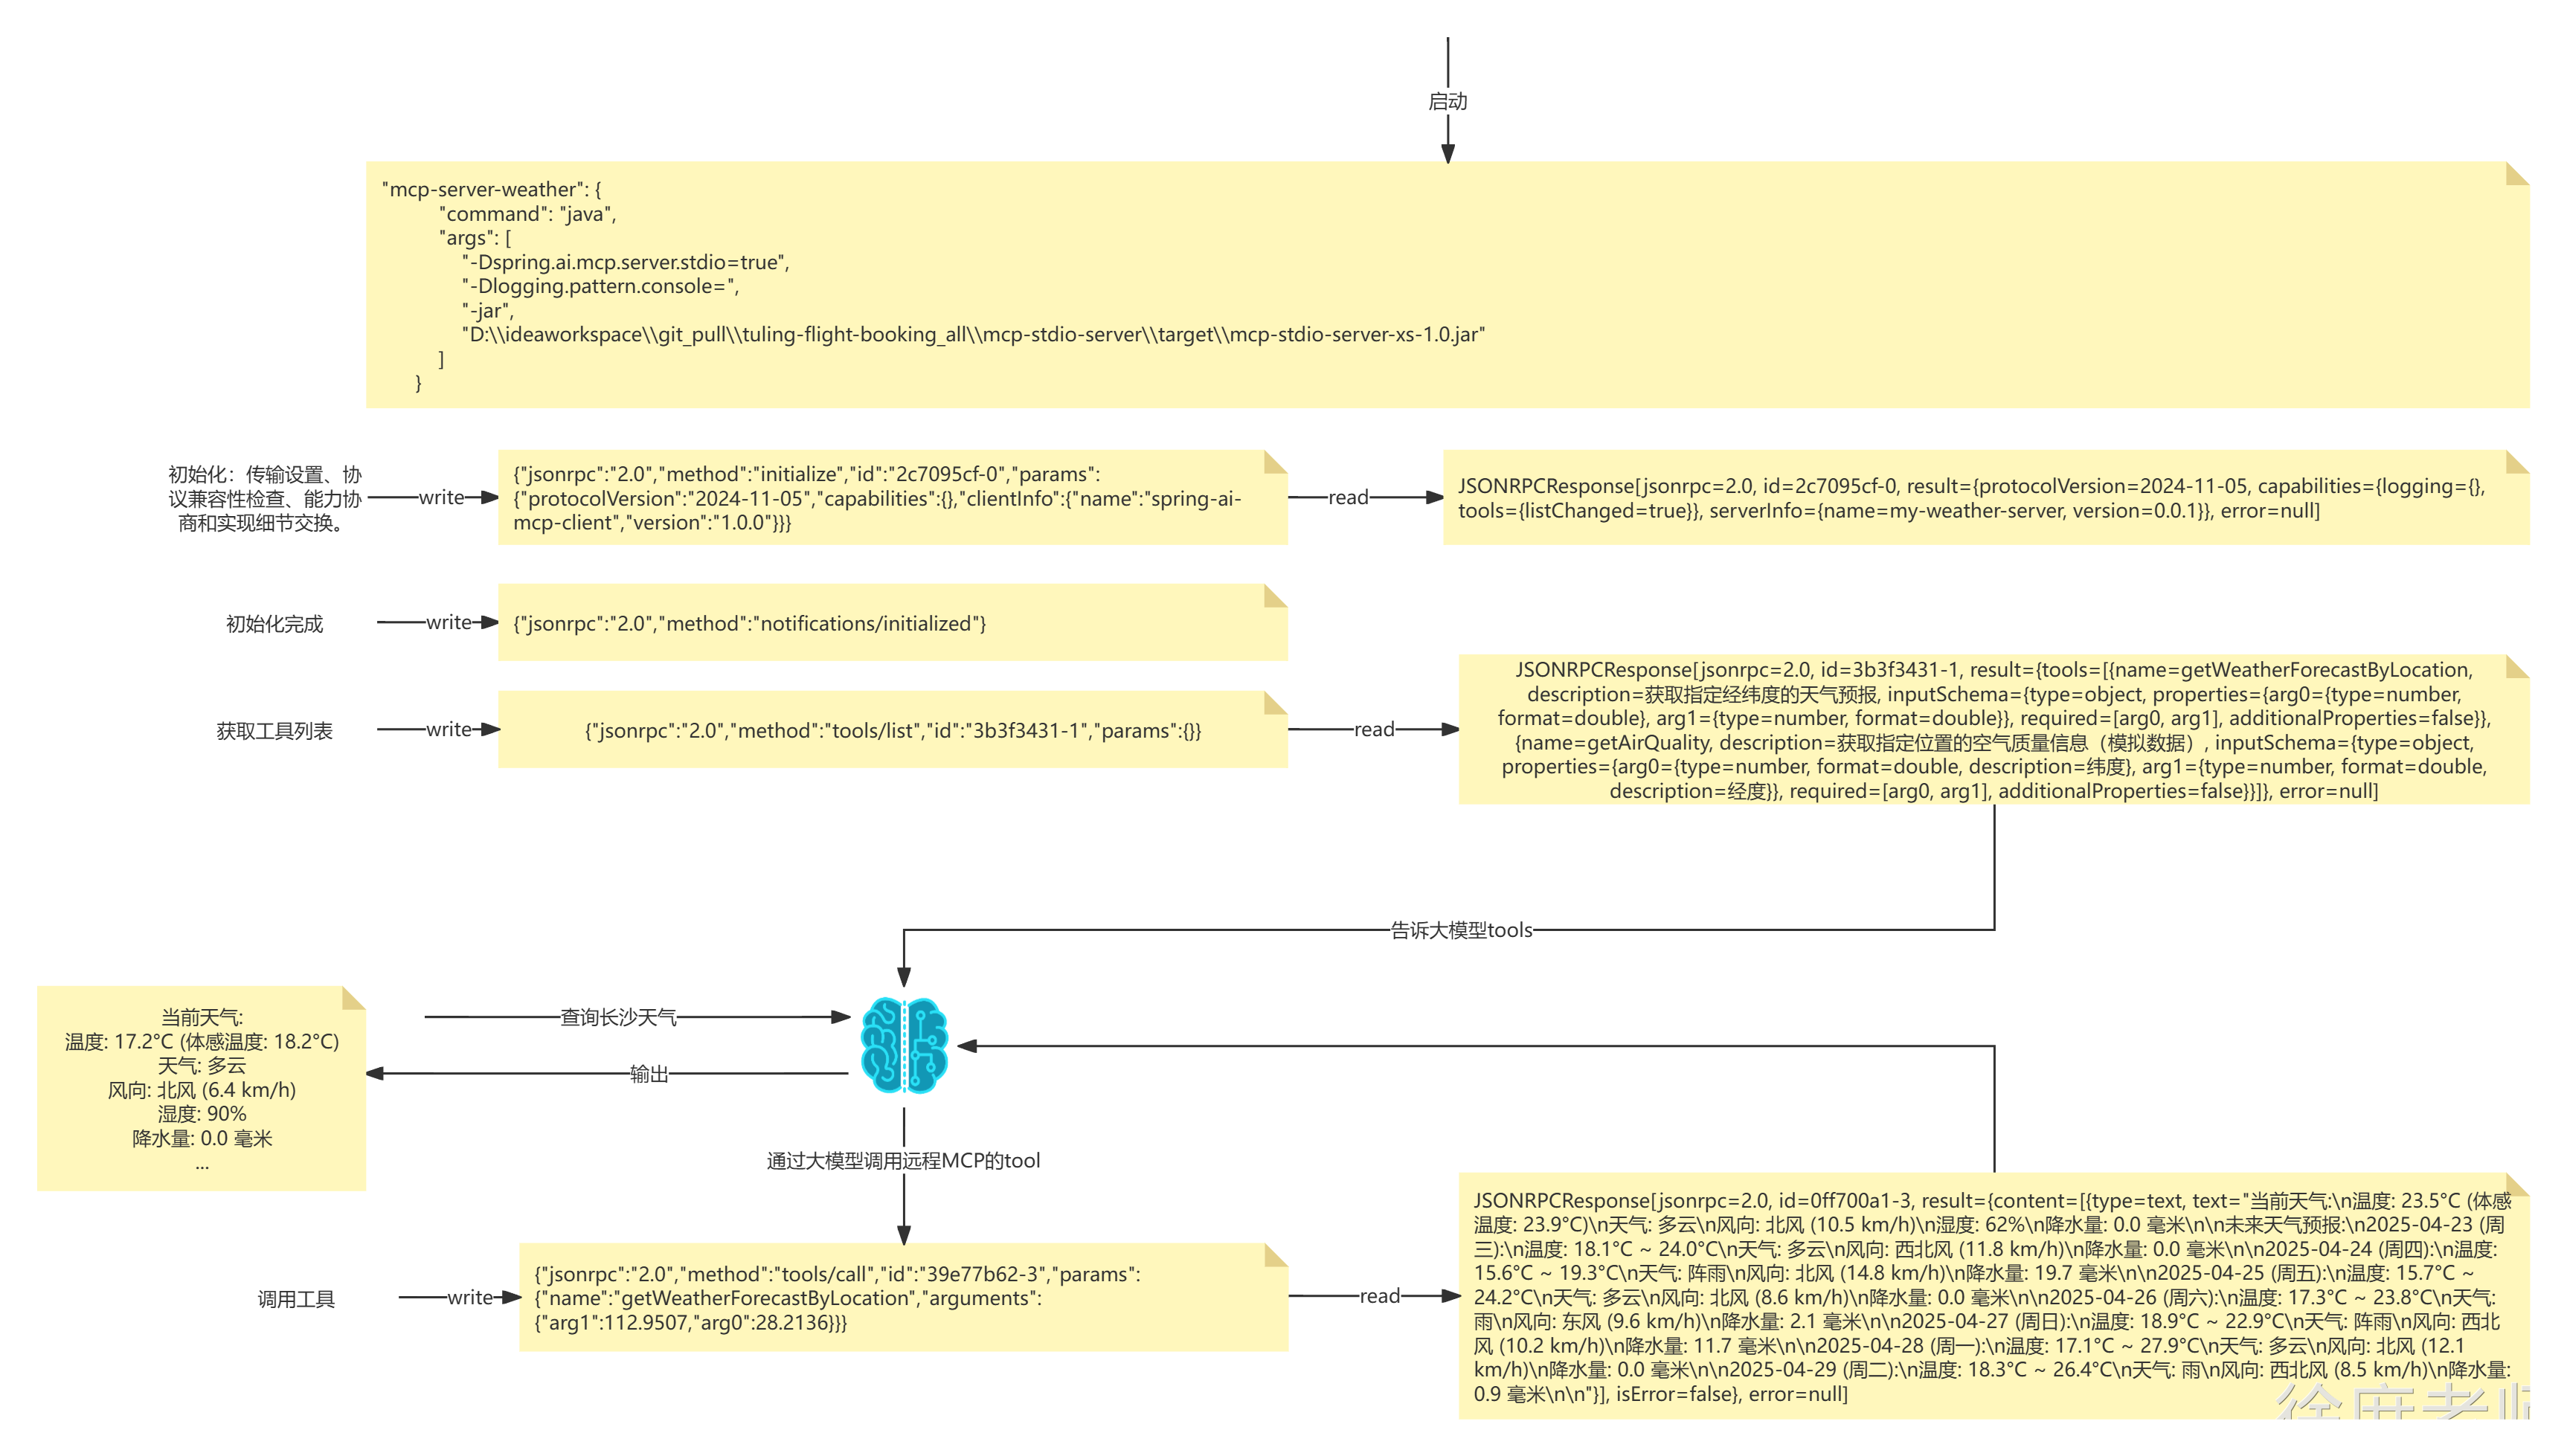 1. 首先SpringAi底层会读取到mcp-servers-config.json的信息 2. 然后执行命令(其实聪明的小伙伴早就发现了,mcp-servers-config.json文件中就是一堆shell命令) 1. 1. 怎么执行? 熟悉java的同学应该知道,java里面有一个对象用于执行命令: ```java ProcessBuilder processBuilder = new ProcessBuilder(); processBuilder.command("java","-version"); Process process = processBuilder.start(); process.errorReader().lines().forEach(System.out::println); ``` 1. 所以springAi底层相当于读取到信息后, 会通过processBuilder去执行命令 ```java String[] commands={"java", "-Dspring.ai.mcp.server.stdio=true", "-Dlogging.pattern.console=", "-jar", "D:\\ideaworkspace\\git_pull\\tuling-flight-booking_all\\mcp-stdio-server\\target\\mcp-stdio-server-xs-1.0.jar"}; ProcessBuilder processBuilder = new ProcessBuilder(); processBuilder.command(commands); // processBuilder.environment().put("username","xushu"); Process process = processBuilder.start(); ``` 其实你也完全可以自己通过mcd去执行命令  1. 运行jar -jar mcp-stdio-server.jar 2. 输入{"jsonrpc":"2.0","method":"tools/list","id":"3b3f3431-1","params":{}} 3. 输出tools列表 这就是标准输入输出流! 看到这里你应该知道, 为什么需要`-Dlogging.pattern.console=` 完全是为了清空控制台,才能读取信息! 所以利用java也是一样的原理: ```java @Test public void test() throws IOException, InterruptedException { String[] commands={"java", "-Dspring.ai.mcp.server.stdio=true", "-Dlogging.pattern.console=", "-jar", "D:\\ideaworkspace\\git_pull\\tuling-flight-booking_all\\mcp-stdio-server\\target\\mcp-stdio-server-xs-1.0.jar"}; ProcessBuilder processBuilder = new ProcessBuilder(); processBuilder.command(commands); processBuilder.environment().put("username","xushu"); Process process = processBuilder.start(); Thread thread = new Thread(() -> { try (BufferedReader processReader = new BufferedReader(new InputStreamReader(process.getInputStream()))) { String line; while ((line=processReader.readLine())!=null) { System.out.println(line); } } catch (IOException e) { e.printStackTrace(); } }); thread.start(); Thread.sleep(1000); new Thread(() -> { try { //String jsonMessage="{\"jsonrpc\":\"2.0\",\"method\":\"initialize\",\"id\":\"3670122a-0\",\"params\":{\"protocolVersion\":\"2024-11-05\",\"capabilities\":{},\"clientInfo\":{\"name\":\"spring-ai-mcp-client\",\"version\":\"1.0.0\"}}}"; String jsonMessage = "{\"jsonrpc\":\"2.0\",\"method\":\"tools/list\",\"id\":\"3b3f3431-1\",\"params\":{}}"; jsonMessage = jsonMessage.replace("\r\n", "\\n").replace("\n", "\\n").replace("\r", "\\n"); var os = process.getOutputStream(); synchronized (os) { os.write(jsonMessage.getBytes(StandardCharsets.UTF_8)); os.write("\n".getBytes(StandardCharsets.UTF_8)); os.flush(); } System.out.println("写入完成!"); }catch (IOException e){ e.printStackTrace(); } }).start(); thread.join(); /*JSONRPCRequest[jsonrpc=2.0, method=initialize, id=5d83d0d1-0, params=InitializeRequest[protocolVersion=2024-11-05, capabilities=ClientCapabilities[experimental=null, roots=null, sampling=null], clientInfo=Implementation[name=spring-ai-mcp-client, version=1.0.0]]]*/ } ``` 1. 通过ProcessBuilder执行命令 2. 通过子线程轮询 process.getInputStream 获取输出流 3. 通过process.getOutputStream(); 进行写入流 所以整个过程是这样的:再回顾上面的图 启动程序--->读取mcpjson--->通过ProcessBuilder启动命令---> 写入初始化jsonrpc---->写入获取tools列表jsonrpc---->请求大模型(携带tools)---->写入请求外部tool的jsonrpc---->获取数据--->发送给大模型---->响应。 #### STDIO源码 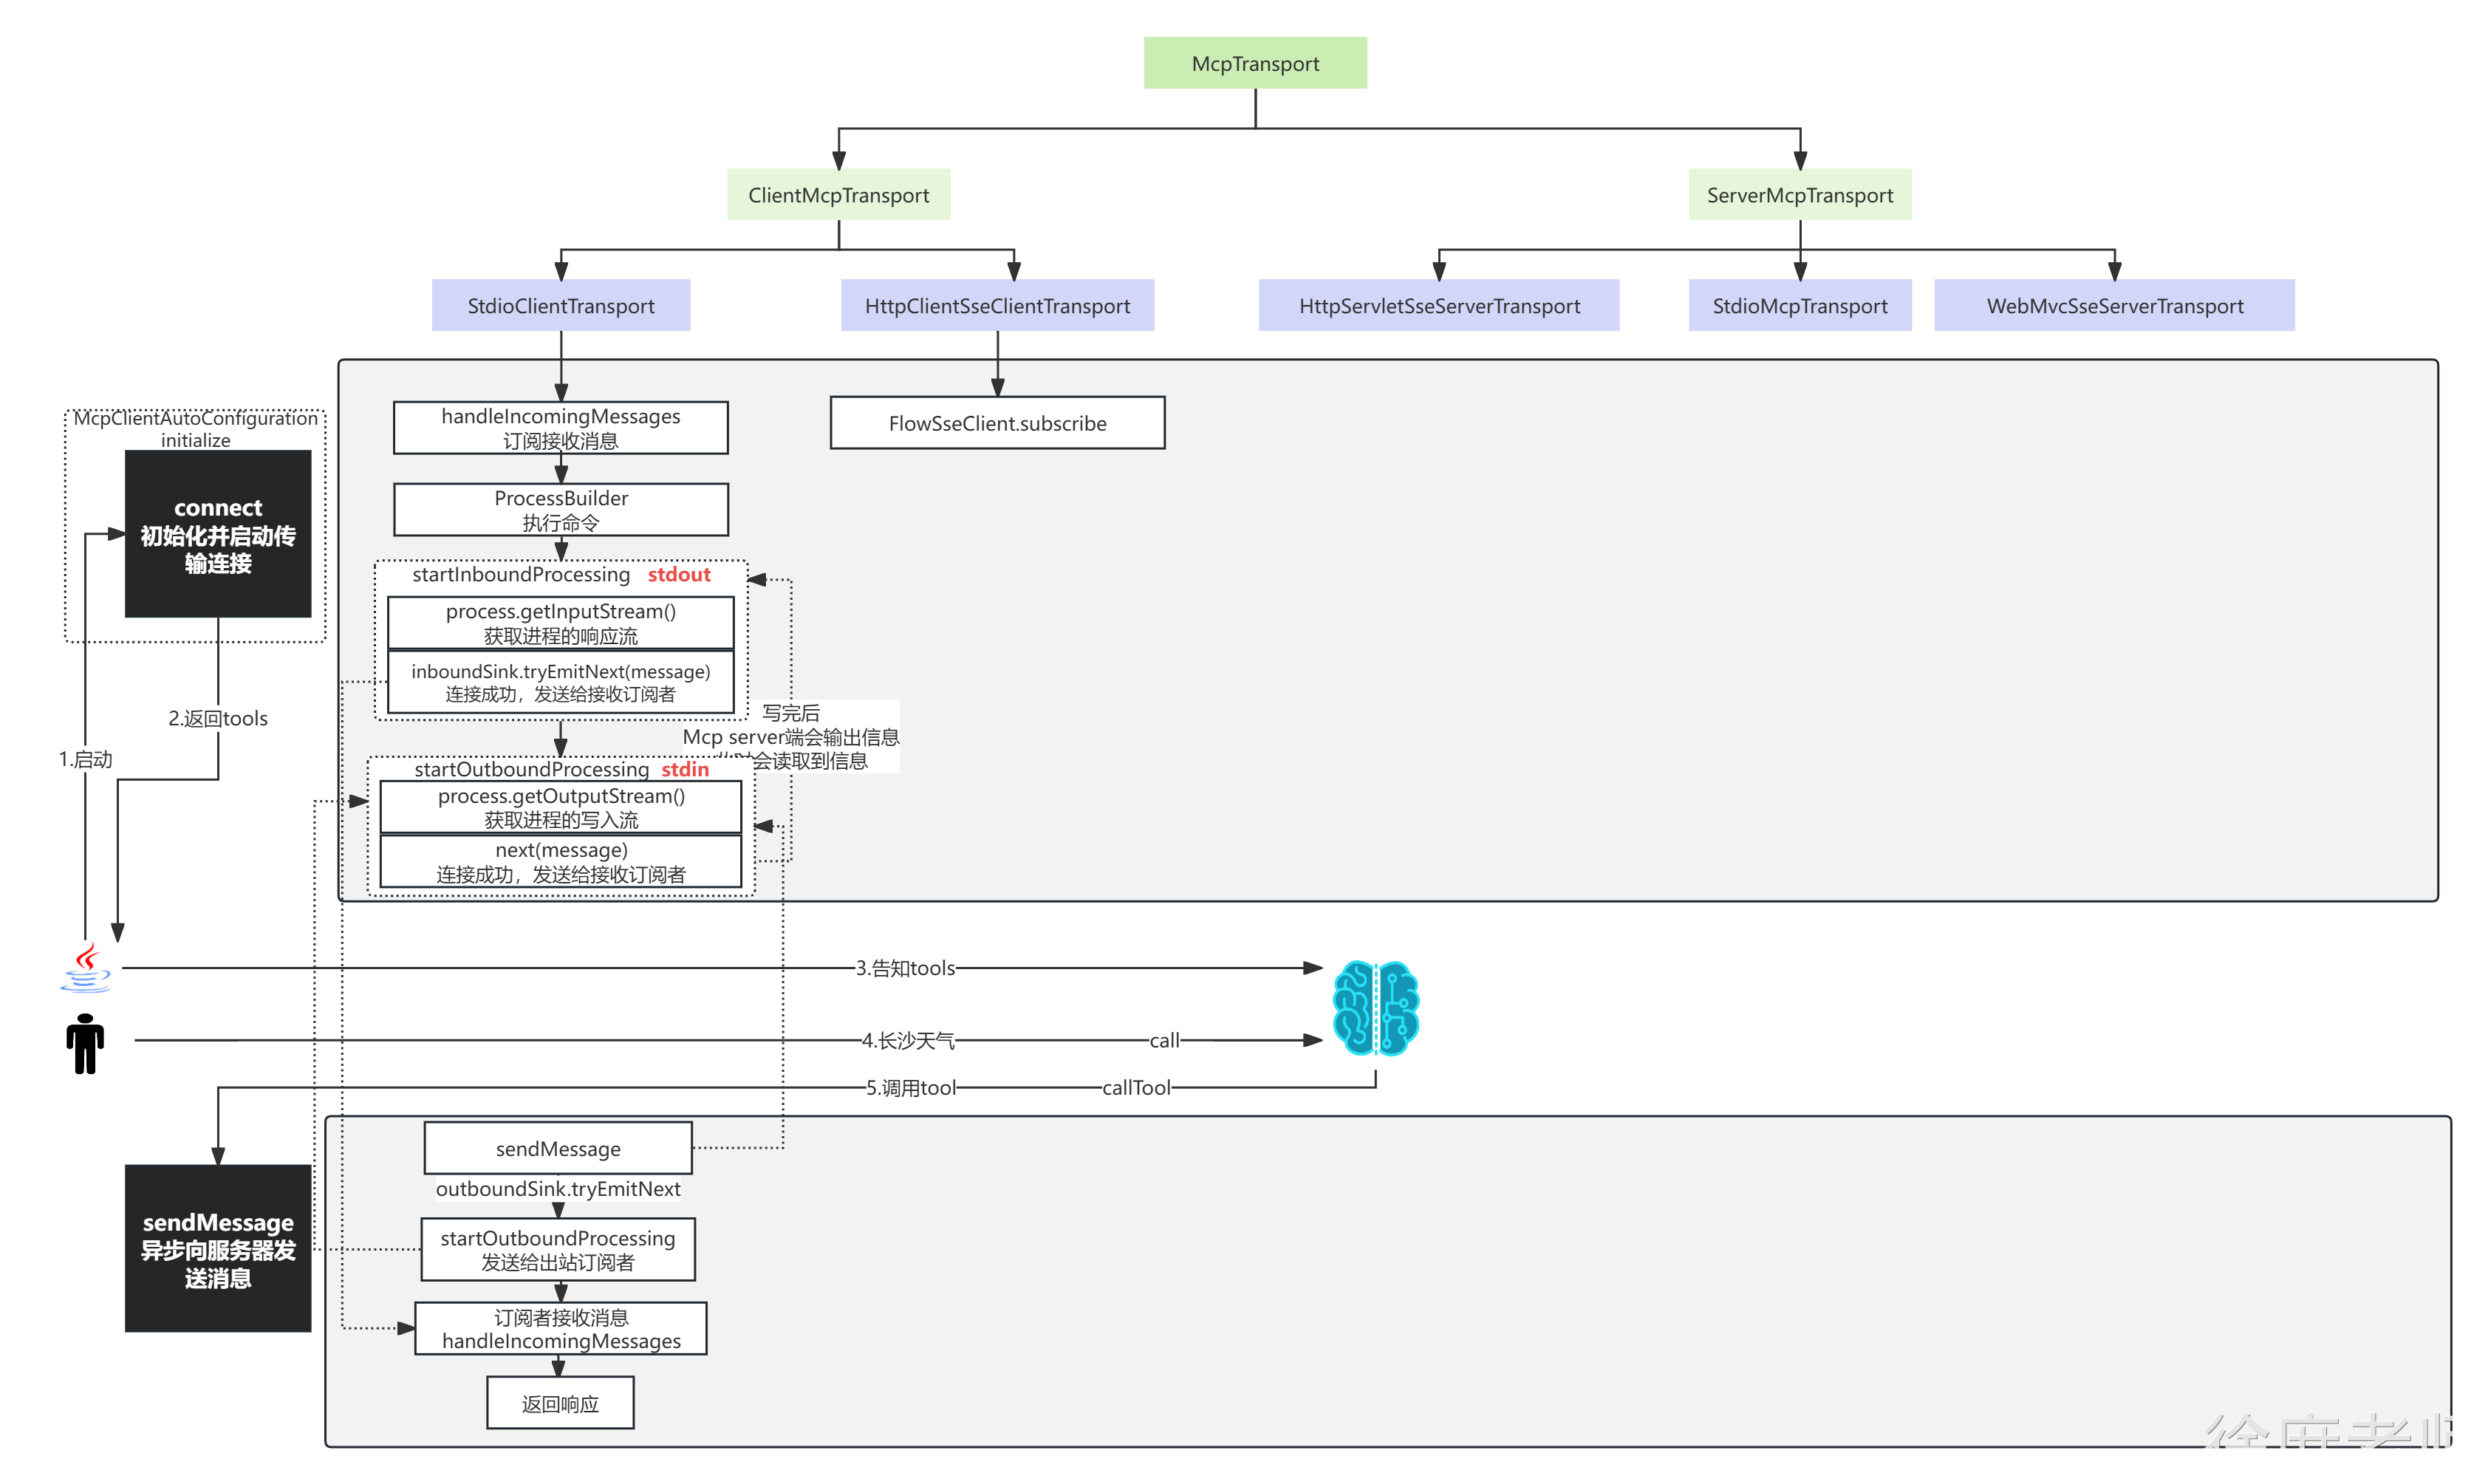 #### MCP鉴权 在做MCP企业级方案落地时, 我们可能不想让没有权限的人访问MCP Server, 或者需要根据不同的用户返回不同的数据, 这里就涉及到MCP Server授权操作。 那MCP Server有2种传输方式, 实现起来不一样: ##### STDIO 这种方式在本地运行,**它 将MCP Server作为子进程启动**。 我们称为标准输入输出, 其实就是利用运行命令的方式写入和读取控制台的信息,以达到传输。 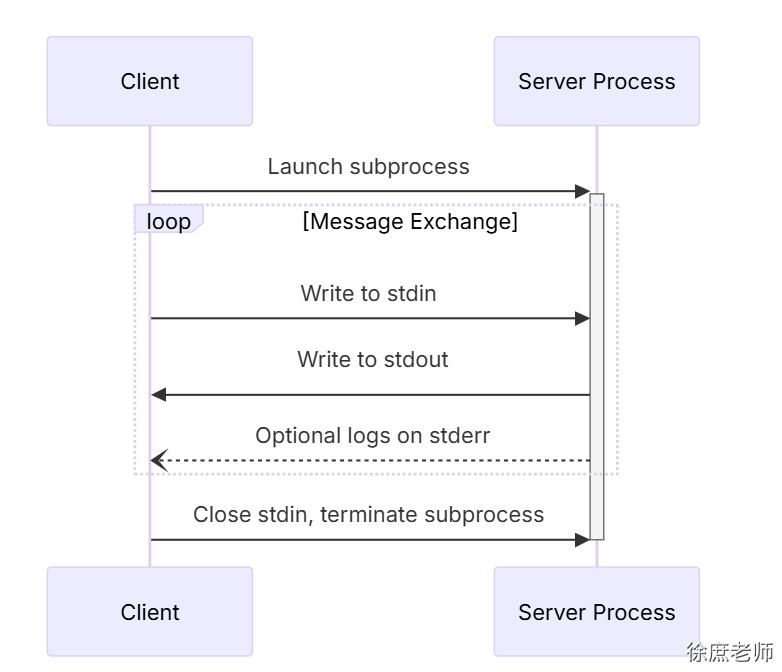 通常我们会配置一段json,比如这里的百度地图MCP Server : - 其中command和args代表运行的命令和参数。 - 其实env中的节点BAIDU_MAP_API_KEY就是做授权的。 如果你传入的BAIDU_MAP_API_KEY不对, 就没有使用权限。 ```json "baidu-map": { "command": "cmd", "args": [ "/c", "npx", "-y", "@baidumap/mcp-server-baidu-map" ], "env": { "BAIDU_MAP_API_KEY": "LEyBQxG9UzR9C1GZ6zDHsFDVKvBem2do" } }, ``` 所以STDIO做授权的方式很明确, 就是通过env【环境变量】,实现步骤如下: 1. 服务端发放一个用户的凭证(可以是秘钥、token) 这步不细讲,需要有一个授权中心发放凭证。 2. 通过mcp client通过env传入凭证 3. mcp server通过环境变量鉴权 所以在MCP Server端就可以通过获取环境变量的方式获取env里面的变量: 也可以通过AOP的方式统一处理 ```java @Tool(description = "获取用户余额") public String getScore() { String userName = System.getenv("API_KEY"); // todo .. 鉴权处理 return "未检索到当前用户"+userName; } ``` 这种方式要注意: 他不支持动态鉴权, 也就是动态更换环境变量, 因为STDIO是本地运行方式,**它 将MCP Server作为子进程启动,** 如果是多个用户动态切换凭证, 会对共享的环境变量造成争抢, 最终只能存储一个。 除非一个用户对应一个STDIO MCP Server. 但是这样肯定很吃性能! 如果要多用户动态切换授权, 可以用SSE的方式; ##### SSE ###### 说明 不过,如果你想把 MCP 服务器开放给外部使用,就需要暴露一些标准的 HTTP 接口。对于私有场景,MCP 服务器可能并不需要严格的身份认证,但在企业级部署下,对这些接口的安全和权限把控就非常重要了。为了解决这个问题,[2025 年 3 月发布的最新 MCP 规范](https://modelcontextprotocol.io/specification/2025-03-26/basic/authorization)引入了安全基础,借助了广泛使用的 [OAuth2 框架](https://modelcontextprotocol.io/specification/2025-03-26/basic/authorization)。 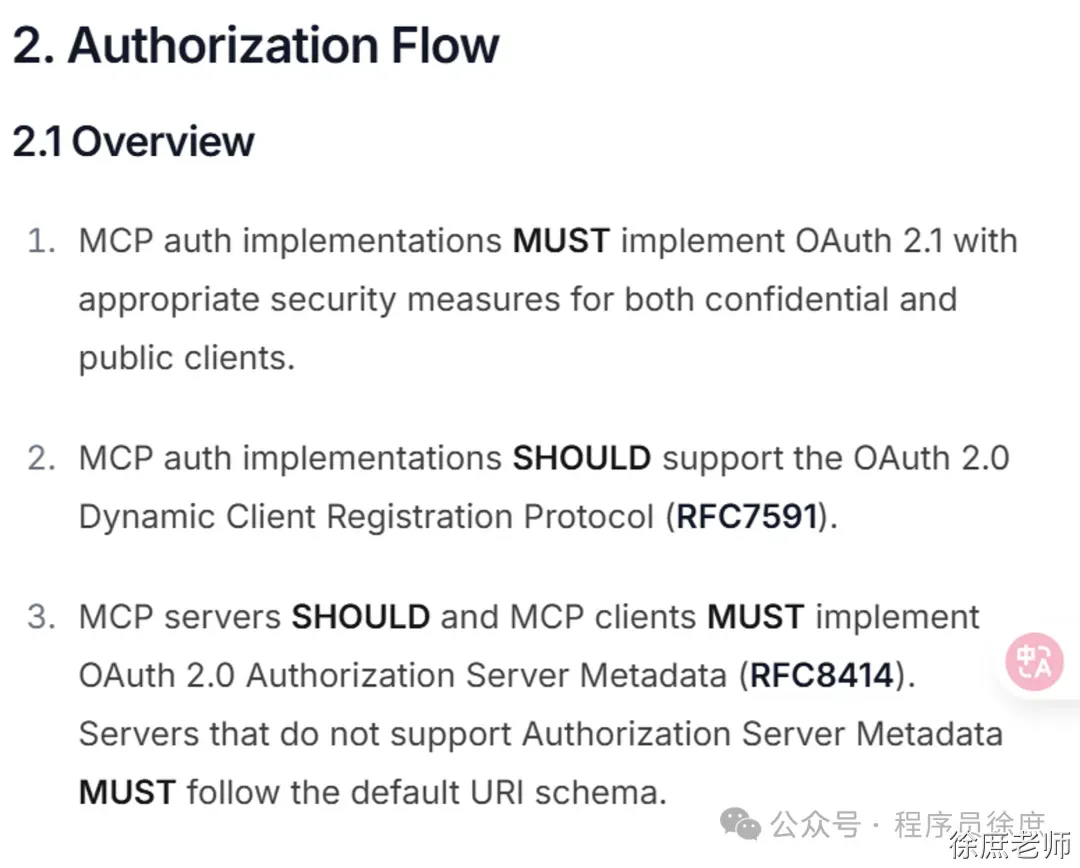 本文不会详细介绍 OAuth2 的所有内容,不过简单回顾一下还是很有帮助。 **在规范的草案中,MCP 服务器既是资源服务器,也是授权服务器。** - **作为资源服务器**,MCP 负责检查每个请求中的 `Authorization`请求头。这个请求头必须包括一个 OAuth2`access_token`(令牌),它代表客户端的“权限”。这个令牌通常是一个 JWT(JSON Web Token),也可能只是一个不可读的随机字符串。如果令牌缺失或无效(无法解析、已过期、不是发给本服务器的等),请求会被拒绝。正常情况下,调用示例如下: ```plain curl https://mcp.example.com/sse -H "Authorization: Bearer <有效的 access token>" ``` - **作为授权服务器**,MCP 还需要有能力为客户端安全地签发 `access_token`。在发放令牌前,服务器会校验客户端的凭据,有时还需要校验访问用户的身份。授权服务器决定令牌的有效期、权限范围、目标受众等特性。 用 Spring Security 和 Spring Authorization Server,可以方便地为现有的 Spring MCP 服务器加上这两大安全能力。 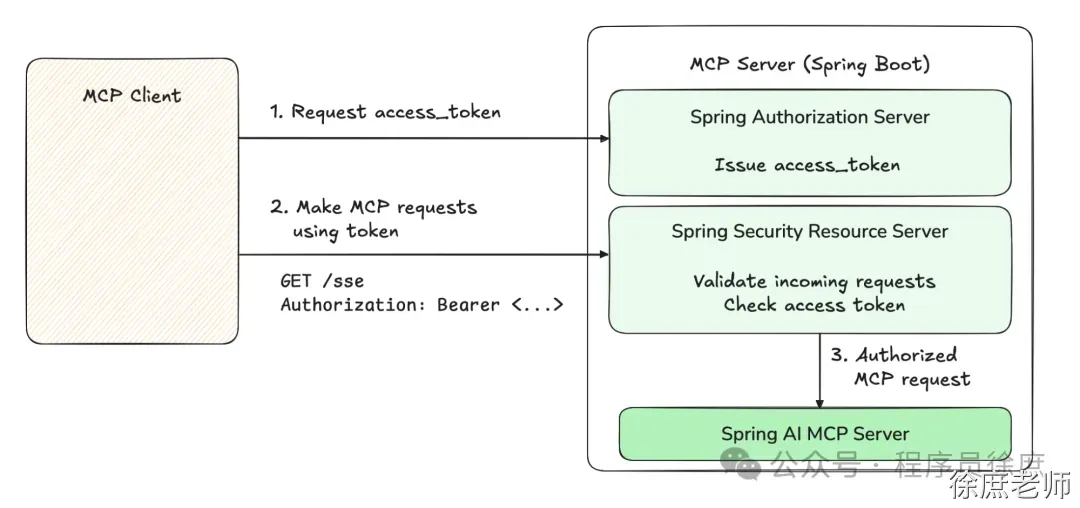 ###### 给 Spring MCP 服务器加上 OAuth2 支持 这里以官方例子仓库的【天气】MCP 工具演示如何集成 OAuth2,主要是让服务器端能签发和校验令牌。 首先,`pom.xml` 里添加必要的依赖: ```xml <dependency> <groupId>org.springframework.boot</groupId> <artifactId>spring-boot-starter-oauth2-resource-server</artifactId> </dependency> <dependency> <groupId>org.springframework.boot</groupId> <artifactId>spring-boot-starter-oauth2-authorization-server</artifactId> </dependency> ``` 接着,在 `application.properties`配置里加上简易的 OAuth2 客户端信息,便于请求令牌: ```properties spring.security.oauth2.authorizationserver.client.oidc-client.registration.client-id=xushu spring.security.oauth2.authorizationserver.client.oidc-client.registration.client-secret={noop}xushu666 spring.security.oauth2.authorizationserver.client.oidc-client.registration.client-authentication-methods=client_secret_basic spring.security.oauth2.authorizationserver.client.oidc-client.registration.authorization-grant-types=client_credentials ``` 这样定义后,你可以直接通过 POST 请求和授权服务器交互,无需浏览器,用配置好的 `/secret` 作为固定凭据。 比如 最后一步是开启授权服务器和资源服务器功能。通常会新增一个安全配置类,比如 `SecurityConfiguration`,如下: ```java import static org.springframework.security.oauth2.server.authorization.config.annotation.web.configurers.OAuth2AuthorizationServerConfigurer.authorizationServer; @Configuration @EnableWebSecurity class SecurityConfiguration { @Bean SecurityFilterChain securityFilterChain(HttpSecurity http) throws Exception { return http.authorizeHttpRequests(auth -> auth.anyRequest().authenticated()) .with(authorizationServer(), Customizer.withDefaults()) .oauth2ResourceServer(resource -> resource.jwt(Customizer.withDefaults())) .csrf(CsrfConfigurer::disable) .cors(Customizer.withDefaults()) .build(); } } ``` 这个过滤链主要做了这些事情: - 要求所有请求都要经过身份认证。也就是访问 MCP 的接口,必须带上 access_token。 - 同时启用了授权服务器和资源服务器两大能力。 - 关闭了 CSRF(跨站请求伪造防护),因为 MCP 不是给浏览器直接用的,这部分无需开启。 - 打开了 CORS(跨域资源共享),方便用 MCP inspector 测试。 这样配置之后,只有带 access_token 的访问才会被接受,否则会直接返回 401 未授权错误,例如: ```powershell curl http://localhost:8080/sse --fail-with-body # 返回: # curl: (22) The requested URL returned error: 401 ``` 要使用 MCP 服务器,先要获取一个 access_token。可通过 `client_credentials` 授权方式(用于机器到机器、服务账号的场景): ```powershell curl -XPOST http://localhost:8080/oauth2/token --data grant_type=client_credentials --user xushu:xushu666 # 返回: # {"access_token":"<YOUR-ACCESS-TOKEN>","token_type":"Bearer","expires_in":299} ``` 把返回的 access_token 记下来(它一般以 “ey” 开头),之后就可以用它来正常请求服务器了: ```powershell curl http://localhost:8080/sse -H"Authorization: Bearer YOUR_ACCESS_TOKEN" # 服务器响应内容 ``` 你还可以直接在 MCP inspector 工具里用这个 access_token。从菜单的 Authentication > Bearer 处粘贴令牌并连接即可。 ###### 为MCP Client设置请求头 目前, mcp 的java sdk 没有提供api直接调用, 经过徐庶老师研究源码后, 你只能通过2种方式实现: ###### 重写源码 扩展mcp 的sse方式java sdk的源码, 整个重写一遍。 工作量较大, 并且我预计过不了多久, spring ai和mcp协议都会更新这块。 看你的紧急程度, 如果考虑整体扩展性维护性,可以整体重写一遍: 提供一个重写思路 **重写McpSseClientProperties** MCPSse客户端属性配置:新增请求头字段 ```java package org.springframework.ai.autoconfigure.mcp.client.properties; @ConfigurationProperties("spring.ai.mcp.client.sse") public class McpSseClientProperties { public static final String CONFIG_PREFIX = "spring.ai.mcp.client.sse"; private final Map<String, SseParameters> connections = new HashMap(); private final Map<String, String> headersMap = new HashMap<>(); private String defaultHeaderName; private String defaultHeaderValue; private boolean enableCompression = false; private int connectionTimeout = 5000; public McpSseClientProperties() { } public Map<String, SseParameters> getConnections() { return this.connections; } public Map<String, String> getHeadersMap() { return this.headersMap; } public String getDefaultHeaderName() { return this.defaultHeaderName; } public void setDefaultHeaderName(String defaultHeaderName) { this.defaultHeaderName = defaultHeaderName; } public String getDefaultHeaderValue() { return this.defaultHeaderValue; } public void setDefaultHeaderValue(String defaultHeaderValue) { this.defaultHeaderValue = defaultHeaderValue; } public boolean isEnableCompression() { return this.enableCompression; } public void setEnableCompression(boolean enableCompression) { this.enableCompression = enableCompression; } public int getConnectionTimeout() { return this.connectionTimeout; } public void setConnectionTimeout(int connectionTimeout) { this.connectionTimeout = connectionTimeout; } public static record SseParameters(String url) { public SseParameters(String url) { this.url = url; } public String url() { return this.url; } } } ``` **重写SseWebFluxTransportAutoConfiguration** **自动装配添加请求头配置信息** ```java package org.springframework.ai.autoconfigure.mcp.client; @AutoConfiguration @ConditionalOnClass({WebFluxSseClientTransport.class}) @EnableConfigurationProperties({McpSseClientProperties.class, McpClientCommonProperties.class}) @ConditionalOnProperty( prefix = "spring.ai.mcp.client", name = {"enabled"}, havingValue = "true", matchIfMissing = true ) public class SseWebFluxTransportAutoConfiguration { public SseWebFluxTransportAutoConfiguration() { } @Bean public List<NamedClientMcpTransport> webFluxClientTransports(McpSseClientProperties sseProperties, WebClient.Builder webClientBuilderTemplate, ObjectMapper objectMapper) { List<NamedClientMcpTransport> sseTransports = new ArrayList(); Iterator var5 = sseProperties.getConnections().entrySet().iterator(); Map<String, String> headersMap = sseProperties.getHeadersMap(); while(var5.hasNext()) { Map.Entry<String, McpSseClientProperties.SseParameters> serverParameters = (Map.Entry)var5.next(); WebClient.Builder webClientBuilder = webClientBuilderTemplate.clone() .defaultHeaders(headers -> { if (headersMap != null && !headersMap.isEmpty()) { headersMap.forEach(headers::add); } }) .baseUrl(((McpSseClientProperties.SseParameters)serverParameters.getValue()).url()); WebFluxSseClientTransport transport = new WebFluxSseClientTransport(webClientBuilder, objectMapper); sseTransports.add(new NamedClientMcpTransport((String)serverParameters.getKey(), transport)); } return sseTransports; } @Bean @ConditionalOnMissingBean public WebClient.Builder webClientBuilder() { return WebClient.builder(); } @Bean @ConditionalOnMissingBean public ObjectMapper objectMapper() { return new ObjectMapper(); } } ``` 使用: 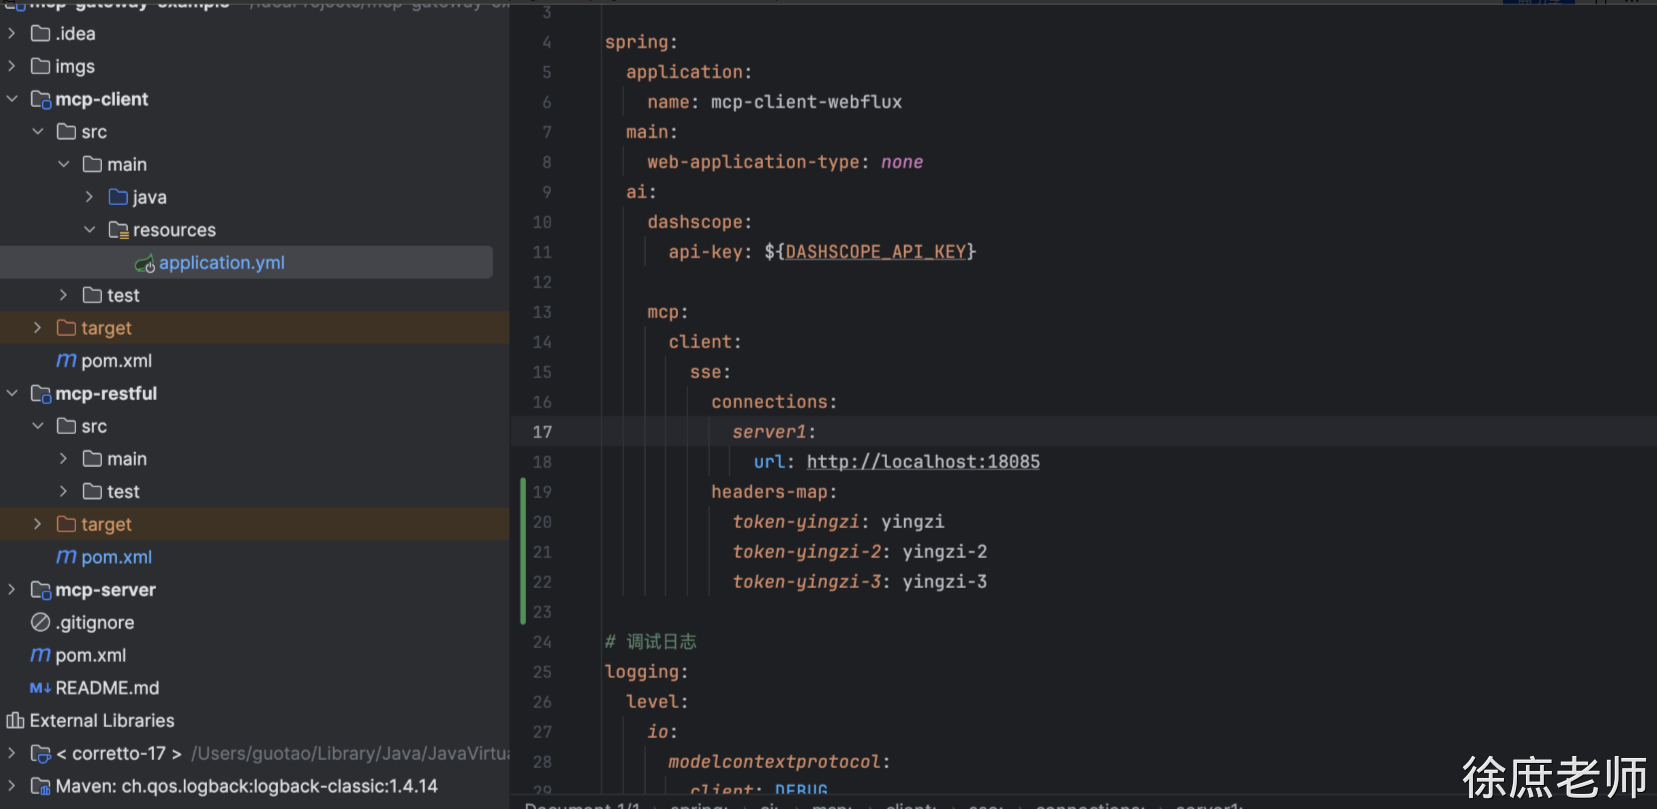 **设置WebClientCustomizer** 在用Spring-ai-M8版本的时候, 发现提供了WebClientCustomizer进行扩展。 可以尝试: 1. 根据用户凭证进行授权 ```java curl -XPOST http://localhost:8080/oauth2/token --data grant_type=client_credentials --user xushu:xushu666 ``` 1. 根据授权后的token进行请求: ```java @Bean public WebClientCustomizer webClientCustomizer() { // 认证 mcp server /oauth?username:password --> access_token return (builder) -> { builder.defaultHeader("Authorization","Bearer eyJraWQiOiIzYmMzMDRmZC02NzcyLTRkYTItODJiMy1hNTEwNGExMDBjNTYiLCJhbGciOiJSUzI1NiJ9.eyJzdWIiOiJ4dXNodSIsImF1ZCI6Inh1c2h1IiwibmJmIjoxNzQ2NzE4MjE5LCJpc3MiOiJodHRwOi8vbG9jYWxob3N0OjgwODAiLCJleHAiOjE3NDY3MTg1MTksImlhdCI6MTc0NjcxODIxOSwianRpIjoiM2VhMzIyODctNTQ5NC00NWZlLThlZDItZGY1MjViNmIwNzkxIn0.Q-zWBZxa2CeFZo2YinenyaLb8KBMMua40X8YSs4n2fez7ODihtoVuCeJQnd2Q6qV2Pa8Z3cfH4QcMUuxMJ-_sLtZaSXpbCThH5q3KoQZ8C4MLJRTpuRqv4z1n7uLNXiVG2rya5hGwjTxu5qzHuBa2ri9pamRwmsjTz4vLHBJ1ILxDJcTkZUFuV1ExQJViewGt_7KMYcFqzGyRPiS4mm4wVvJTDjqcEGwMelu51L44K1DDYgt29vVLRVQEmnUtbBzePAxRqfw_HWJdhRSeQNiqRYCYhdAlPr3QZUFJa54GpuZn3CNyaXFoL7mENSR7wCYWx6wi--_REw6oaIfeSm-Xg"); }; } ``` SSE是支持动态切换token的, 因为一个请求就是一个新的http请求, 不会出现多线程争抢。 但是需要动态请求: curl -XPOST http://localhost:8080/oauth2/token --data grant_type=client_credentials --user xushu:xushu666 进行重新授权 ## ## RAG 检索增强生成(Retrieval-augmented Generation) 对于基础大模型来说, 他只具备通用信息,他的参数都是拿公网进行训练,并且有一定的时间延迟, 无法得知一些具体业务数据和实时数据, 这些数据往往在各种文件中(比如txt、word、html、数据库...) 虽然function-call、SystemMessage可以用来解决一部分问题 但是它只能少量,并且针对的场景不一样 如果你要提供大量的业务领域信息, 就需要给他外接一个知识库: 比如 1. 我问他退订要多少费用 2. 这些资料可能都由产品或者需求编写在了文档中: [📎terms-of-service.txt](https://www.yuque.com/attachments/yuque/0/2025/txt/22309163/1749546158537-e2a594c3-1fd2-4513-adce-1870cb23b493.txt) 1. 1. 所以需要现在需求信息存到向量数据库(这个过程叫Embedding, 涉及到文档读取、分词、向量化存入) 1. 去向量数据库中查询“退订费用相关信息” 2. 将查询到的数据和对话信息再请求大模型 3. 此时会响应退订需要多少费用 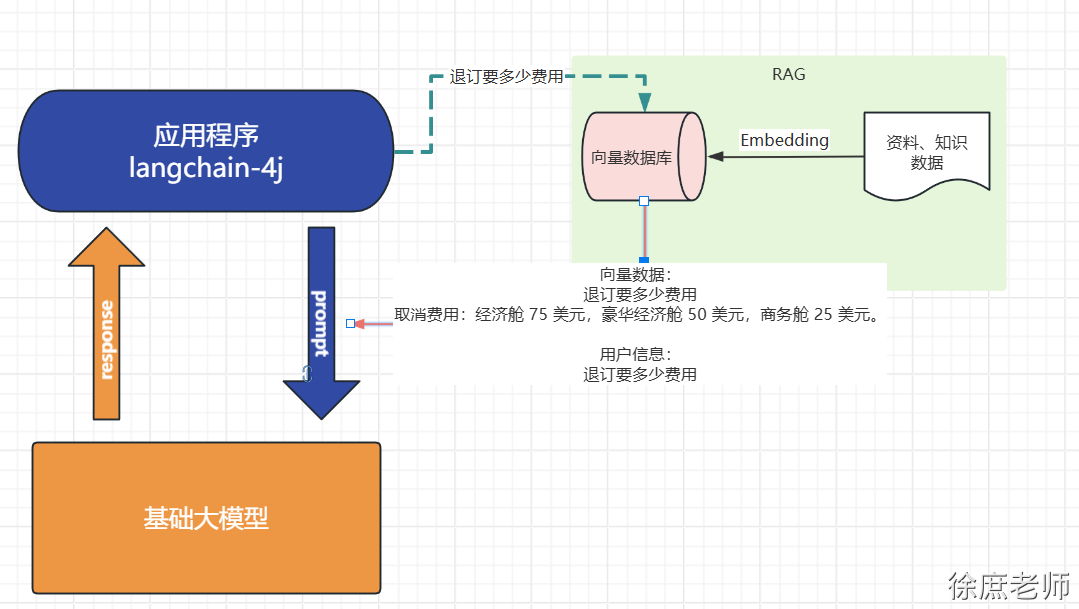 ### 概念 #### 向量: 向量通常用来做相似性搜索,比如语义的一维向量,可以表示词语或短语的语义相似性。例如,“你好”、“hello”和“见到你很高兴”可以通过一维向量来表示它们的语义接近程度。  然而,对于更复杂的对象,比如小狗,无法仅通过一个维度来进行相似性搜索。这时,我们需要提取多个特征,如颜色、大小、品种等,将每个特征表示为向量的一个维度,从而形成一个多维向量。例如,一只棕色的小型泰迪犬可以表示为一个多维向量 [棕色, 小型, 泰迪犬]。 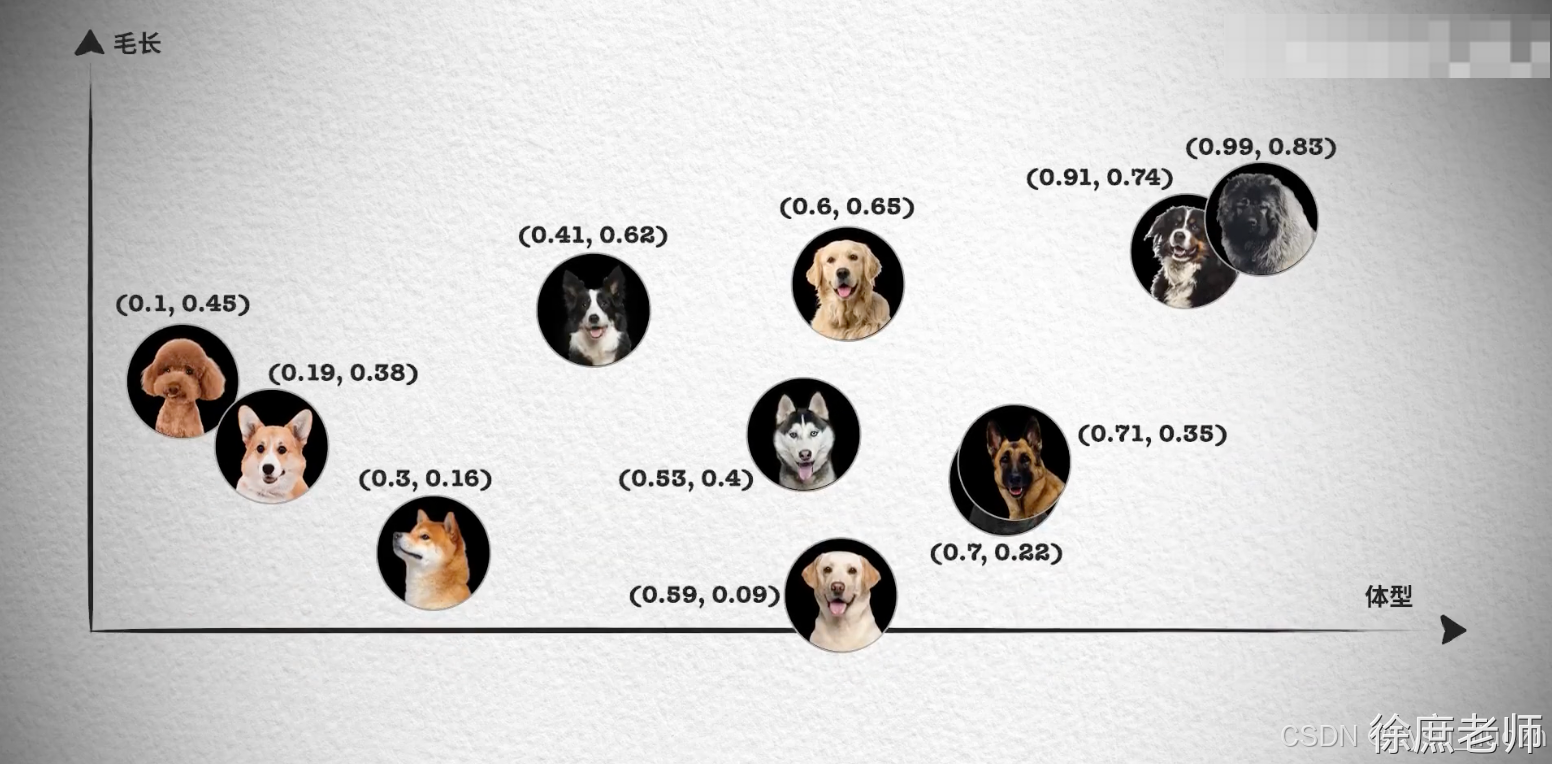 如果需要检索见过更加精准, 我们肯定还需要更多维度的向量, 组成更多维度的空间,在多维向量空间中,相似性检索变得更加复杂。我们需要使用一些算法,如余弦相似度或欧几里得距离,来计算向量之间的相似性。**向量数据库**会帮我实现。 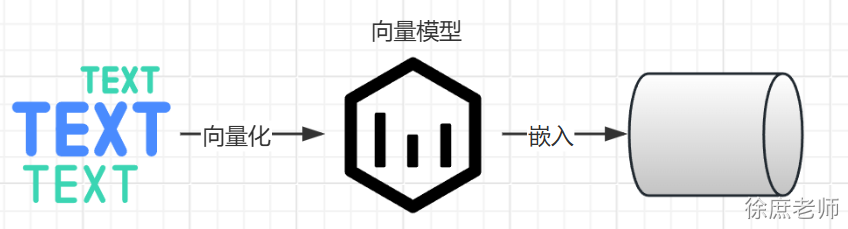 #### 文本向量化 通过向量模型即可向量化, 这里我们学到了一种新的模型, 叫“向量模型” 专门用来做文本向量化的。 大语言模型不能做向量化, 所以需要单独找一个向量模型 1. deepseek不支持向量模型 2. 阿里百炼有大量向量模型 1. 1. 默认模型`DashScopeEmbeddingProperties#DEFAULT_EMBEDDING_MODEL="text-embedding-v1"` 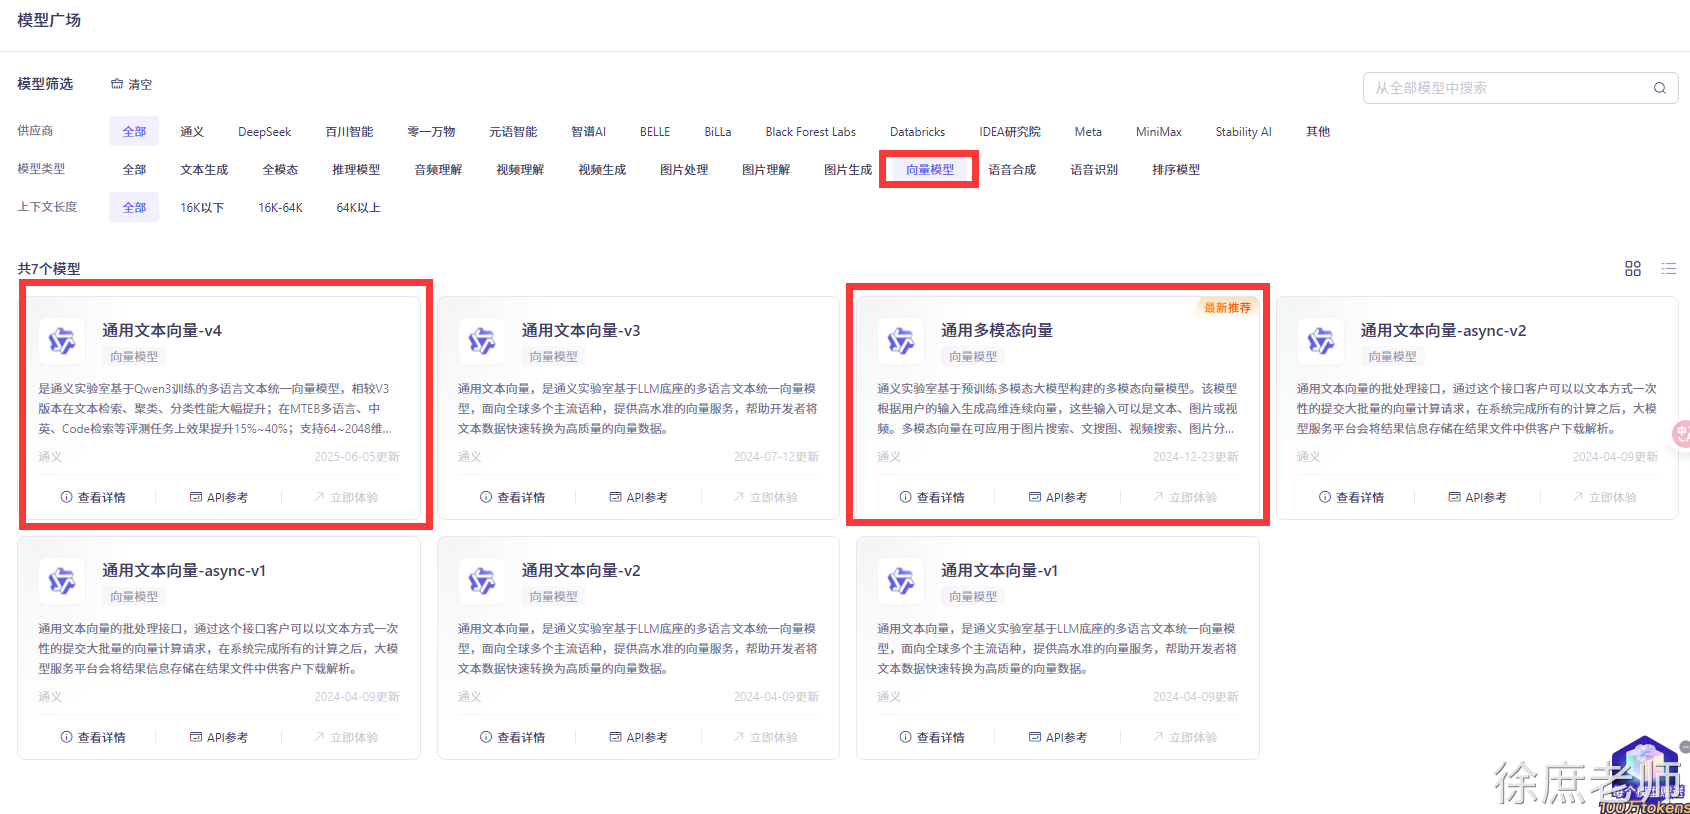 ```properties spring.ai.dashscope.embedding.options.model= text-embedding-v4 ``` 1. ollama有大量向量模型, 自己拉取 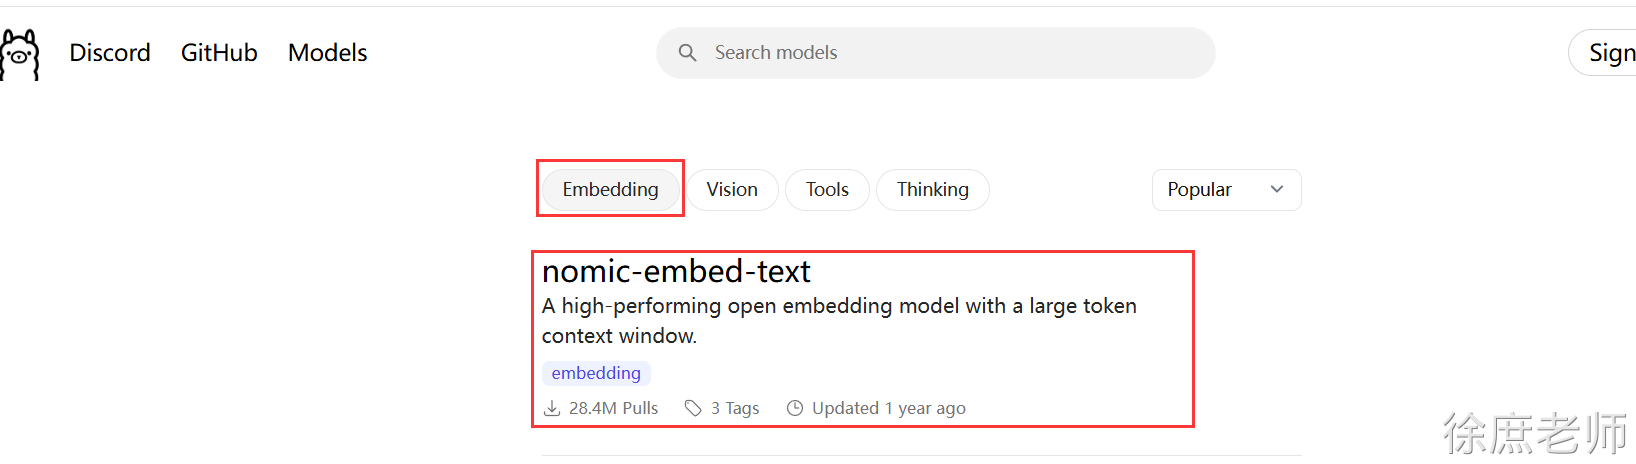 以ollama为例: ```properties spring.ai.ollama.embedding.model= nomic-embed-text ``` ```java @SpringBootTest public class EmbaddingTest { @Test public void testEmbadding(@Autowired OllamaEmbeddingModel ollamaEmbeddingModel) { float[] embedded = ollamaEmbeddingModel.embed("我叫徐庶"); System.out.println(embedded.length); System.out.println(Arrays.toString(embedded)); } } ```  从结果可以知道"我叫徐庶"这句话经过OllamaEmbeddingModel向量化之后得到的一个长度为768的float数组。注意,768是向量模型nomic-embed-text-v1.5固定的,不会随着句子长度而变化,不同的向量模型提供了不同的维度。 那么,我们通过这种向量模型得到一句话对应的向量有什么作用呢?非常有用,因为我们可以基于向量来判断两句话之间的相似度,举个例子: 查询跟秋田犬类似的狗, 在向量数据库中根据每个狗的特点进行多维向量, 你会发现秋田犬的向量数值和柴犬的向量数值最接近, 就可以查到类似的狗。 (当然我这里只是举例,让你对向量数据库有一个印象) 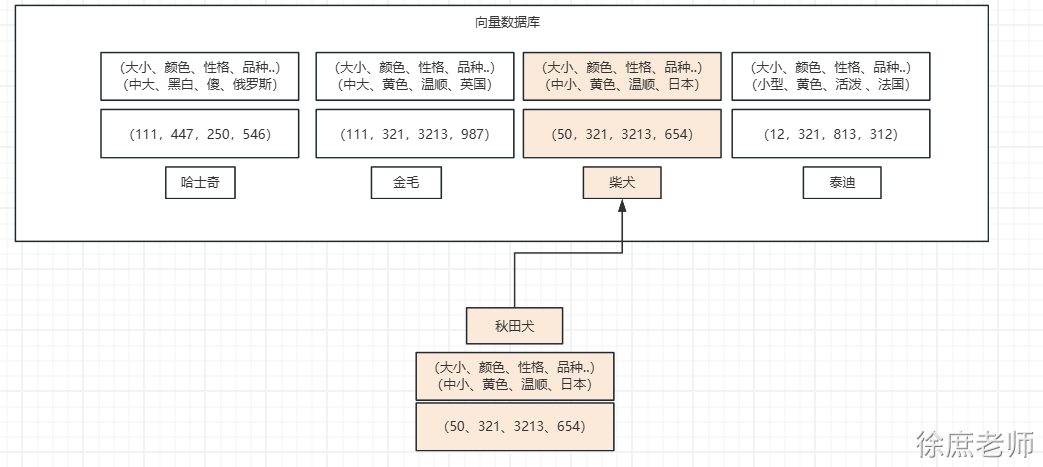 - 向量模型的本质目标,就是把**语义相似**的内容用“相近”的向量表示,把“不相关”内容尽量拉远。 - 所以好的向量模型能够更好的识别语义, 进行向量化. #### 向量数据库 对于向量模型生成出来的向量,我们可以持久化到向量数据库,并且能利用向量数据库来计算两个向量之间的相似度,或者根据一个向量查找跟这个向量最相似的向量。 在SpringAi中,VectorStore 表示向量数据库,目前支持的向量数据库有 - [Azure Vector Search](https://docs.spring.io/spring-ai/reference/api/vectordbs/azure.html) - The [Azure](https://learn.microsoft.com/en-us/azure/search/vector-search-overview) vector store. - [Apache Cassandra](https://docs.spring.io/spring-ai/reference/api/vectordbs/apache-cassandra.html) - The [Apache Cassandra](https://cassandra.apache.org/doc/latest/cassandra/vector-search/overview.html) vector store. - [Chroma Vector Store](https://docs.spring.io/spring-ai/reference/api/vectordbs/chroma.html) - The [Chroma](https://www.trychroma.com/) vector store. - [Elasticsearch Vector Store](https://docs.spring.io/spring-ai/reference/api/vectordbs/elasticsearch.html) - The [Elasticsearch](https://www.elastic.co/) vector store. 可以“以向量+关键词”方式做混合检索。深度优化更多针对文本,不是专门“向量搜索引擎”。向量存储和检索容量有限制,查询延迟高于 Milvus。 - [GemFire Vector Store](https://docs.spring.io/spring-ai/reference/api/vectordbs/gemfire.html) - The [GemFire](https://tanzu.vmware.com/content/blog/vmware-gemfire-vector-database-extension) vector store. - [MariaDB Vector Store](https://docs.spring.io/spring-ai/reference/api/vectordbs/mariadb.html) - The [MariaDB](https://mariadb.com/) vector store. - [Milvus Vector Store](https://docs.spring.io/spring-ai/reference/api/vectordbs/milvus.html) - The [Milvus](https://milvus.io/) vector store. - [MongoDB Atlas Vector Store](https://docs.spring.io/spring-ai/reference/api/vectordbs/mongodb.html) - The [MongoDB Atlas](https://www.mongodb.com/atlas/database) vector store. - [Neo4j Vector Store](https://docs.spring.io/spring-ai/reference/api/vectordbs/neo4j.html) - The [Neo4j](https://neo4j.com/) vector store.可以结合结构化图谱查询与向量检索, **大规模嵌入检索(如千万—亿级高维向量)性能明显落后于 Milvus** - [OpenSearch Vector Store](https://docs.spring.io/spring-ai/reference/api/vectordbs/opensearch.html) - The [OpenSearch](https://opensearch.org/platform/search/vector-database.html) vector store. - [Oracle Vector Store](https://docs.spring.io/spring-ai/reference/api/vectordbs/oracle.html) - The [Oracle Database](https://docs.oracle.com/en/database/oracle/oracle-database/23/vecse/overview-ai-vector-search.html) vector store. - [PgVector Store](https://docs.spring.io/spring-ai/reference/api/vectordbs/pgvector.html) - The [PostgreSQL/PGVector](https://github.com/pgvector/pgvector) vector store. - [Pinecone Vector Store](https://docs.spring.io/spring-ai/reference/api/vectordbs/pinecone.html) - [PineCone](https://www.pinecone.io/) vector store. - [Qdrant Vector Store](https://docs.spring.io/spring-ai/reference/api/vectordbs/qdrant.html) - [Qdrant](https://www.qdrant.tech/) vector store. - [Redis Vector Store](https://docs.spring.io/spring-ai/reference/api/vectordbs/redis.html) - The [Redis](https://redis.io/) vector store. 低门槛实现小规模向量检索。对于高维大规模向量(如几百万到上亿条),性能和存储效率不如专用向量库。 - [SAP Hana Vector Store](https://docs.spring.io/spring-ai/reference/api/vectordbs/hana.html) - The [SAP HANA](https://news.sap.com/2024/04/sap-hana-cloud-vector-engine-ai-with-business-context/) vector store. - [Typesense Vector Store](https://docs.spring.io/spring-ai/reference/api/vectordbs/typesense.html) - The [Typesense](https://typesense.org/docs/0.24.0/api/vector-search.html) vector store. - [Weaviate Vector Store](https://docs.spring.io/spring-ai/reference/api/vectordbs/weaviate.html) - The [Weaviate](https://weaviate.io/) vector store. - [SimpleVectorStore](https://github.com/spring-projects/spring-ai/blob/main/spring-ai-vector-store/src/main/java/org/springframework/ai/vectorstore/SimpleVectorStore.java) - A simple implementation of persistent vector storage, good for educational purposes. 其中有我们熟悉的几个数据库都可以用来存储向量,比如Elasticsearch、MongoDb、Neo4j、Pgsql、Redis。 视频中我会讲解2种: 1. [SimpleVectorStore](https://github.com/spring-projects/spring-ai/blob/main/spring-ai-vector-store/src/main/java/org/springframework/ai/vectorstore/SimpleVectorStore.java) 教学版向量数据库 2. [Milvus Vector Store](https://docs.spring.io/spring-ai/reference/api/vectordbs/milvus.html) Milvus(国产团队)、文档友好、社区国内活跃、性能最佳、市场占用率大。 实战中使用的向量数据库. 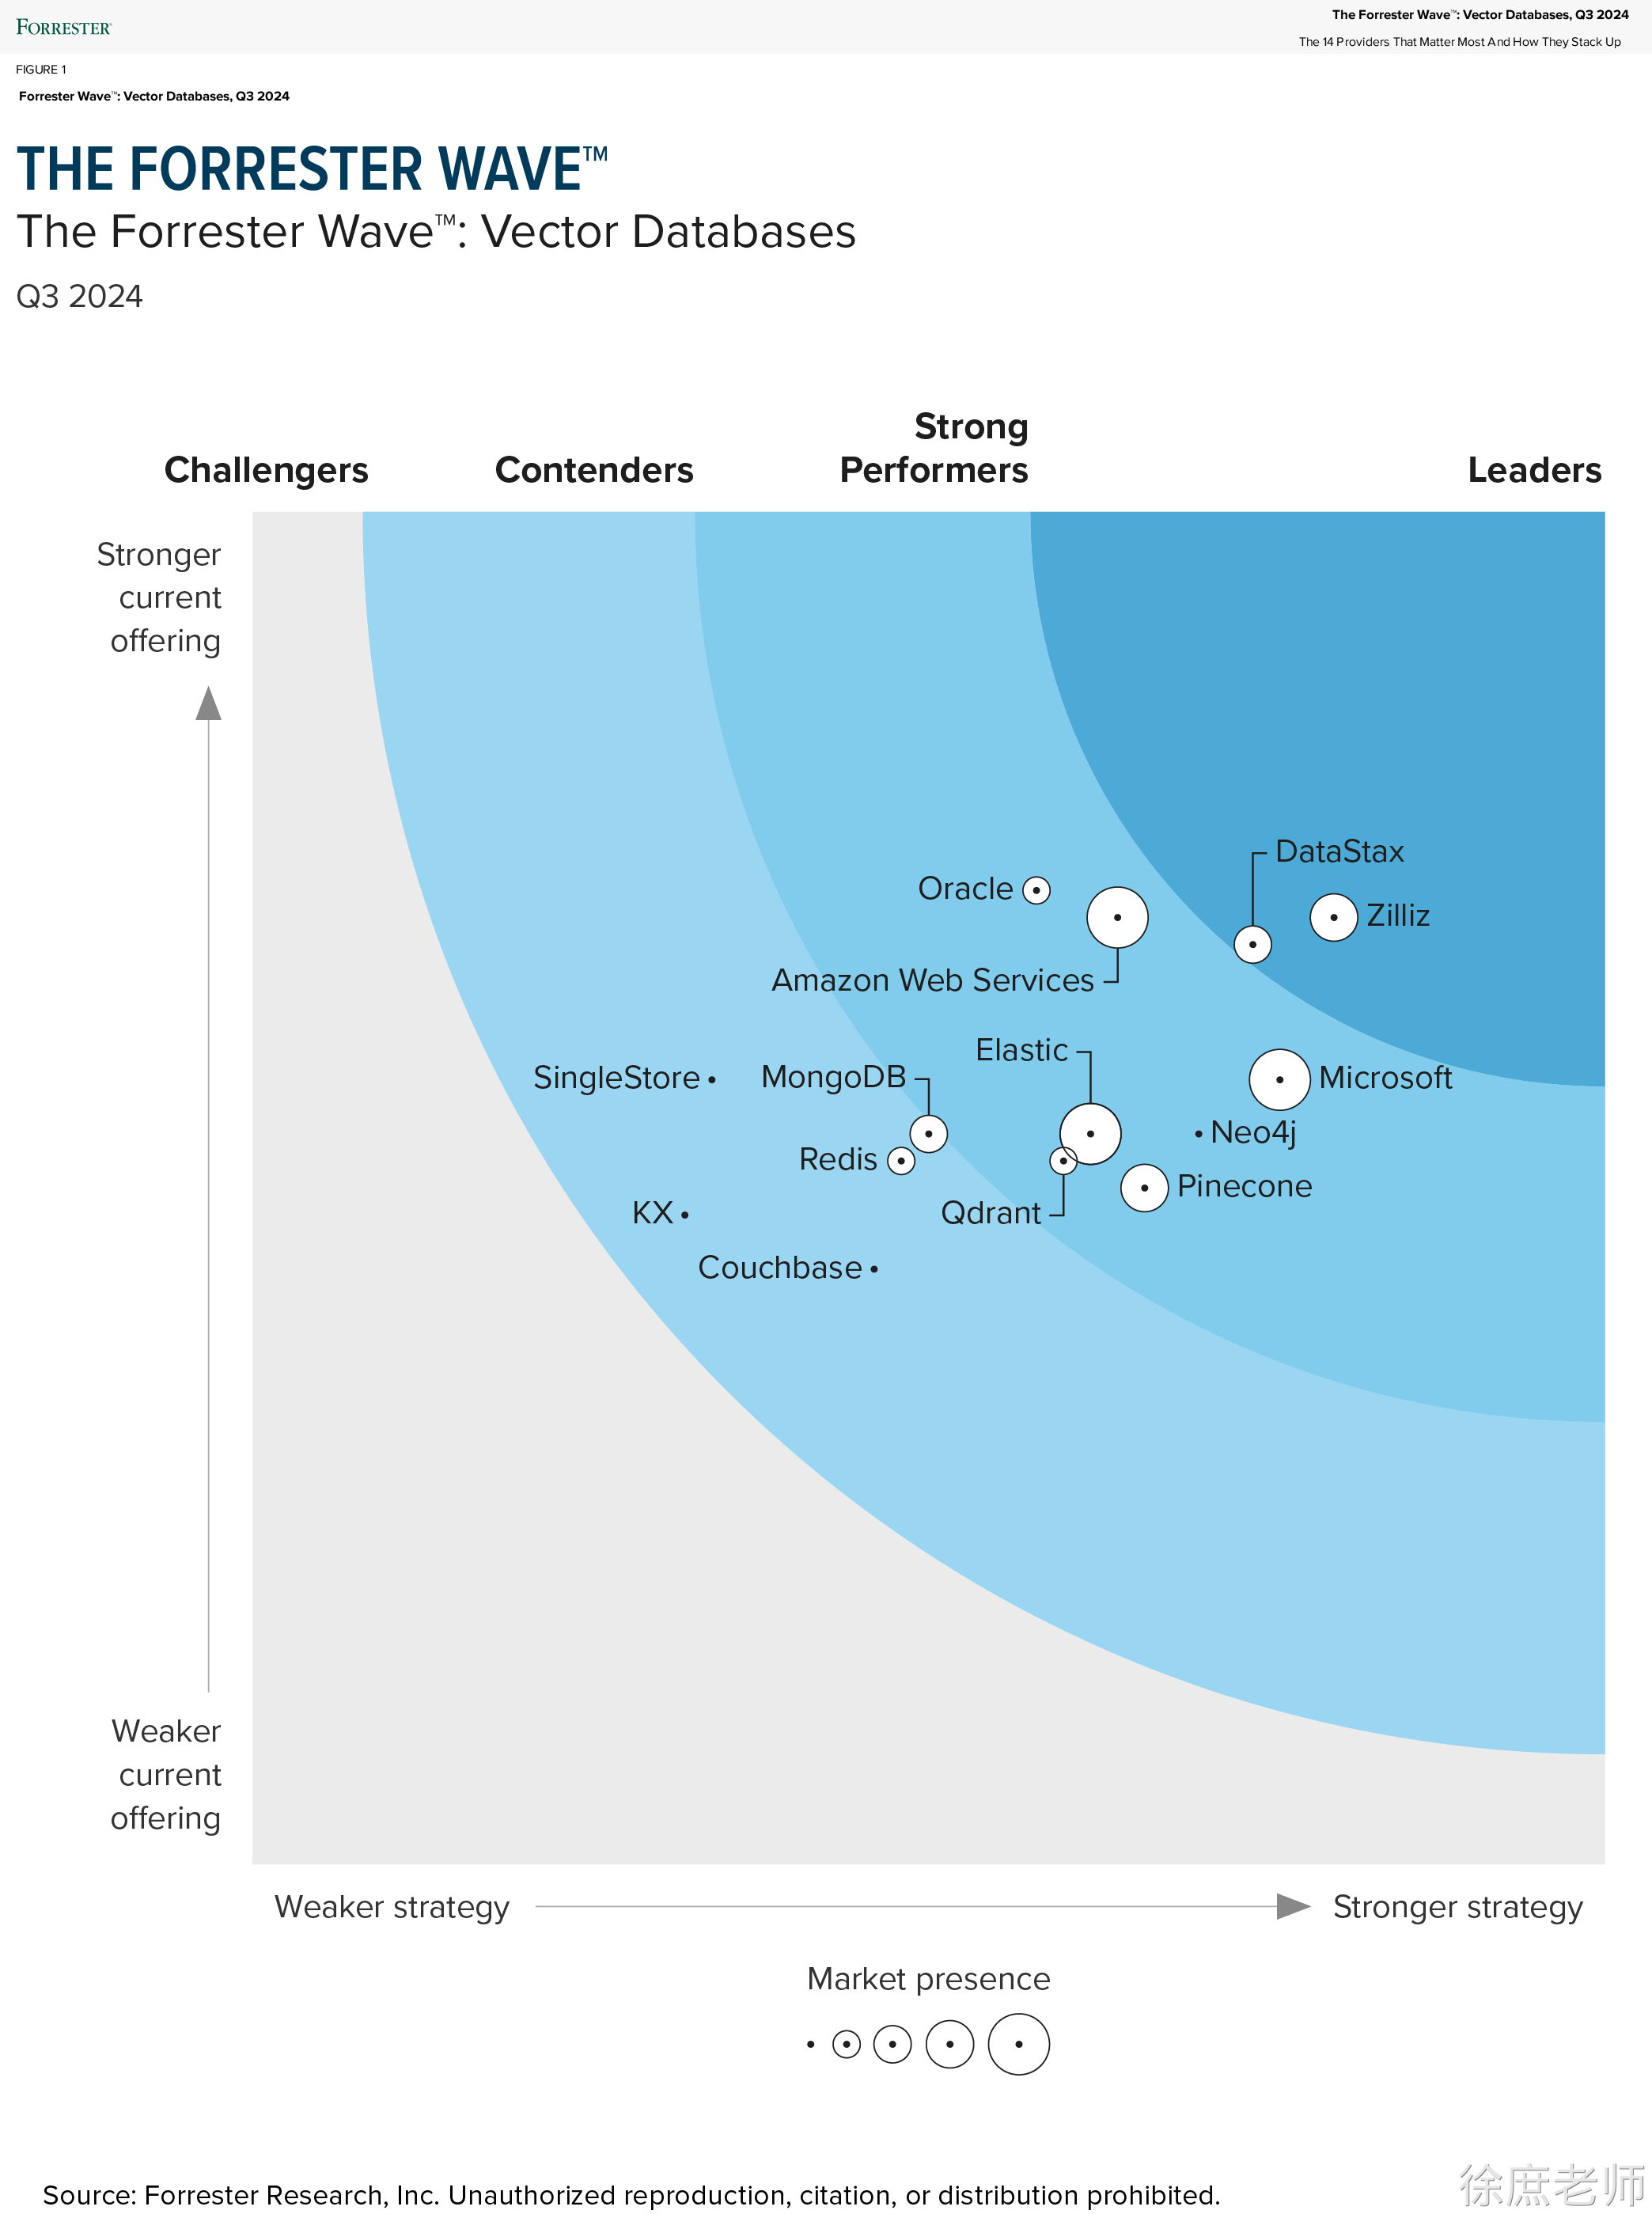 #### 匹配检索 在这个示例中, 我分别存储了`预订航班`和`取消预订`2段说明到向量数据库中 然后通过"退票要多少钱" 进行查询 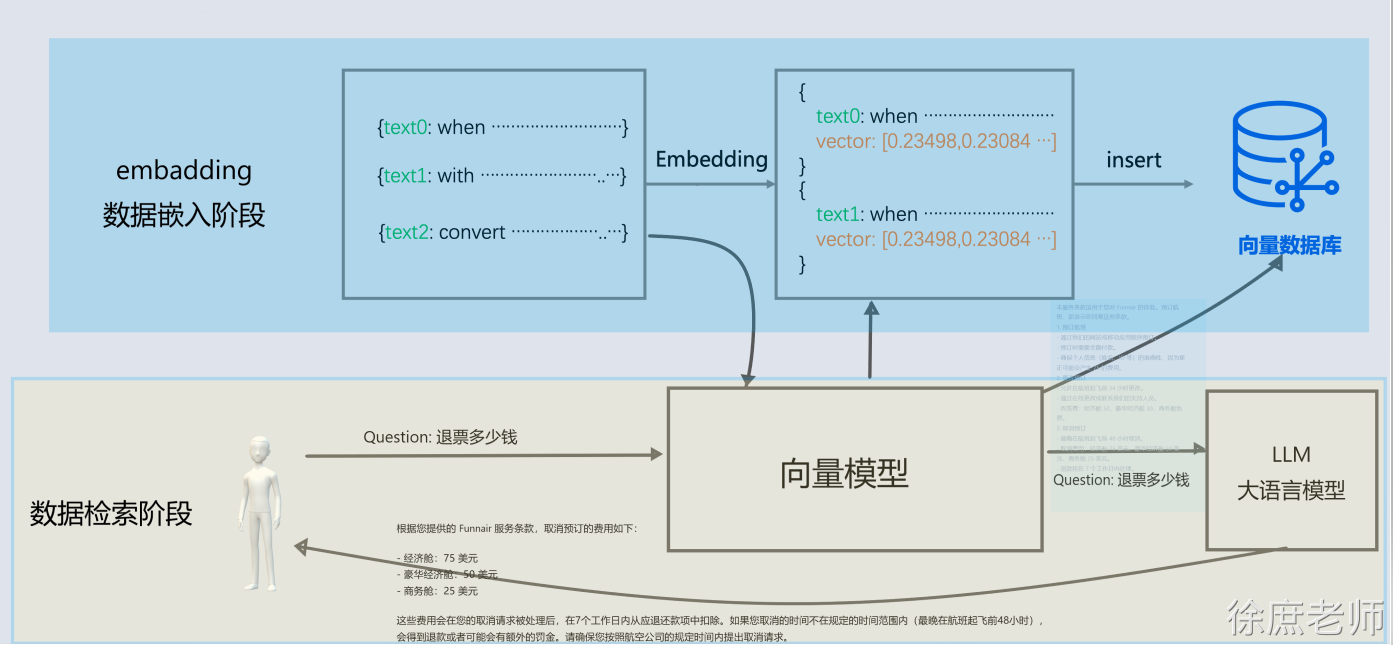 代码执行结果为: OllamaEmbedding结果 ```java @Bean public VectorStore vectorStore(OllamaEmbeddingModel embeddingModel) { SimpleVectorStore.SimpleVectorStoreBuilder builder = SimpleVectorStore.builder(embeddingModel); return builder.build(); } ``` ##### SearchRequest 可以利用searchRequest设置检索请求: - query 代表要检索的内容 - topK 设置检索结果的前N条 - - 通常我们查询所有结果查出来, 因为查询结果最终要发给大模型, 查询过多的结果会: - - - 1. 过多的token意味着更长延迟, 更多的费用, 并且过多上下文会超限; - 2. 研究表明过多的内容会降低 LLM 的****召回性能\*;\*** - similarityThreshold 设置相似度阈值, 可以通关设置分数限制召回内容相似度. 从而过滤掉废料。 (中文语料要适当降低分数) , 所以应遵循**始终以“业务召回效果”为主,而不是追求网上常说的高分阈值。** ```java @BeforeEach public void init( @Autowired VectorStore vectorStore) { // 1. 声明内容文档 Document doc = Document.builder() .text(""" 预订航班: - 通过我们的网站或移动应用程序预订。 - 预订时需要全额付款。 - 确保个人信息(姓名、ID 等)的准确性,因为更正可能会产生 25 的费用。 """) .build(); Document doc2 = Document.builder() .text(""" 取消预订: - 最晚在航班起飞前 48 小时取消。 - 取消费用:经济舱 75 美元,豪华经济舱 50 美元,商务舱 25 美元。 - 退款将在 7 个工作日内处理。 """) .build(); // 2. 将文本进行向量化,并且存入向量数据库(无需再手动向量化) vectorStore.add(Arrays.asList(doc,doc2)); } @Test void similaritySearchTest( @Autowired VectorStore vectorStore) { // 3. 相似性查询 SearchRequest searchRequest = SearchRequest .builder().query("预定航班") .topK(5) .similarityThreshold(0.3) .build(); List<Document> results = vectorStore.similaritySearch(searchRequest); // 4.输出 System.out.println(results); } ``` 可以看到明显阿里的向量模型归类的更加准确,Ollama的向量模型查出来后结果并不正确。 所以为了你的准确性,请选择性能更好的向量模型。 想要更快更相似的搜索,用好的向量数据库。 ### 接入ChatClient 1. 依赖 ```json <dependency> <groupId>org.springframework.ai</groupId> <artifactId>spring-ai-advisors-vector-store</artifactId> </dependency> ``` 1. 代码 ```java @Bean public VectorStore vectorStore(DashScopeEmbeddingModel embeddingModel) { SimpleVectorStore.SimpleVectorStoreBuilder builder = SimpleVectorStore.builder(embeddingModel); return builder.build(); } ``` 1. 测试 实际你会发现, 最核心的是通过拦截器:QuestionAnswerAdvisor . 你应该能猜到底层肯定会通过拦截对话将相似内容发给大模型。 可以结合SimpleLoggerAdvisor 查看日志内容. ```java @SpringBootTest public class SimpleVectorStoreTest { @BeforeEach public void init( @Autowired VectorStore vectorStore) { // 1. 声明内容文档 Document doc = Document.builder() .text(""" 预订航班: - 通过我们的网站或移动应用程序预订。 - 预订时需要全额付款。 - 确保个人信息(姓名、ID 等)的准确性,因为更正可能会产生 25 的费用。 """) .build(); Document doc2 = Document.builder() .text(""" 取消预订: - 最晚在航班起飞前 48 小时取消。 - 取消费用:经济舱 75 美元,豪华经济舱 50 美元,商务舱 25 美元。 - 退款将在 7 个工作日内处理。 """) .build(); // 2. 将文本进行向量化,并且存入向量数据库(无需再手动向量化) vectorStore.add(Arrays.asList(doc,doc2)); } @Test void chatRagTest( @Autowired VectorStore vectorStore, @Autowired DashScopeChatModel chatModel ) { ChatClient chatClient = ChatClient.builder(chatModel) .build(); String message="退费需要多少费用?"; String content = chatClient.prompt().user(message) .advisors( new SimpleLoggerAdvisor(), QuestionAnswerAdvisor.builder(vectorStore) .searchRequest( SearchRequest .builder().query(message) .topK(5) .similarityThreshold(0.3) .build()) .build() ).call().content(); System.out.println(content); } } ``` #### RetrievalAugmentationAdvisor - 查询空时扩展策略 : ```java .queryAugmenter(ContextualQueryAugmenter.builder() .allowEmptyContext(false) .emptyContextPromptTemplate(PromptTemplate.builder().template("用户查询位于知识库之外。礼貌地告知用户您无法回答").build()) .build()) ``` - 查询检索器 - - 检索提示词重写 ```java .queryTransformers(RewriteQueryTransformer.builder() .chatClientBuilder(ChatClient.builder(dashScopeChatModel)) .targetSearchSystem("航空票务助手") .build()) ``` - - **翻译重写** ```java .queryTransformers(TranslationQueryTransformer.builder() .chatClientBuilder(ChatClient.builder(dashScopeChatModel)) .targetLanguage("中文") .build()) ``` - 后置处理器:需要文档后处理和重排序 - 实现复杂的 RAG 流水线 ```java @Test public void testRag3(@Autowired VectorStore vectorStore, @Autowired DashScopeChatModel dashScopeChatModel) { chatClient = ChatClient.builder(dashScopeChatModel) .defaultAdvisors(SimpleLoggerAdvisor.builder().build()) .build(); // 增强多 Advisor retrievalAugmentationAdvisor = RetrievalAugmentationAdvisor.builder() // 查 = QuestionAnswerAdvisor .documentRetriever(VectorStoreDocumentRetriever.builder() .similarityThreshold(0.50) .vectorStore(vectorStore) .build()) // 检索为空时,返回提示 /*.queryAugmenter(ContextualQueryAugmenter.builder() .allowEmptyContext(false) .emptyContextPromptTemplate(PromptTemplate.builder().template("用户查询位于知识库之外。礼貌地告知用户您无法回答").build()) .build())*/ // 相似性查询内容转换 /*.queryTransformers(RewriteQueryTransformer.builder() .chatClientBuilder(ChatClient.builder(dashScopeChatModel)) .targetSearchSystem("航空票务助手") .build())*/ // 检索后文档监控、操作 /*.documentPostProcessors((query, documents) -> { System.out.println("Original query: " + query.text()); System.out.println("Retrieved documents: " + documents.size()); return documents; })*/ .build(); String answer = chatClient.prompt() .advisors(retrievalAugmentationAdvisor) .user("退一张票大概要多少费用?希望别扣太多啊") .call() .content(); System.out.println(answer); } @TestConfiguration static class TestConfig { @Bean public VectorStore vectorStore(DashScopeEmbeddingModel embeddingModel) { return SimpleVectorStore.builder(embeddingModel).build(); } } ``` ### ELT 在之前,我们主要完成了数据检索阶段, 但是完整的RAG流程还需要有emedding阶段, 即: 提取(读取)、转换(分隔)和加载(写入)  #### 1.1. [Document Loaders](https://docs.langchain4j.dev/category/document-loaders) 文档读取器 **springai提供了以下文档阅读器** - [JSON](https://docs.spring.io/spring-ai/reference/api/etl-pipeline.html#_json) - [文本](https://docs.spring.io/spring-ai/reference/api/etl-pipeline.html#_text) - [HTML(JSoup)](https://docs.spring.io/spring-ai/reference/api/etl-pipeline.html#_html_jsoup) - [Markdown](https://docs.spring.io/spring-ai/reference/api/etl-pipeline.html#_markdown) - [PDF页面](https://docs.spring.io/spring-ai/reference/api/etl-pipeline.html#_pdf_page) - [PDF段落](https://docs.spring.io/spring-ai/reference/api/etl-pipeline.html#_pdf_paragraph) - [Tika(DOCX、PPTX、HTML……)](https://docs.spring.io/spring-ai/reference/api/etl-pipeline.html#_tika_docx_pptx_html) **alibaba ai也提供了很多阅读器** https://github.com/alibaba/spring-ai-alibaba/tree/main/community/document-parsers - **document-parser-apache-pdfbox**:用于解析 PDF 格式文档。 - **document-parser-bshtml**:用于解析基于 BSHTML 格式的文档。 - **document-parser-pdf-tables**:专门用于从 PDF 文档中提取表格数据。 - **document-parser-bibtex**:用于解析 BibTeX 格式的参考文献数据。 - **document-parser-markdown**:用于解析 Markdown 格式的文档。 - **document-parser-tika**:一个多功能文档解析器,支持多种文档格式。 以及**网络来源**文档读取器: https://github.com/alibaba/spring-ai-alibaba/tree/main/community/document-readers  ##### 1.1.1. 读取Text ```java @Test public void testReaderText(@Value("classpath:rag/terms-of-service.txt") Resource resource) { TextReader textReader = new TextReader(resource); List<Document> documents = textReader.read(); for (Document document : documents) { System.out.println(document.getText()); } } ``` ##### 1.1.2. 读取markdown ```java <dependency> <groupId>org.springframework.ai</groupId> <artifactId>spring-ai-markdown-document-reader</artifactId> </dependency> @Test public void testReaderMD(@Value("classpath:rag/9_横店影视股份有限公司_0.md") Resource resource) { MarkdownDocumentReaderConfig config = MarkdownDocumentReaderConfig.builder() .withHorizontalRuleCreateDocument(true) // 分割线创建新document .withIncludeCodeBlock(false) // 代码创建新document .withIncludeBlockquote(false) // 引用创建新document .withAdditionalMetadata("filename", resource.getFilename()) // 每个document添加的元数据 .build(); MarkdownDocumentReader markdownDocumentReader = new MarkdownDocumentReader(resource, config); List<Document> documents = markdownDocumentReader.read(); for (Document document : documents) { System.out.println(document.getText()); } } ``` ##### 1.1.3. pdf - `PagePdfDocumentReader`一页1个document - `ParagraphPdfDocumentReader` 按pdf目录分成一个个document ```java <dependency> <groupId>org.springframework.ai</groupId> <artifactId>spring-ai-markdown-document-reader</artifactId> </dependency> @Test public void testReaderPdf(@Value("classpath:rag/平安银行2023年半年度报告摘要.pdf") Resource resource) { PagePdfDocumentReader pdfReader = new PagePdfDocumentReader(resource, PdfDocumentReaderConfig.builder() .withPageTopMargin(0) .withPageExtractedTextFormatter(ExtractedTextFormatter.builder() .withNumberOfTopTextLinesToDelete(0) .build()) .withPagesPerDocument(1) .build()); List<Document> documents = pdfReader.read(); for (Document document : documents) { System.out.println(document.getText()); } } // 必需要带目录, 按pdf的目录分document @Test public void testReaderParagraphPdf(@Value("classpath:rag/平安银行2023年半年度报告.pdf") Resource resource) { ParagraphPdfDocumentReader pdfReader = new ParagraphPdfDocumentReader(resource, PdfDocumentReaderConfig.builder() // 不同的PDF生成工具可能使用不同的坐标系 , 如果内容识别有问题, 可以设置该属性为true .withReversedParagraphPosition(true) .withPageTopMargin(0) // 上边距 .withPageExtractedTextFormatter(ExtractedTextFormatter.builder() // 从页面文本中删除前 N 行 .withNumberOfTopTextLinesToDelete(0) .build()) .build()); List<Document> documents = pdfReader.read(); for (Document document : documents) { System.out.println(document.getText()); } } ``` ##### 1.1.4. B站: ```plain <dependency> <groupId>com.alibaba.cloud.ai</groupId> <artifactId>spring-ai-alibaba-starter-document-reader-bilibili</artifactId> </dependency> @Test void bilibiliDocumentReaderTest() { BilibiliDocumentReader bilibiliDocumentReader = new BilibiliDocumentReader( "https://www.bilibili.com/video/BV1C5UxYuEc2/?spm_id_from=333.1387.upload.video_card.click&vd_source=fa810d8b8d6765676cb343ada918d6eb"); List<Document> documents = bilibiliDocumentReader.get(); System.out.println(documents); } ``` #### 1.2. [DocumentSplitter](https://docs.langchain4j.dev/tutorials/rag#document-splitter) 文档拆分器(转换器) 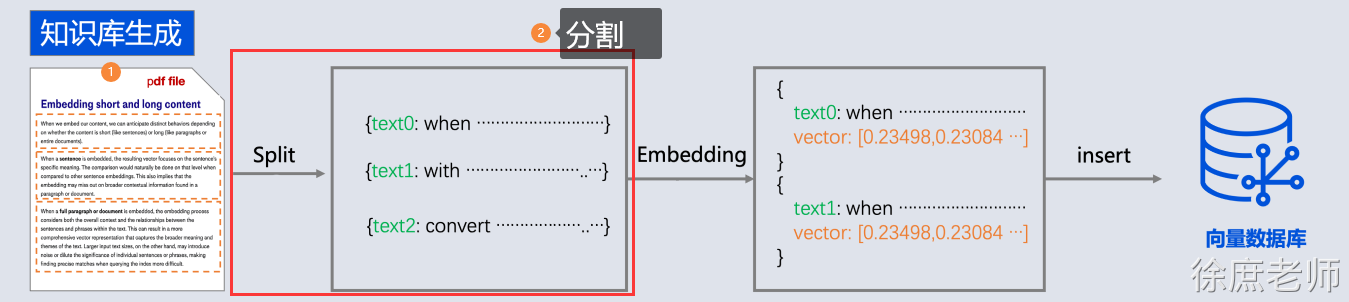 由于文本读取过来后, 还需要分成一段一段的片段(分块chunk), 分块是为了更好地拆分语义单元,这样在后面可以更精确地进行语义相似性检索,也可以避免LLM的Token限制。 SpringAi就提供了一个文档拆分器: - [TextSplitter](https://docs.spring.io/spring-ai/reference/api/etl-pipeline.html#_textsplitter) 抽象类 - [TokenTextSplitter](https://docs.spring.io/spring-ai/reference/api/etl-pipeline.html#_tokentextsplitter) 按token分隔 ##### 1.2.1. TokenTextSplitter 1. `**chunkSize**` (默认值: 800) 100 - - 每个文本块的目标大小,以token为单位 1. `**minChunkSizeChars**` (默认值: 350) 建议小一点 - - 如果块超过最小块字符数( 按照块的最后. ! ? \n 符号截取) - 如果块没超过最小块字符数, 不会按照符号截取(保留原块)。 ```java 本服务条款适用于您对图灵航空 的体验。预订航班,即表示您同意这些条款。 1. 预订航班 - 通过我们的网站或移动应用程序预订。 - 预订时需要全额付款。 \n - 确保个人信息(姓名、ID 等)的准确性,因为更正可能会产生 25 ``` 1. `**minChunkLengthToEmbed**` (默认值: 5) 5 - - 丢弃短于此长度的文本块(如果去掉\r\n, 只剩5个有效文本, 那就丢掉) ```java 本服务条 ``` 1. `**maxNumChunks**` (默认值: 10000) - - 最多能分多少个块, 超过了就不管了 1. `**keepSeparator**` (默认值: true) - - 是否在块中保留分隔符、换行符 \r\n ```java @Test public void testTokenTextSplitter(@Value("classpath:rag/terms-of-service.txt") Resource resource) { TextReader textReader = new TextReader(resource); textReader.getCustomMetadata().put("filename", resource.getFilename()); List<Document> documents = textReader.read(); TokenTextSplitter splitter = new TokenTextSplitter(1000, 400, 10, 5000, true); List<Document> apply = splitter.apply(documents); apply.forEach(System.out::println); } ``` 整个流程如下: 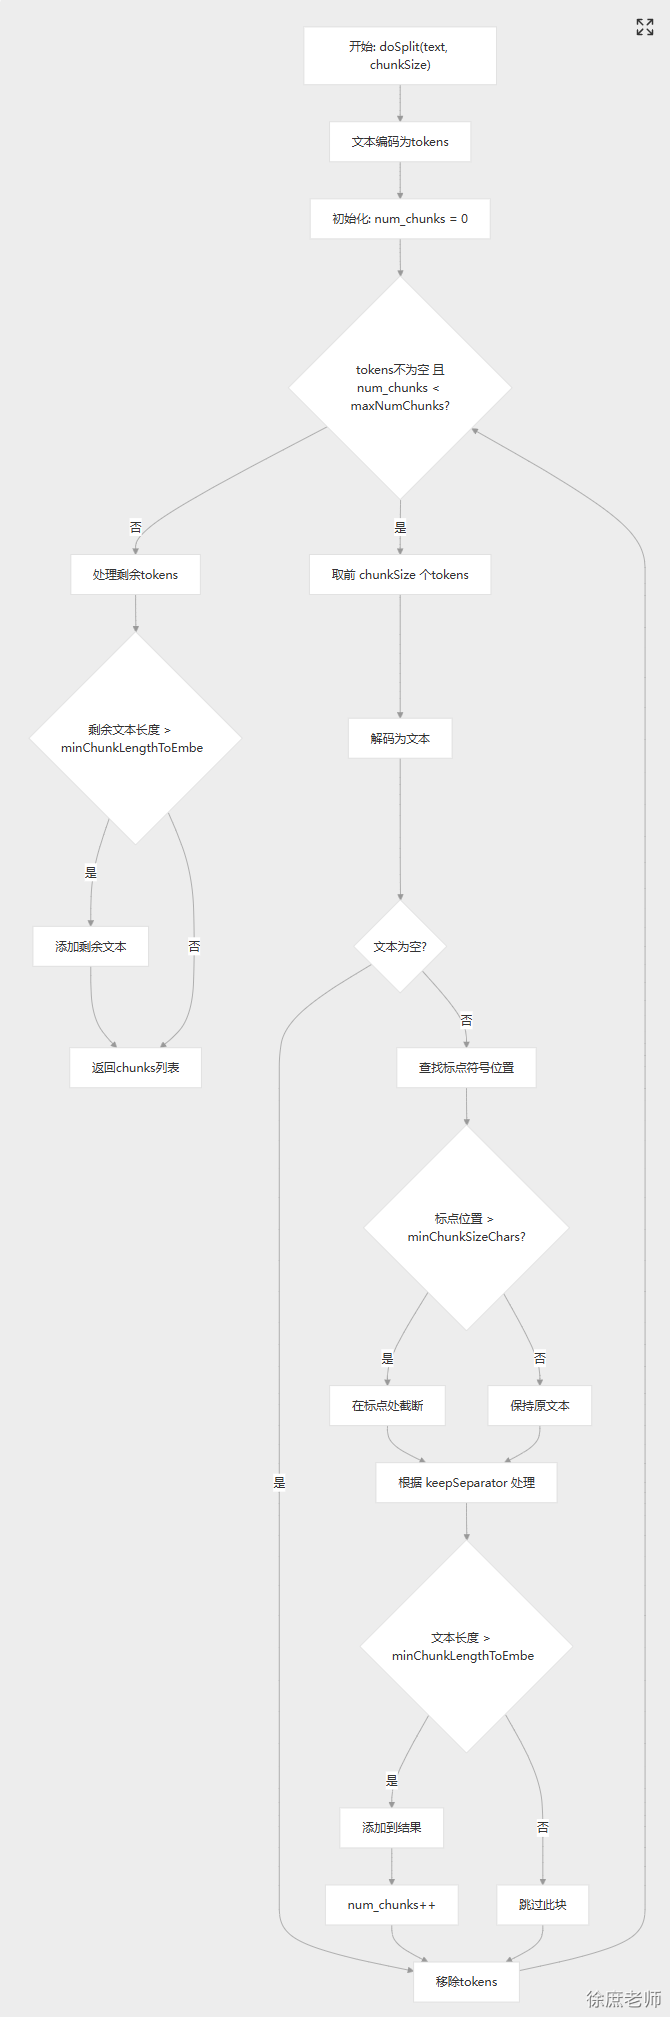 ##### 1.2.2. 自定分割器: **支持中英文**:同时支持中文和英文标点符号 ```java package com.xushu.springai.rag.ELT; public class ChineseTokenTextSplitter extends TextSplitter { private static final int DEFAULT_CHUNK_SIZE = 800; private static final int MIN_CHUNK_SIZE_CHARS = 350; private static final int MIN_CHUNK_LENGTH_TO_EMBED = 5; private static final int MAX_NUM_CHUNKS = 10000; private static final boolean KEEP_SEPARATOR = true; private final EncodingRegistry registry = Encodings.newLazyEncodingRegistry(); private final Encoding encoding = this.registry.getEncoding(EncodingType.CL100K_BASE); // The target size of each text chunk in tokens private final int chunkSize; // The minimum size of each text chunk in characters private final int minChunkSizeChars; // Discard chunks shorter than this private final int minChunkLengthToEmbed; // The maximum number of chunks to generate from a text private final int maxNumChunks; private final boolean keepSeparator; public ChineseTokenTextSplitter() { this(DEFAULT_CHUNK_SIZE, MIN_CHUNK_SIZE_CHARS, MIN_CHUNK_LENGTH_TO_EMBED, MAX_NUM_CHUNKS, KEEP_SEPARATOR); } public ChineseTokenTextSplitter(boolean keepSeparator) { this(DEFAULT_CHUNK_SIZE, MIN_CHUNK_SIZE_CHARS, MIN_CHUNK_LENGTH_TO_EMBED, MAX_NUM_CHUNKS, keepSeparator); } public ChineseTokenTextSplitter(int chunkSize, int minChunkSizeChars, int minChunkLengthToEmbed, int maxNumChunks, boolean keepSeparator) { this.chunkSize = chunkSize; this.minChunkSizeChars = minChunkSizeChars; this.minChunkLengthToEmbed = minChunkLengthToEmbed; this.maxNumChunks = maxNumChunks; this.keepSeparator = keepSeparator; } public static Builder builder() { return new Builder(); } @Override protected List<String> splitText(String text) { return doSplit(text, this.chunkSize); } protected List<String> doSplit(String text, int chunkSize) { if (text == null || text.trim().isEmpty()) { return new ArrayList<>(); } List<Integer> tokens = getEncodedTokens(text); List<String> chunks = new ArrayList<>(); int num_chunks = 0; // maxNumChunks多能分多少个块, 超过了就不管了 while (!tokens.isEmpty() && num_chunks < this.maxNumChunks) { // 按照chunkSize进行分隔 List<Integer> chunk = tokens.subList(0, Math.min(chunkSize, tokens.size())); String chunkText = decodeTokens(chunk); // Skip the chunk if it is empty or whitespace if (chunkText.trim().isEmpty()) { tokens = tokens.subList(chunk.size(), tokens.size()); continue; } // Find the last period or punctuation mark in the chunk int lastPunctuation = Math.max(chunkText.lastIndexOf('.'), Math.max(chunkText.lastIndexOf('?'), Math.max(chunkText.lastIndexOf('!'), Math.max(chunkText.lastIndexOf('\n'), Math.max(chunkText.lastIndexOf('。'), Math.max(chunkText.lastIndexOf('?'), chunkText.lastIndexOf('!') )))))); // 按照句子截取之后长度 > minChunkSizeChars if (lastPunctuation != -1 && lastPunctuation > this.minChunkSizeChars) { // 保留按照句子截取之后的内容 chunkText = chunkText.substring(0, lastPunctuation + 1); } // 按照句子截取之后长度 < minChunkSizeChars 保留原块 // keepSeparator=true 替换/r/n =false不管 String chunkTextToAppend = (this.keepSeparator) ? chunkText.trim() : chunkText.replace(System.lineSeparator(), " ").trim(); // 替换/r/n之后的内容是不是<this.minChunkLengthToEmbed 忽略 if (chunkTextToAppend.length() > this.minChunkLengthToEmbed) { chunks.add(chunkTextToAppend); } // Remove the tokens corresponding to the chunk text from the remaining tokens tokens = tokens.subList(getEncodedTokens(chunkText).size(), tokens.size()); num_chunks++; } // Handle the remaining tokens if (!tokens.isEmpty()) { String remaining_text = decodeTokens(tokens).replace(System.lineSeparator(), " ").trim(); if (remaining_text.length() > this.minChunkLengthToEmbed) { chunks.add(remaining_text); } } return chunks; } private List<Integer> getEncodedTokens(String text) { Assert.notNull(text, "Text must not be null"); return this.encoding.encode(text).boxed(); } private String decodeTokens(List<Integer> tokens) { Assert.notNull(tokens, "Tokens must not be null"); var tokensIntArray = new IntArrayList(tokens.size()); tokens.forEach(tokensIntArray::add); return this.encoding.decode(tokensIntArray); } public static final class Builder { private int chunkSize = DEFAULT_CHUNK_SIZE; private int minChunkSizeChars = MIN_CHUNK_SIZE_CHARS; private int minChunkLengthToEmbed = MIN_CHUNK_LENGTH_TO_EMBED; private int maxNumChunks = MAX_NUM_CHUNKS; private boolean keepSeparator = KEEP_SEPARATOR; private Builder() { } public Builder withChunkSize(int chunkSize) { this.chunkSize = chunkSize; return this; } public Builder withMinChunkSizeChars(int minChunkSizeChars) { this.minChunkSizeChars = minChunkSizeChars; return this; } public Builder withMinChunkLengthToEmbed(int minChunkLengthToEmbed) { this.minChunkLengthToEmbed = minChunkLengthToEmbed; return this; } public Builder withMaxNumChunks(int maxNumChunks) { this.maxNumChunks = maxNumChunks; return this; } public Builder withKeepSeparator(boolean keepSeparator) { this.keepSeparator = keepSeparator; return this; } public ChineseTokenTextSplitter build() { return new ChineseTokenTextSplitter(this.chunkSize, this.minChunkSizeChars, this.minChunkLengthToEmbed, this.maxNumChunks, this.keepSeparator); } } } ``` ##### 1.2.3. 分隔经验: **过细分块的潜在问题** 1. **语义割裂**: 破坏上下文连贯性,影响模型理解 。 2. **计算成本增加**:分块过细会导致向量嵌入和检索次数增多,增加时间和算力开销。 3. **信息冗余与干扰**:碎片化的文本块可能引入无关内容,干扰检索结果的质量,降低生成答案的准确性。 **分块过大的弊端** 1. **信息丢失风险**:过大的文本块可能超出嵌入模型的输入限制,导致关键信息未被有效编码。 2. **检索精度下降**:大块内容可能包含多主题混合,与用户查询的相关性降低,影响模型反馈效果。 | **场景** | **分块策略** | **参数参考** | | ----------- | ---------------------------------- | ---------------- | | 微博/短文本 | 句子级分块,保留完整语义 | 每块100-200字符 | | 学术论文 | 段落级分块,叠加10%重叠 | 每块300-500字符 | | 法律合同 | 条款级分块,严格按条款分隔 | 每块200-400字符 | | 长篇小说 | 章节级分块,过长段落递归拆分为段落 | 每块500-1000字符 | 不要过分指望按照文本主题进行分隔, 因为实战中的资料太多而且没有规律, 根本没办法保证每个chunk是一个完整的主题内容, 哪怕人为干预也很难。 所以实战中往往需要结合资料来决定分割器,大多数情况就是按token数分, 因为没有完美的, 还可以加入人工干预,或者大模型分隔。 ##### 1.2.4. 分块五种策略 以下是 RAG 的五种分块策略: [](https://substackcdn.com/image/fetch/$s_!us2E!,f_auto,q_auto:good,fl_progressive:steep/https%3A%2F%2Fsubstack-post-media.s3.amazonaws.com%2Fpublic%2Fimages%2F92c70184-ba0f-4877-9a55-e4add0e311ad_870x1116.gif) ------ ###### 1.2.4.1. 1)固定大小分块 生成块的最直观和直接的方法是根据预定义的字符、单词或标记数量将文本分成统一的段。 [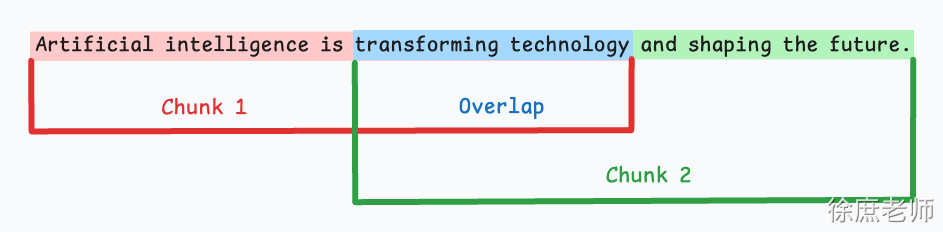](https://substackcdn.com/image/fetch/$s_!RG5y!,f_auto,q_auto:good,fl_progressive:steep/https%3A%2F%2Fsubstack-post-media.s3.amazonaws.com%2Fpublic%2Fimages%2F98c422a0-f0e2-457c-a256-4476a56a601f_943x232.png) 由于直接分割会破坏语义流,因此建议在两个连续的块之间保持一些重叠(上图蓝色部分)。 这很容易实现。而且,由于所有块的大小相同,它简化了批处理。 但有一个大问题。这通常会打断句子(或想法)。因此,重要的信息很可能会分散到不同的块之间。 ------ ###### 1.2.4.2. 2)语义分块 这个想法很简单。 [](https://substackcdn.com/image/fetch/$s_!tmOD!,f_auto,q_auto:good,fl_progressive:steep/https%3A%2F%2Fsubstack-post-media.s3.amazonaws.com%2Fpublic%2Fimages%2Fa6ad83a6-2879-4c77-9e49-393f16577aef_1066x288.gif) - 根据句子、段落或主题部分等有意义的单位对文档进行细分。 - 接下来,为每个片段创建嵌入。 - 假设我从第一个片段及其嵌入开始。 - - 如果第一个段的嵌入与第二个段的嵌入具有较高的余弦相似度,则这两个段形成一个块。 - 这种情况一直持续到余弦相似度显著下降。 - 一旦发生这种情况,我们就开始新的部分并重复。 输出可能如下所示: [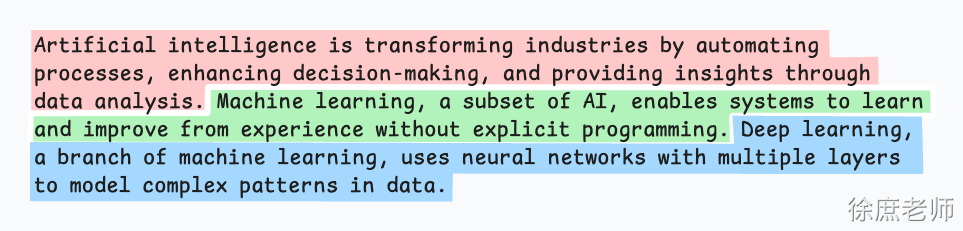](https://substackcdn.com/image/fetch/$s_!sTc2!,f_auto,q_auto:good,fl_progressive:steep/https%3A%2F%2Fsubstack-post-media.s3.amazonaws.com%2Fpublic%2Fimages%2F74037e11-362d-4ea2-8ee2-ee85ab013523_963x231.png) 与固定大小的块不同,这保持了语言的自然流畅并保留了完整的想法。 由于每个块都更加丰富,它提高了检索准确性,进而使 LLM 产生更加连贯和相关的响应。 一个小问题是,它依赖于一个阈值来确定余弦相似度是否显著下降,而这个阈值在不同文档之间可能会有所不同。 ------ ###### 1.2.4.3. 3)递归分块 这也很简单。 [](https://substackcdn.com/image/fetch/$s_!WRuN!,f_auto,q_auto:good,fl_progressive:steep/https%3A%2F%2Fsubstack-post-media.s3.amazonaws.com%2Fpublic%2Fimages%2Ff4009caa-34fc-48d6-8102-3d0f6f2c1386_1066x316.gif) 首先,根据固有分隔符(如段落或章节)进行分块。 接下来,如果每个块的大小超出了预定义的块大小限制,则将其拆分成更小的块。但是,如果块符合块大小限制,则不再进行进一步拆分。 输出可能如下所示: [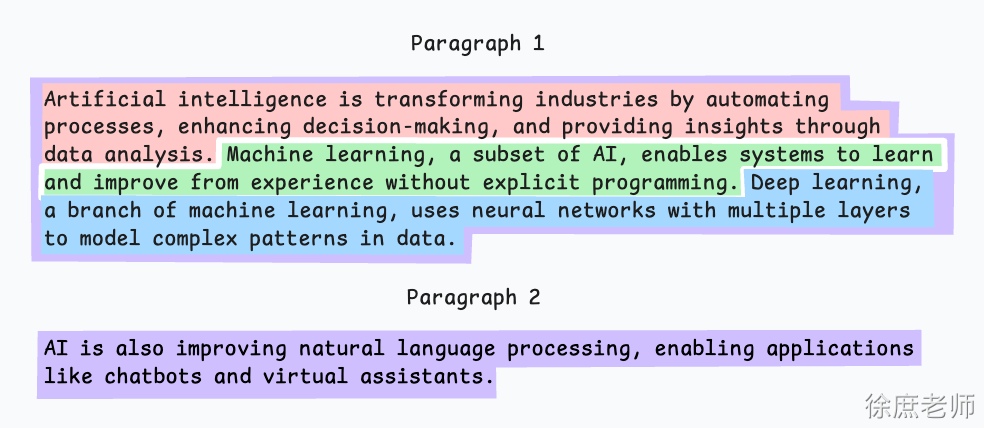](https://substackcdn.com/image/fetch/$s_!5-DV!,f_auto,q_auto:good,fl_progressive:steep/https%3A%2F%2Fsubstack-post-media.s3.amazonaws.com%2Fpublic%2Fimages%2Fb0e40cc1-996f-48f4-9306-781b112536e4_984x428.png) 如上图: - 首先,我们定义两个块(紫色的两个段落)。 - 接下来,第 1 段被进一步分成更小的块。 与固定大小的块不同,这种方法还保持了语言的自然流畅性并保留了完整的想法。 然而,在实施和计算复杂性方面存在一些额外的开销。 ------ ###### 1.2.4.4. 4)基于文档结构的分块 这是另一种直观的方法。 [](https://substackcdn.com/image/fetch/$s_!NtgT!,f_auto,q_auto:good,fl_progressive:steep/https%3A%2F%2Fsubstack-post-media.s3.amazonaws.com%2Fpublic%2Fimages%2Fe8febecd-ee68-42ff-ab06-41a0a3a43cd3_1102x306.gif) 它利用文档的固有结构(如标题、章节或段落)来定义块边界。 这样,它就通过与文档的逻辑部分对齐来保持结构完整性。 输出可能如下所示: [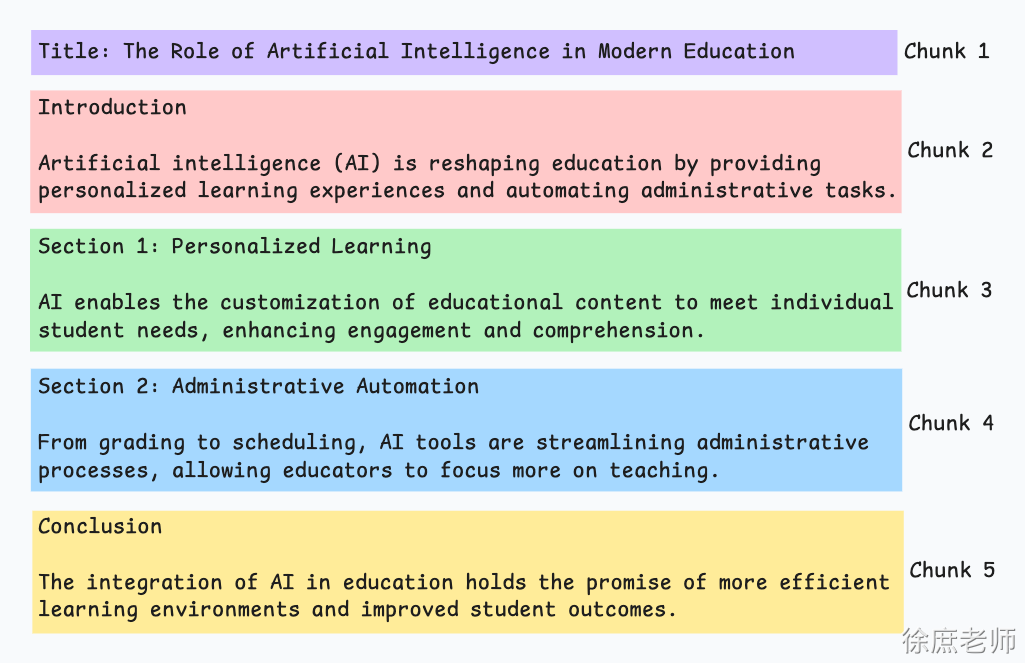](https://substackcdn.com/image/fetch/$s_!9CjT!,f_auto,q_auto:good,fl_progressive:steep/https%3A%2F%2Fsubstack-post-media.s3.amazonaws.com%2Fpublic%2Fimages%2F40bdaf3b-601d-4357-bc7f-89b47f812097_1025x663.png) 也就是说,这种方法假设文档具有清晰的结构,但事实可能并非如此。 此外,块的长度可能会有所不同,可能会超出模型令牌的限制。您可以尝试使用递归拆分进行合并。 ------ ###### 1.2.4.5. 5)基于LLM的分块 [](https://substackcdn.com/image/fetch/$s_!jVmL!,f_auto,q_auto:good,fl_progressive:steep/https%3A%2F%2Fsubstack-post-media.s3.amazonaws.com%2Fpublic%2Fimages%2F4d1b6d60-8956-4030-8525-d899ee61a9d5_1140x198.gif) 既然每种方法都有优点和缺点,为什么不使用 LLM 来创建块呢? 可以提示 LLM 生成语义上孤立且有意义的块。 显然,这种方法将确保较高的语义准确性,因为 LLM 可以理解超越简单启发式方法(用于上述四种方法)的上下文和含义。 唯一的问题是,它是这里讨论的所有五种技术中计算要求最高的分块技术。 此外,由于 LLM 通常具有有限的上下文窗口,因此需要注意这一点。 ------ 每种技术都有其自身的优势和劣势。 我观察到语义分块在很多情况下效果很好,但同样,您需要进行测试。 选择将在很大程度上取决于内容的性质、嵌入模型的功能、计算资源等。 我们很快就会对这些策略进行实际演示。 同时,如果您错过了,昨天我们讨论了构建依赖于成对内容相似性的强大 NLP 系统的技术(RAG 就是其中之一)。 ##### 1.2.5. ContentFormatTransformer 检索到的内容最终会发给大模型, 由该组件决定发送到模型的RAG内容 ```java private static final String DEFAULT_TEXT_TEMPLATE = String.format("%s\n\n%s", TEMPLATE_METADATA_STRING_PLACEHOLDER, TEMPLATE_CONTENT_PLACEHOLDER); ``` 即:假设: - 文本内容:`**"The World is Big and Salvation Lurks Around the Corner"**` - 元数据:`**Map.of("fileName", "xushu.pdf")**` 最终发送给大模型的格式化内容是: ```plain source: xushu.pdf The World is Big and Salvation Lurks Around the Corner ``` 很少会去改, 了解即可 ##### 1.2.6. KeywordMetadataEnriching 使用生成式AI模型从文档内容中提取关键词并将其添加为元数据,为文档添加关键词标签,提升检索精度 ``` new KeywordMetadataEnricher(chatModel, 5); ``` 1. chatModel 需要提取关键字的模型 2. 关键字数量 ```java @Test public void testKeywordMetadataEnricher( @Autowired DashScopeChatModel chatModel, @Value("classpath:rag/terms-of-service.txt") Resource resource) { TextReader textReader = new TextReader(resource); textReader.getCustomMetadata().put("filename", resource.getFilename()); List<Document> documents = textReader.read(); ChineseTokenTextSplitter splitter = new ChineseTokenTextSplitter(); List<Document> apply = splitter.apply(documents); KeywordMetadataEnricher enricher = new KeywordMetadataEnricher(chatModel, 5); apply= enricher.apply(apply); for (Document document : apply) { System.out.println(document.getText()); System.out.println(document.getText().length()); } apply.forEach(System.out::println); } ``` 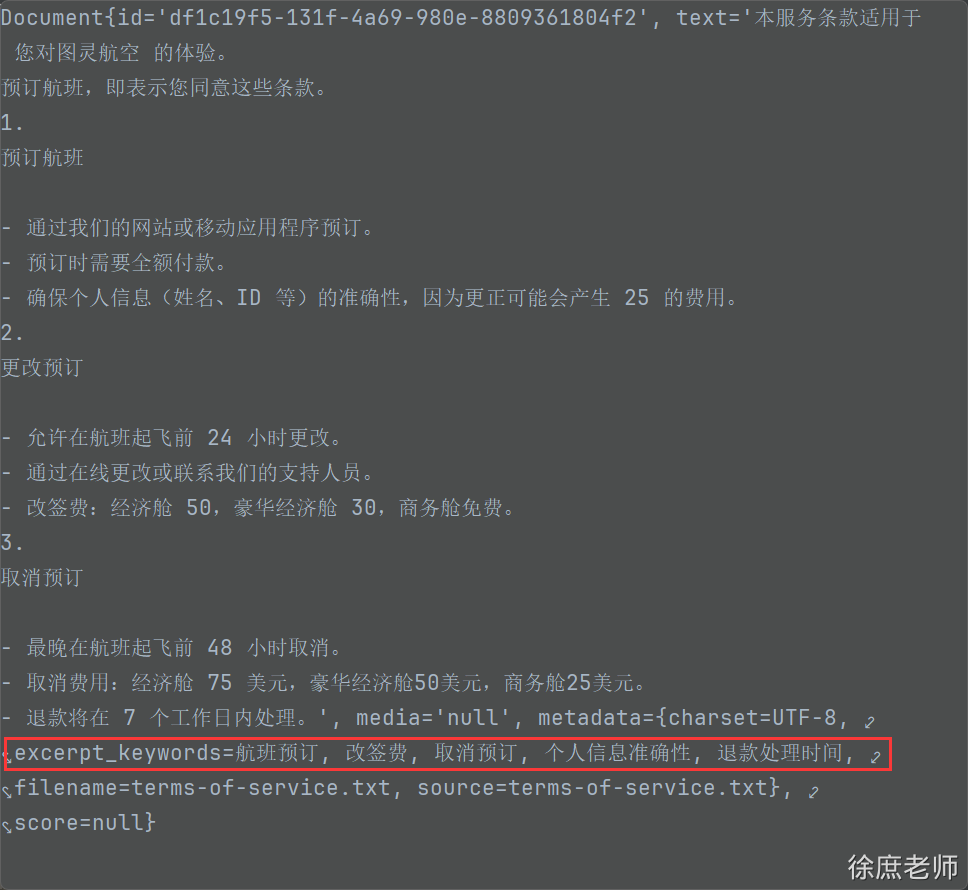 **作用**: 帮助做元数据过滤。 并不参数向量数据库的相似性检索 **问题**: KeywordMetadataEnriching 生成出来的关键字无法进行元数据过滤 在SpringAi1.0.1 中已支持KeywordMetadataEnriching 自定义模版: - Enhanced KeywordMetadataEnricher with custom template functionality to provide more flexible metadata enrichment capabilities [2082a59](https://github.com/spring-projects/spring-ai/commit/2082a594a40b6552b57cdbc51cae7c2112efd0f9) ##### 1.2.7. SummaryMetadataEnricher 使用生成式AI模型为文档创建摘要并将其添加为元数据。它可以为当前文档以及相邻文档(前一个和后一个)生成摘要,以提供更丰富的上下文信息 。 场景: 有顺序关联的文档,比如西游记小说的RAG,‘三打白骨精的故事以及后续剧情’。 - **技术文档**:前后章节有依赖关系 - **教程内容**:步骤之间有逻辑顺序 - **法律文档**:条款之间有关联性 - **学术论文**:章节间有逻辑递进 ```java @Test public void testSummaryMetadataEnricher( @Autowired DashScopeChatModel chatModel, @Value("classpath:rag/terms-of-service.txt") Resource resource) { TextReader textReader = new TextReader(resource); textReader.getCustomMetadata().put("filename", resource.getFilename()); List<Document> documents = textReader.read(); ChineseTokenTextSplitter splitter = new ChineseTokenTextSplitter(); List<Document> apply = splitter.apply(documents); SummaryMetadataEnricher enricher = new SummaryMetadataEnricher(chatModel, List.of(SummaryMetadataEnricher.SummaryType.PREVIOUS, SummaryMetadataEnricher.SummaryType.CURRENT, SummaryMetadataEnricher.SummaryType.NEXT)); apply = enricher.apply(apply); } ``` Document{id='66e859b2-f719-43ca-8466-d97f1880b530', text='更改预订 \- 允许在航班起飞前 24 小时更改。 \- 通过在线更改或联系我们的支持人员。 \- 改签费:经济舱 50,豪华经济舱 30,商务舱免费。 3. 取消预订 \- 最晚在航班起飞前 48 小时取消。', media='null', metadata={prev_section_summary=The key topics and entities of the section include: 1. **Service Terms Agreement**: The terms apply to the user's experience with 图灵航空 (Turing Airlines). 2. **Acceptance of Terms**: By booking a flight, the user agrees to these terms. 3. **Flight Booking**: \- Bookings can be made via the website or mobile application. \- Full payment is required at the time of booking. \- Personal information must be accurate to avoid a correction fee of 25 units. Entities: \- 图灵航空 (Turing Airlines) \- Website and mobile application \- Flight bookings \- Payment process \- Personal information (name, ID), charset=UTF-8, filename=terms-of-service.txt, source=terms-of-service.txt, section_summary=The key topics and entities of the section are as follows: 1. **更改预订 (Modifying Reservations)**: \- Allowed within 24 hours before the flight departure. \- Can be done either online or by contacting support personnel. \- Change fees: \- Economy class: 50 \- Premium economy class: 30 \- Business class: Free 2. **取消预订 (Canceling Reservations)**: \- Must be done at least 48 hours before the flight departure. Summary: The section outlines the policies for modifying and canceling reservations, including timeframes and associated fees for different classes (economy, premium economy, and business)., next_section_summary=The section outlines the **cancellation fees** for different cabin classes and the **refund processing time**. Key entities include: \- Cancellation fees: **Economy class (75 USD)**, **Premium Economy class (50 USD)**, **Business class (25 USD)**. \- Refund processing time: **7 business days**.}, score=null} ###### #### 1.3. 文本向量化 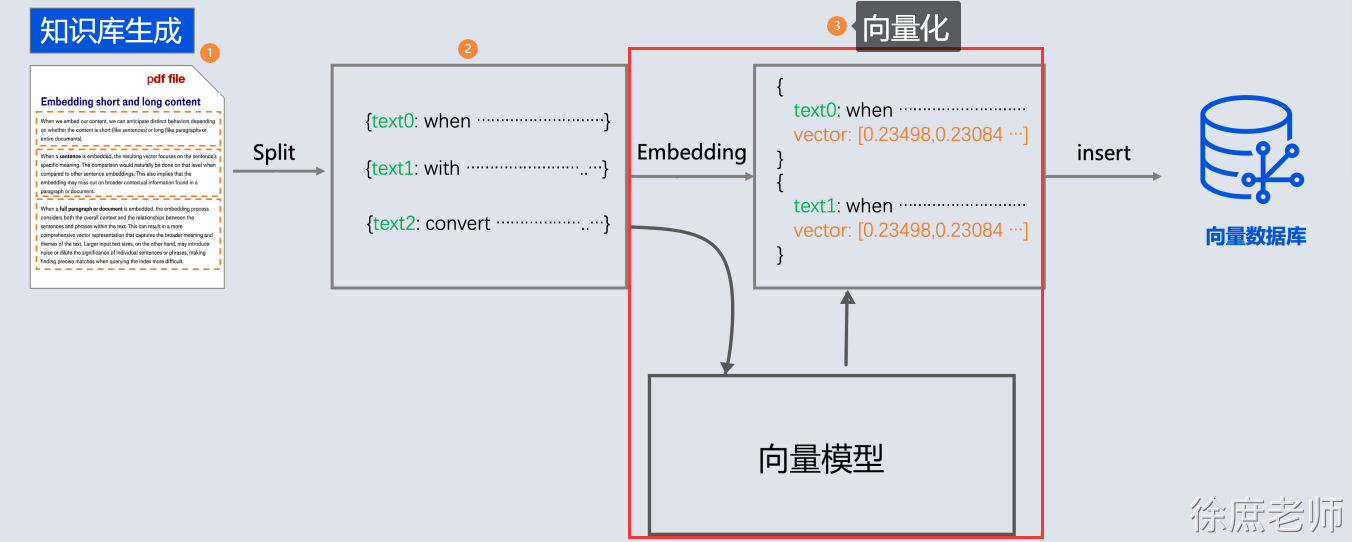 向量化存储之前在“文本向量化”介绍了, 就是通过向量模型库进行向量化 代码: 依然通过Qwen向量模型进行向量化: 将第分割的chunk进行向量化 ```java @Test public void testTokenTextSplitter( @Autowired DashScopeEmbeddingModel embeddingModel, @Value("classpath:rag/terms-of-service.txt") Resource resource) { TextReader textReader = new TextReader(resource); textReader.getCustomMetadata().put("filename", resource.getFilename()); List<Document> documents = textReader.read(); ChineseTokenTextSplitter splitter = new ChineseTokenTextSplitter(100); List<Document> apply = splitter.apply(documents); for (Document document : apply) { float[] embedded = embeddingModel.embed(document); } } ``` #### 1.4. 存储向量 但是我告诉你其实 , 我们通过向量数据库存储document, 可以省略向量化这一步, 向量数据库会在底层自动完成向量化 ```java for (Document document : apply) { float[] embedded = embeddingModel.embed(document); } // 替换为: 写入=向量化+存储 vectorStore.write(apply); ``` 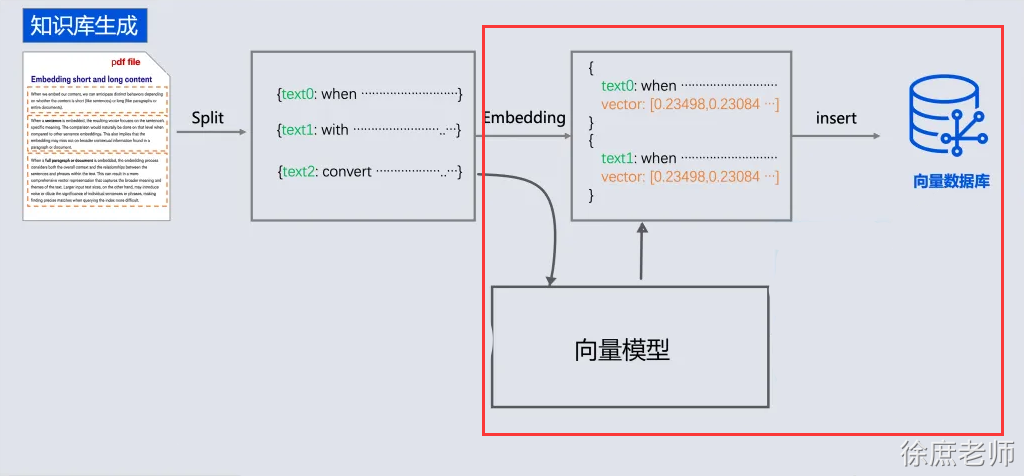 ```java @Test public void testTokenTextSplitter( @Autowired VectorStore vectorStore, @Value("classpath:rag/terms-of-service.txt") Resource resource) { TextReader textReader = new TextReader(resource); textReader.getCustomMetadata().put("filename", resource.getFilename()); List<Document> documents = textReader.read(); ChineseTokenTextSplitter splitter = new ChineseTokenTextSplitter(100); List<Document> apply = splitter.apply(documents); vectorStore.add(apply); } ``` #### 1.5. 向量数据库检索 代码: 需要先将文本进行向量化, 然后去向量数据库查询, ```java // 3. 相似性查询 SearchRequest searchRequest = SearchRequest .builder().query("预定航班") .topK(5) .similarityThreshold(0.3) .build(); List<Document> results = vectorStore.similaritySearch(searchRequest); // 4.输出 System.out.println(results); ``` 完整代码: ```java @Test public void testRag( @Autowired VectorStore vectorStore, @Value("classpath:rag/terms-of-service.txt") Resource resource) { // 1. 读取 TextReader textReader = new TextReader(resource); textReader.getCustomMetadata().put("filename", resource.getFilename()); List<Document> documents = textReader.read(); // 2.分隔 ChineseTokenTextSplitter splitter = new ChineseTokenTextSplitter(100); List<Document> apply = splitter.apply(documents); // 3. 向量化+写入 vectorStore.write(apply); // 3. 相似性查询 SearchRequest searchRequest = SearchRequest .builder().query("退费需要多少费用") .topK(5) .similarityThreshold(0.3) .build(); List<Document> results = vectorStore.similaritySearch(searchRequest); // 4.输出 System.out.println(results); } ``` #### 1.6. 对话阶段 如果结合ChatClient 可以直接将检索和Advisor整合在一起 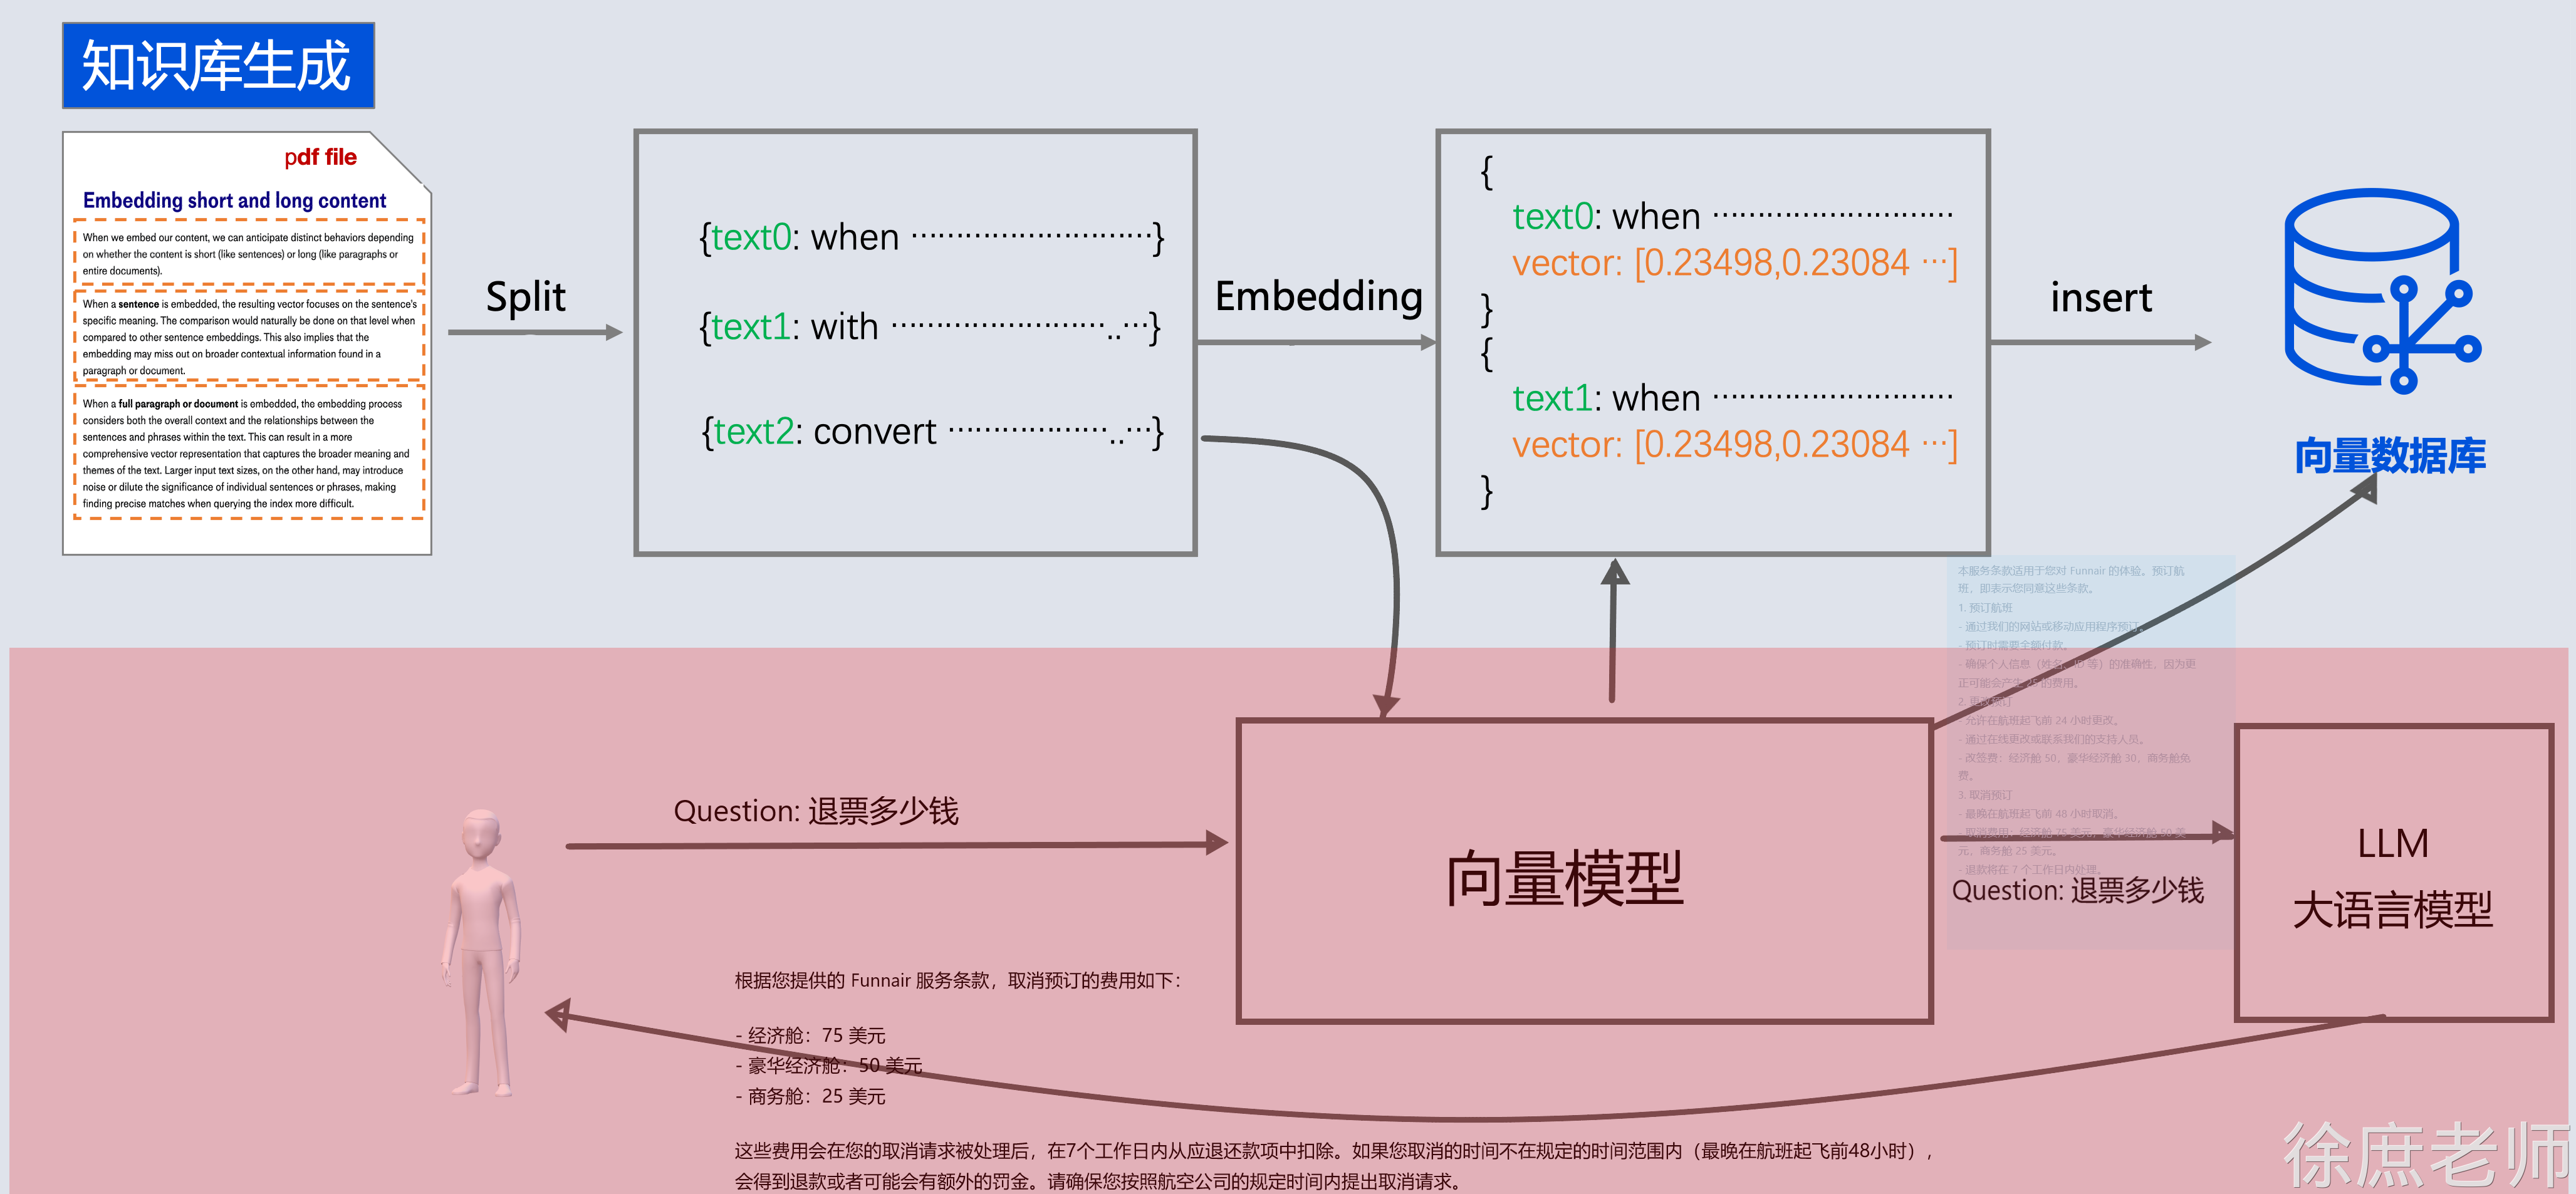 ```java @Test public void testRagToLLM( @Autowired VectorStore vectorStore, @Autowired DashScopeChatModel chatModel, @Value("classpath:rag/terms-of-service.txt") Resource resource) { TextReader textReader = new TextReader(resource); textReader.getCustomMetadata().put("filename", resource.getFilename()); List<Document> documents = textReader.read(); ChineseTokenTextSplitter splitter = new ChineseTokenTextSplitter(100); List<Document> apply = splitter.apply(documents); vectorStore.write(apply); // 3. 相似性查询 ChatClient chatClient = ChatClient.builder(chatModel) .build(); String message="退费需要多少费用?"; String content = chatClient.prompt().user(message) .advisors( new SimpleLoggerAdvisor(), QuestionAnswerAdvisor.builder(vectorStore) .searchRequest( SearchRequest .builder().query(message) .topK(5) .similarityThreshold(0.3) .build()) .build() ).call().content(); System.out.println(content); } ``` SpringAI整个过程原理: 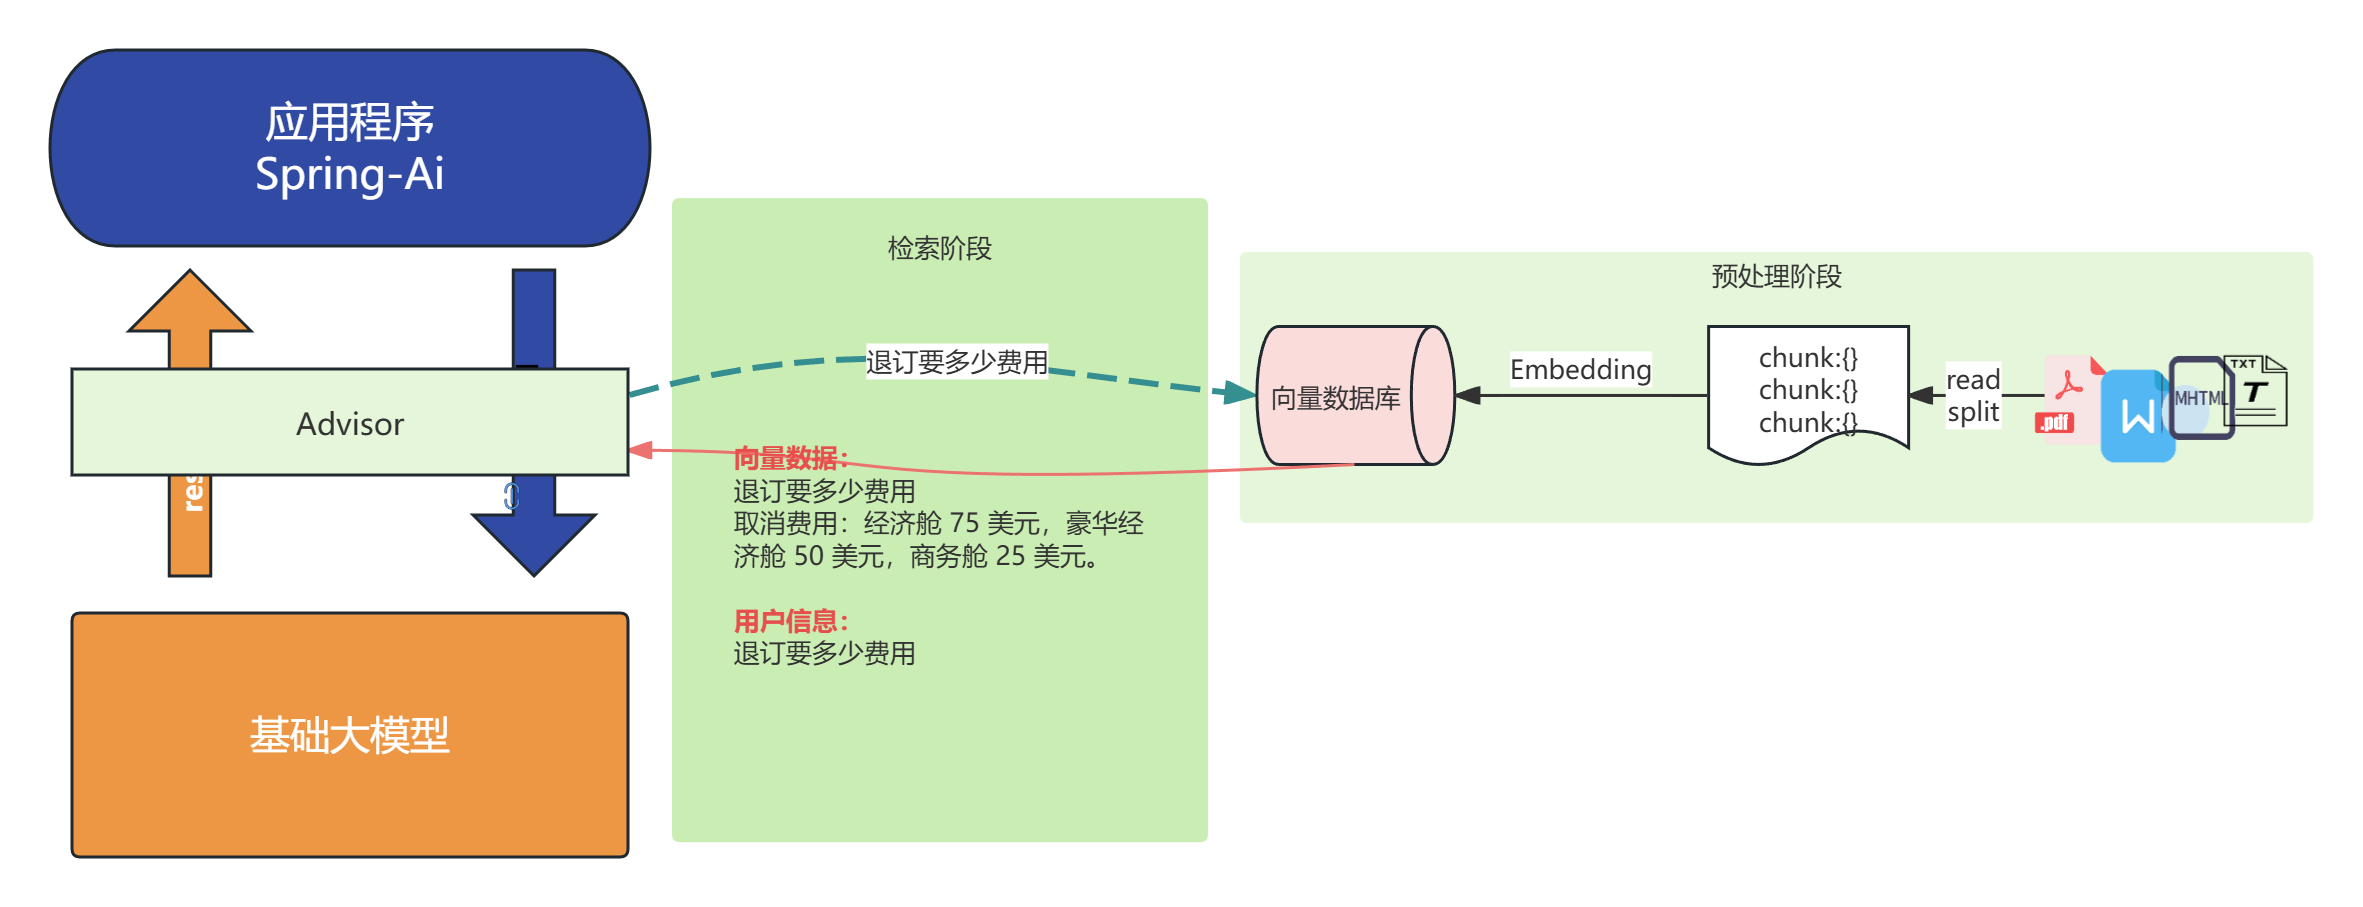 ### 提升检索精度—rerank(重排序) #### 为什么需要 rerank 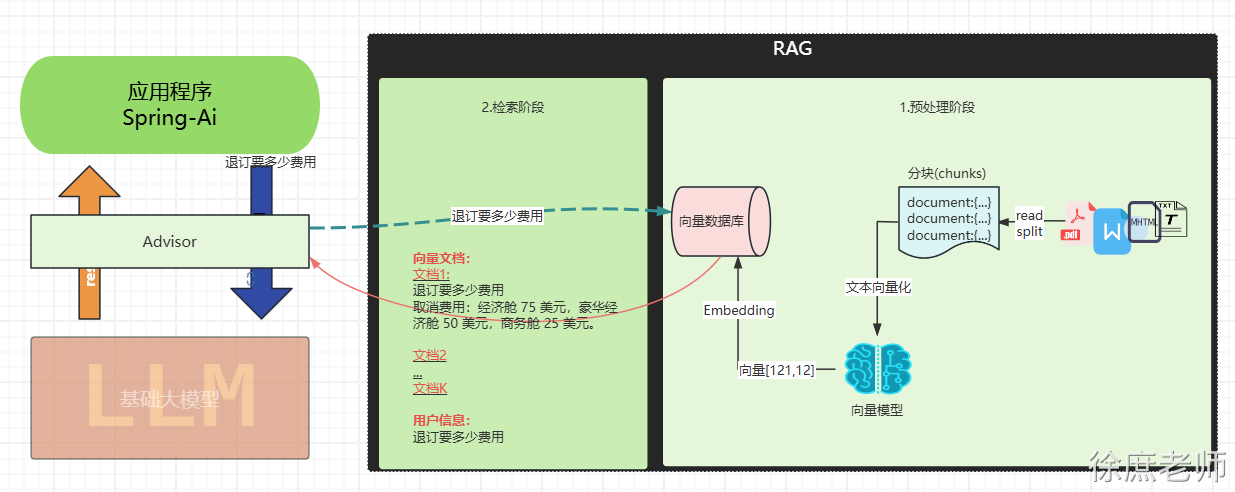 传统的向量检索存在几个关键问题: **语义相似度的局限性**:向量检索主要基于余弦相似度等数学计算,但相似的向量表示不一定意味着内容一定绝对相关。单纯的向量相似度无法充分理解查询的真实意图和上下文。 **排序质量不佳**:初始检索的排序往往不是最优的,可能将不太相关的文档排在前面,尤其性能差的向量模型更为明显。 **上下文理解缺失**:传统检索(完全依赖向量数据库和向量模型)缺乏对查询和文档完整上下文的深度理解,容易出现语义漂移问题。 #### 重排序: 主要在检索阶段进行改进: 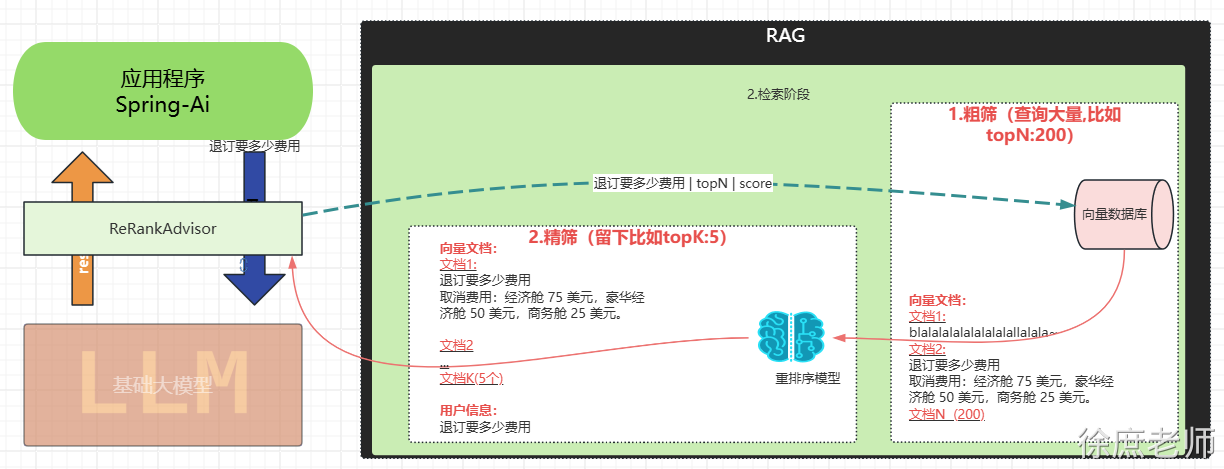 **二阶段优化架构**:rerank 采用"粗排+精排"的两阶段架构。第一阶段快速检索大量候选文档,第二阶段使用专门的重排序模型进行精确评分。 **专业化模型**:重排序模型(如 `**gte-rerank-hybrid**`)专门针对文档相关性评估进行训练,能够更准确地计算查询与文档的语义匹配度。 **分数阈值过滤**:通过设置最小分数阈值,可以过滤掉低质量的文档,确保只有高相关性的内容被保留。在实现中可以看到这个过滤逻辑: **动态参数调整**:支持根据实际效果动态调整 `**topN**` 等参数,优化最终返回的文档数量和质量。 #### 代码 说明: 为了更好的测试 1. 我这里用的事ollama一个性能较差的向量模型, 这样才能更好体现他瞎排的顺序 2. 我分隔的比较小new ChineseTokenTextSplitter(80,10,5,10000,true);为了有更多的document; 3. 粗排需要设置数量较大的topk(建议200) , 精排(默认topN5) ```java @SpringBootTest public class RerankTest { @BeforeEach public void init( @Autowired VectorStore vectorStore, @Value("classpath:rag/terms-of-service.txt") Resource resource) { // 读取 TextReader textReader = new TextReader(resource); textReader.getCustomMetadata().put("filename", resource.getFilename()); List<Document> documents = textReader.read(); // 分隔 ChineseTokenTextSplitter splitter = new ChineseTokenTextSplitter(80,10,5,10000,true); List<Document> apply = splitter.apply(documents); // 存储向量(内部会自动向量化) vectorStore.add(apply); } @TestConfiguration static class TestConfig { @Bean public VectorStore vectorStore(OllamaEmbeddingModel embeddingModel) { return SimpleVectorStore.builder(embeddingModel).build(); } } @Test public void testRerank( @Autowired DashScopeChatModel dashScopeChatModel, @Autowired VectorStore vectorStore, @Autowired DashScopeRerankModel rerankModel) { ChatClient chatClient = ChatClient.builder(dashScopeChatModel) .build(); RetrievalRerankAdvisor retrievalRerankAdvisor = new RetrievalRerankAdvisor(vectorStore, rerankModel , SearchRequest.builder().topK(200).build()); String content = chatClient.prompt().user("退票费用") .advisors(retrievalRerankAdvisor) .call() .content(); System.out.println(content); } } ``` 重排前: 排第一的doucment跟退费并没有关系:  重排后: 排第一的document:  #### ## 《基于航空智能客服+RAG》实战 1. 配置向量数据库 2. 写入数据(Embedding) 3. 查询 [📎terms-of-service.txt](https://www.yuque.com/attachments/yuque/0/2025/txt/22309163/1752848013056-c5d9eec3-e48d-4888-bfe9-b64ebab77f81.txt) ```plain 本服务条款适用于您对 Funnair 的体验。预订航班,即表示您同意这些条款。 1. 预订航班 - 通过我们的网站或移动应用程序预订。 - 预订时需要全额付款。 - 确保个人信息(姓名、ID 等)的准确性,因为更正可能会产生 25 的费用。 2. 更改预订 - 允许在航班起飞前 24 小时更改。 - 通过在线更改或联系我们的支持人员。 - 改签费:经济舱 50,豪华经济舱 30,商务舱免费。 3. 取消预订 - 最晚在航班起飞前 48 小时取消。 - 取消费用:经济舱 75 美元,豪华经济舱 50 美元,商务舱 25 美元。 - 退款将在 7 个工作日内处理。 ``` #### 向量数据库 ```java @Bean public VectorStore vectorStore(EmbeddingModel embeddingModel) { return new SimpleVectorStore(embeddingModel); } ``` 写入向量数据库 ```java @Bean CommandLineRunner ingestTermOfServiceToVectorStore(EmbeddingModel embeddingModel, VectorStore vectorStore, @Value("classpath:rag/terms-of-service.txt") Resource termsOfServiceDocs) { return args -> { vectorStore.write( // 3.写入 new TokenTextSplitter().transform( // 2.转换 new TextReader(termsOfServiceDocs).read()) // 1.读取 ); }; } ``` **配置Advisor:** new QuestionAnswerAdvisor(vectorStore, SearchRequest.defaults()), // RAG `QuestionAnswerAdvisor`可以在用户发起的提问时,先向数据库查询相关的文档,再把相关的文档拼接到用户的提问中,再让模型生成答案。那就是`RAG`的实现了。 ```java this.chatClient = chatClientBuilder .defaultSystem(""" 您是“图灵”航空公司的客户聊天支持代理。请以友好、乐于助人且愉快的方式来回复。 您正在通过在线聊天系统与客户互动。 在提供有关预订或取消预订的信息之前,您必须始终 从用户处获取以下信息:预订号、客户姓名。 在询问用户之前,请检查消息历史记录以获取此信息。 在更改或退订之前,请先获取预订信息待用户回复确定之后才进行更改或退订的function-call。 请讲中文。 今天的日期是 {current_date}. """) .defaultAdvisors( new PromptChatMemoryAdvisor(chatMemory), new QuestionAnswerAdvisor(vectorStore, SearchRequest.defaults()), // RAG new LoggingAdvisor()) .defaultFunctions("getBookingDetails", "changeBooking", "cancelBooking") // FUNCTION CALLING .build(); ``` #### #### 文档嵌入 在上面的`VectorStore`配置中我们提供了`EmbeddingModel`,调用`vectorStore.add(splitDocuments)`底层会把文档给`EmbeddingModel`把文本变成向量然后再存入向量数据库。 ```java private final VectorStore vectorStore; /** * 嵌入文件 * * @param file 待嵌入的文件 * @return 是否成功 */ @SneakyThrows @PostMapping("embedding") public Boolean embedding(@RequestParam MultipartFile file) { // 从IO流中读取文件 TikaDocumentReader tikaDocumentReader = new TikaDocumentReader(new InputStreamResource(file.getInputStream())); // 将文本内容划分成更小的块 List<Document> splitDocuments = new TokenTextSplitter() .apply(tikaDocumentReader.read()); // 存入向量数据库,这个过程会自动调用embeddingModel,将文本变成向量再存入。 vectorStore.add(splitDocuments); return true; } ``` #### 文档查询 调用`vectorStore.similaritySearch(query)`时同样会先把用户的提问给`EmbeddingModel`,将提问变成向量,然后与向量数据库中的文档向量进行相似度计算(cosine值)。 要注意:此时向量数据库不会回答用户的提问。要回答用户的提问需要指定advisor ```java /** * 查询向量数据库 * * @param query 用户的提问 * @return 匹配到的文档 */ @GetMapping("query") public List<Document> query(@RequestParam String query) { return vectorStore.similaritySearch(query); } ``` 指定advisor ```java return chatClient.prompt() .user(prompt) // 2. QuestionAnswerAdvisor会在运行时替换模板中的占位符`question_answer_context`,替换成向量数据库中查询到的文档。此时的query=用户的提问+替换完的提示词模板; .advisors(new QuestionAnswerAdvisor(vectorStore, prompt)) .stream() // 3. query发送给大模型得到答案 .content() .map(chatResponse -> ServerSentEvent.builder(chatResponse) .event("message") .build()); ``` ## 《基于RAG技术的个人知识库AI问答系统》实战 **不对外开放** 前端(提供): Vue 3 + TypeScript + Vite 后端: - Spring Boot: 3.4.2 - JDK: 17 - spring-ai: 1.0.0 GA - spring-ai-alibaba: 1.0.0.2 - maven: 3.9.6 - Mysql 5.7 - Milvus(向量存储) - LLM使用的通义千问 - 对象存储使用阿里云OSS (文生图模型) https://www.yuque.com/geren-t8lyq/ncgl94/ndw2tv9u6bu3zo2h?singleDoc# 《基于RAG技术的个人知识库AI问答系统》实战 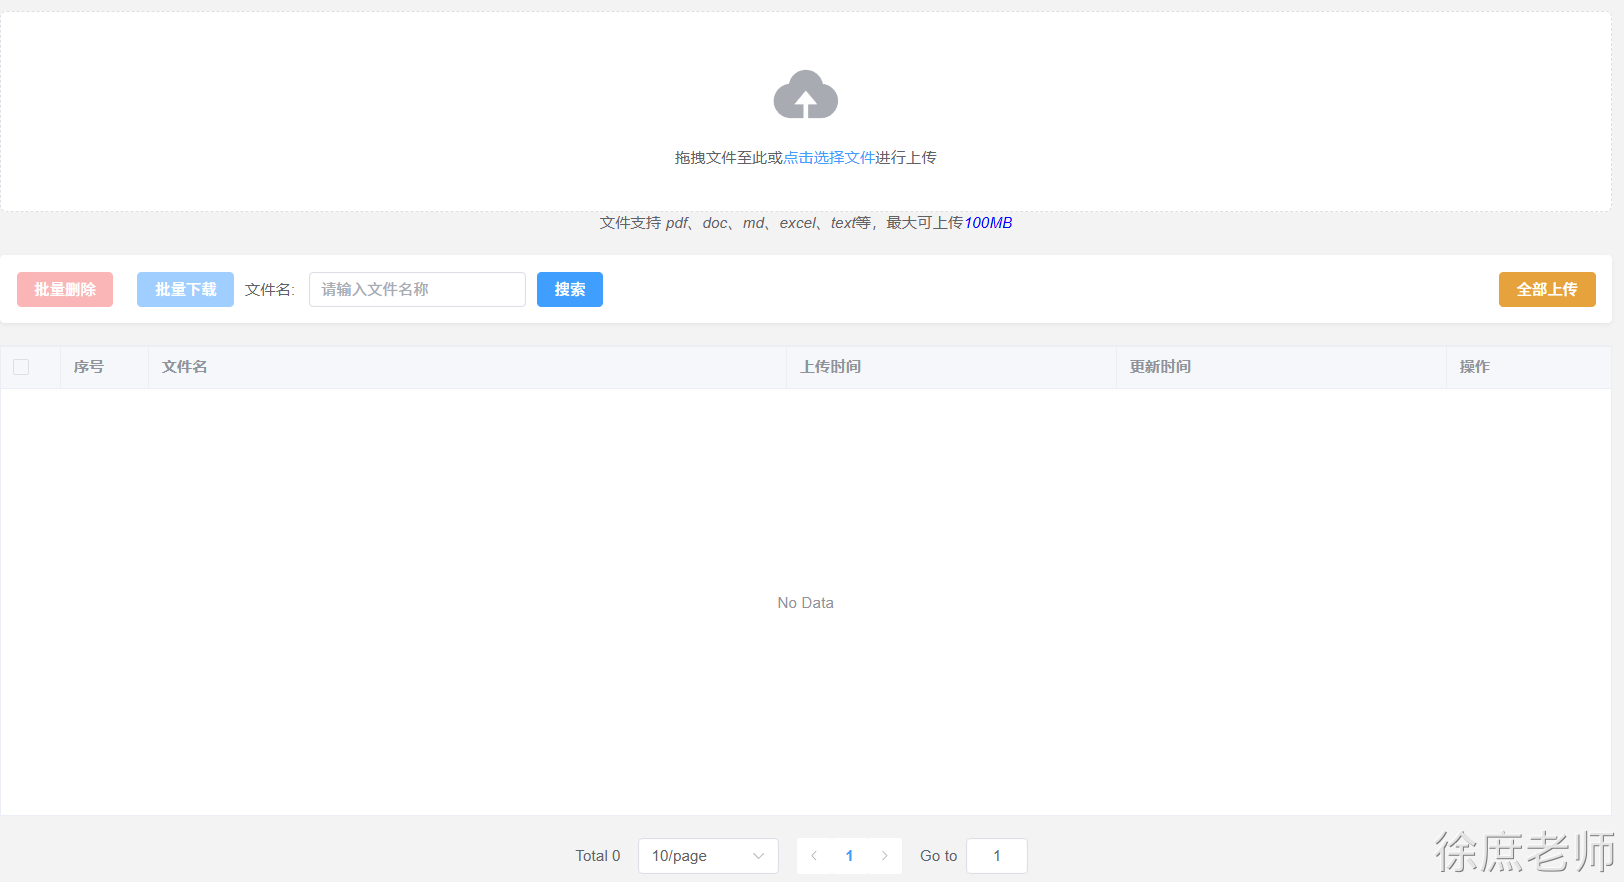 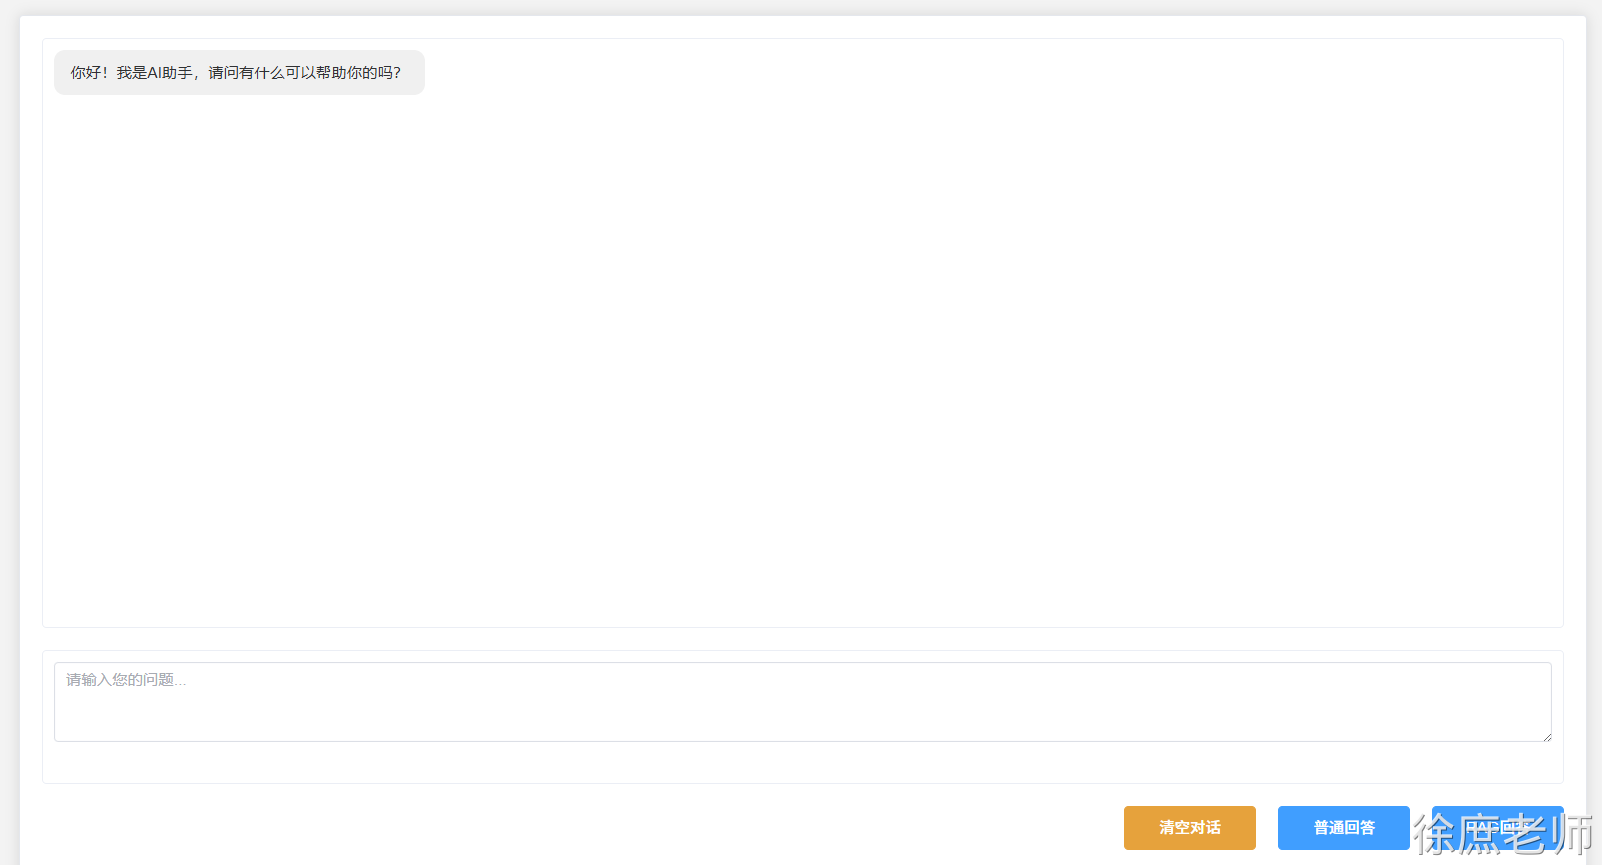 ## 模型RAG评测 ### 模型理解力评测 RAG 之所以广受欢迎,是因为它(**基于检索到的真实资料**)能够减少幻觉。然而, RAG 并不一定意味着幻觉会被完全消除。 #### 现实中出现事实性幻觉的常见场景 1. **上下文提供了明确事实,但模型未读取或匹配,凭常识胡乱生成。** 2. **模型“看”到的背景信息有限,但它仍然自信地“虚构”细节回答问题。** **问:马云在阿里巴巴创办初期遇到了哪些具体困难?** **RAG:**马云,著名企业家,阿里巴巴创始人。 **答A(幻觉):** 马云在阿里巴巴创立初期曾因办公楼失火导致数据全部丢失,团队一度陷入危机。 1. **多个相似案例混淆,模型输出了正确格式但内容错误的事实** 怎么你确定是否有这些问题: **事实性的评估** 评估器主要用于以下场景: 1. **开发和测试阶段**:在集成测试中验证 RAG 系统的质量 2. **批量质量检查**:对一批历史对话进行离线评估 3. **系统监控**:定期抽样评估生产环境中的对话质量,比如每100次对话评估1次 4. **模型验证**:当更换 AI 模型或调整 RAG 配置时,用于验证新配置的效果 ```java @SpringBootTest public class FactCheckingTest { @Test void testFactChecking(@Autowired OllamaChatModel chatModel) { // 创建 FactCheckingEvaluator var factCheckingEvaluator = new FactCheckingEvaluator(ChatClient.builder(chatModel)); // 示例上下文和声明 String context = "地球是仅次于太阳的第三颗行星,也是已知唯一孕育生命的天文物体。"; String claim = "地球是距离太阳第三大行星。"; // 创建 EvaluationRequest EvaluationRequest evaluationRequest = new EvaluationRequest(context, Collections.emptyList(), claim); // 执行评估 EvaluationResponse evaluationResponse = factCheckingEvaluator.evaluate(evaluationRequest); Assertions.assertTrue(evaluationResponse.isPass(), "The claim should not be supported by the context"); } } ``` 解决: - 高风险领域(医疗、法律、金融等)必须进行事实性幻觉定期评估 - **限定上下文范围**:通过系统提示词让模型明确只能在指定背景或文档内容中作答,禁止引用未检索到的信息。 - **"回答不确定"机制** - **调整分数、定义精确RAG相似性搜索能力** ### RAG幻觉评测 当我们发现大模型回答的内容并没有按照检索的documents进行有效回答, 就可以通过这种方式进行测试,评估 AI 生成的响应的事实准确性。该评估器通过验证给定的语句(responseContent)是否在逻辑上得到提供的上下文(文档)的支持,帮助检测并减少 AI 输出中的错觉。 “responseContent”和“document”将提交给人工智能模型进行评估。目前已有更小、更高效的人工智能模型专门用于此目的,例如 Bespoke 的 Minicheck,与 GPT-4 等旗舰模型相比,它有助于降低执行这些检查的成本。Minicheck 也可通过 Ollama 使用。 **什么时候需要用到:** - 验证已构建的RAG系统的响应质量 - 在集成测试中自动化质量检查 - 调试和优化RAG配置时评估效果 ```java @SpringBootTest public class RagEvalTest { @Test public void testRag( @Autowired VectorStore vectorStore, @Autowired DashScopeChatModel dashScopeChatModel) { List<Document> documents = List.of( new Document(""" 1. 预订航班 - 通过我们的网站或移动应用程序预订。 - 预订时需要全额付款。 - 确保个人信息(姓名、ID 等)的准确性,因为更正可能会产生 25 的费用。 """), new Document(""" 2. 更改预订 - 允许在航班起飞前 24 小时更改。 - 通过在线更改或联系我们的支持人员。 - 改签费:经济舱 50,豪华经济舱 30,商务舱免费。 """), new Document(""" 3. 取消预订 - 最晚在航班起飞前 48 小时取消。 - 取消费用:经济舱 75 美元,豪华经济舱50美元,商务舱25美元。 - 退款将在 7 个工作日内处理。 """)); vectorStore.add(documents); RetrievalAugmentationAdvisor retrievalAugmentationAdvisor = RetrievalAugmentationAdvisor.builder() .documentRetriever(VectorStoreDocumentRetriever.builder() .vectorStore(vectorStore) .build()) .build(); String query = "退票费用"; ChatResponse chatResponse = ChatClient.builder(dashScopeChatModel) .build().prompt(query).advisors(retrievalAugmentationAdvisor).call().chatResponse(); EvaluationRequest evaluationRequest = new EvaluationRequest( // The original user question query, // The retrieved context from the RAG flow chatResponse.getMetadata().get(RetrievalAugmentationAdvisor.DOCUMENT_CONTEXT), // The AI model's response chatResponse.getResult().getOutput().getText() ); RelevancyEvaluator evaluator = new RelevancyEvaluator(ChatClient.builder(dashScopeChatModel)); EvaluationResponse evaluationResponse = evaluator.evaluate(evaluationRequest); System.out.println(evaluationResponse); System.out.println(chatResponse.getResult().getOutput().getText()); } } ```  ``` query = "我叫什么名字"; ```  ## 观测性 ### 为什么Spring AI应用急需可观测性? #### AI服务成本失控的痛点 在企业级AI应用中,使用DeepSeek、OpenAI、Google Gemini或Azure OpenAI等服务时,成本控制是一个严峻挑战: - • **Token消耗不透明**:无法精确了解每次AI调用的成本 - • **费用增长失控**:大规模应用中,AI服务费用可能呈指数级增长 - • **性能瓶颈难定位**:AI调用链路复杂,问题排查困难 - • **资源使用不合理**:缺乏数据支撑的优化决策 #### Spring AI可观测性的价值 Spring AI的可观测性功能为这些痛点提供了完美解决方案: - • ✅ **精准Token监控**:实时追踪输入/输出Token消耗,精确到每次调用 - • ✅ **智能成本控制**:基于使用统计制定成本优化策略 - • ✅ **深度性能分析**:识别AI调用瓶颈,优化响应时间 - • ✅ **完整链路追踪**:端到端记录请求在Spring AI应用中的完整流转 ### 实战演练:构建可观测的Spring AI翻译应用 #### 第一步:Spring AI项目初始化 在start.spring.io[1]创建Spring Boot项目,集成Spring AI核心依赖: **Maven依赖配置(Spring AI BOM管理):** ```plain <!--百炼--> <dependency> <groupId>com.alibaba.cloud.ai</groupId> <artifactId>spring-ai-alibaba-starter-dashscope</artifactId> </dependency> <!-- Spring Boot Actuator 监控 --> <dependency> <groupId>org.springframework.boot</groupId> <artifactId>spring-boot-starter-actuator</artifactId> </dependency> <!--web--> <dependency> <groupId>org.springframework.boot</groupId> <artifactId>spring-boot-starter-web</artifactId> </dependency> ``` #### 第二步:Spring AI客户端配置 **主应用类配置:** ```plain @SpringBootApplication publicclassSpringAiTranslationApplication { publicstaticvoidmain(String[] args) { SpringApplication.run(SpringAiTranslationApplication.class, args); } @Bean public ChatClient chatClient(ChatClient.Builder builder) { return builder.build(); } } ``` **Spring AI配置文件:** ```plain # Spring AI 可观测性配置 management: endpoints: web: exposure: include:"*" endpoint: health: show-details:always metrics: export: prometheus: enabled:true spring: threads: virtual: enabled:true ai: deepseek: api-key:${DEEPSEEK_API_KEY} chat: options: model:deepseek-chat temperature: 0.8 ``` **环境变量设置:** export DEEPSEEK_API_KEY=your-deepseek-api-key #### 第三步:构建Spring AI翻译服务 **智能翻译控制器:** ```java @RestController @RequestMapping("/api/v1") @RequiredArgsConstructor @Slf4j public class SpringAiTranslationController { private final ChatModel chatModel; @PostMapping("/translate") public TranslationResponse translate(@RequestBody TranslationRequest request) { log.info("Spring AI翻译请求: {} -> {}", request.getSourceLanguage(), request.getTargetLanguage()); String prompt= String.format( "作为专业翻译助手,请将以下%s文本翻译成%s,保持原文的语气和风格:\n%s", request.getSourceLanguage(), request.getTargetLanguage(), request.getText() ); String translatedText= chatModel.call(prompt); return TranslationResponse.builder() .originalText(request.getText()) .translatedText(translatedText) .sourceLanguage(request.getSourceLanguage()) .targetLanguage(request.getTargetLanguage()) .timestamp(System.currentTimeMillis()) .build(); } } @Data @NoArgsConstructor @AllArgsConstructor @Builder class TranslationRequest { private String text; private String sourceLanguage; private String targetLanguage; } @Data @NoArgsConstructor @AllArgsConstructor @Builder class TranslationResponse { private String originalText; private String translatedText; private String sourceLanguage; private String targetLanguage; private Long timestamp; } ``` #### 第四步:Spring AI翻译API测试 ```plain curl -X POST http://localhost:8080/api/v1/translate -H "Content-Type: application/json" -d '{ "text": "Spring AI makes AI integration incredibly simple and powerful", "sourceLanguage": "英语", "targetLanguage": "中文" }' # 响应示例 { "originalText": "Spring AI makes AI integration incredibly simple and powerful", "translatedText": "Spring AI让AI集成变得极其简单而强大", "sourceLanguage": "英语", "targetLanguage": "中文", "timestamp": 1704067200000 } ``` ### Spring AI监控指标深度解析 #### 核心指标1:Spring AI操作性能监控 **指标端点**:`/actuator/metrics/spring.ai.chat.client` ```plain { "name":"spring.ai.chat.client.operation", "description":"Spring AI ChatClient操作性能指标", "baseUnit":"seconds", "measurements":[ { "statistic":"COUNT", "value":15 }, { "statistic":"TOTAL_TIME", "value":8.456780293 }, { "statistic":"MAX", "value":2.123904083 } ], "availableTags":[ { "tag":"gen_ai.operation.name", "values":["framework"] }, { "tag":"spring.ai.kind", "values":["chat_client"] } ] } ``` **业务价值**: - • 监控Spring AI翻译服务调用频次 - • 分析Spring AI响应时间分布 - • 识别Spring AI性能瓶颈 #### 核心指标2:Spring AI Token使用量精准追踪 **指标端点**:`/actuator/metrics/gen_ai.client.token.usage` ```plain { "name":"gen_ai.client.token.usage", "description":"Spring AI Token使用量统计", "measurements":[ { "statistic":"COUNT", "value":1250 } ], "availableTags":[ { "tag":"gen_ai.response.model", "values":["deepseek-chat"] }, { "tag":"gen_ai.request.model", "values":["deepseek-chat"] }, { "tag":"gen_ai.token.type", "values":[ "output", "input", "total" ] } ] } ``` **成本控制价值**: - • 精确计算Spring AI服务成本 - • 优化Prompt设计降低Token消耗 - • 制定基于使用量的预算策略 ## Agent应用 什么是ai agent: 你给个任务,它自己拆分、规划、调用资源、执行链路,直到返回结果。 你给个任务,它自己规划(根据你指定的规划方式)、拆分(根据你指定的拆分方式)、调用资源(根据你提供的资源)、(自动)执行链路,直到返回结果。 ### 1. [评估优化器模式](https://github.com/spring-projects/spring-ai-examples/tree/main/agentic-patterns/evaluator-optimizer)(**evaluator-optimizer)** 根据任务-->生成信息--->通过评估器不断完善--->最终输出结果  这个模式实现了双 LLM 过程,其中一个模型生成响应,另一个模型在迭代循环中提供评估和反馈 1. 生成器 LLM 为给定任务产生初始解决方案 2. 评估器 LLM 根据质量标准评估解决方案 3. 如果解决方案通过评估,则作为最终结果返回 4. 如果需要改进,反馈被纳入新的生成周期 5. 重复该过程直到达到满意的解决方案 示例代码: ```java @SpringBootApplication public class Application { public static void main(String[] args) { SpringApplication.run(Application.class, args); } @Bean public CommandLineRunner commandLineRunner(DashScopeChatModel dashScopeChatModel) { var chatClient = ChatClient.create(dashScopeChatModel); return args -> { new SimpleEvaluatorOptimizer(chatClient).loop(""" <user input> 面试被问: 怎么高效的将100行list<User>数据,转化成map<id,user>,不是用stream. </user input> """); }; } } ``` ```java public class SimpleEvaluatorOptimizer { private final ChatClient chatClient; // 中文生成器提示词 private static final String GENERATOR_PROMPT = """ 你是一个Java代码生成助手。请根据任务要求生成高质量的Java代码。 重要提醒: - 第一次生成时,创建一个基础但完整的实现 - 如果收到反馈,请仔细分析每一条建议并逐一改进 - 每次迭代都要在前一版本基础上显著提升代码质量 - 不要一次性实现所有功能,而是逐步完善 必须以JSON格式回复: {"thoughts":"详细说明本轮的改进思路","response":"改进后的Java代码"} """; // 中文评估器提示词 private static final String EVALUATOR_PROMPT = """ 你是一个非常严格的面试官。请从以下维度严格评估代码: 1. 代码是否高效:从底层分析每一个类型以满足最佳性能! 评估标准: - 只有当代码满足要求达到优秀水平时才返回PASS - 如果任何一个维度有改进空间,必须返回NEEDS_IMPROVEMENT - 提供具体、详细的改进建议 必须以JSON格式回复: {"evaluation":"PASS或NEEDS_IMPROVEMENT或FAIL","feedback":"详细的分维度反馈"} 记住:宁可严格也不要放松标准! """; public SimpleEvaluatorOptimizer(ChatClient chatClient) { this.chatClient = chatClient; } int iteration = 0; String context = ""; public RefinedResponse loop(String task) { System.out.println("=== 第" + (iteration + 1) + "轮迭代 ==="); // 生成代码 Generation generation = generate(task,context); // 评估代码 EvaluationResponse evaluation = evaluate(generation.response(), task); System.out.println("生成结果: " + generation.response()); System.out.println("评估结果: " + evaluation.evaluation()); System.out.println("反馈: " + evaluation.feedback()); if (evaluation.evaluation() == EvaluationResponse.Evaluation.PASS) { System.out.println("代码通过评估!"); return new RefinedResponse(generation.response()); } else{ // 准备下一轮的上下文 context = String.format("之前的尝试:\n%s\n\n评估反馈:\n%s\n\n请根据反馈改进代码。", generation.response(), evaluation.feedback()); iteration++; return loop(task); } } private Generation generate(String task, String context) { return chatClient.prompt() .user(u -> u.text("{prompt}\n{context}\n任务: {task}") .param("prompt", GENERATOR_PROMPT) .param("context", context) .param("task", task)) .call() .entity(Generation.class); } private EvaluationResponse evaluate(String content, String task) { return chatClient.prompt() .user(u -> u.text("{prompt}\n\n任务: {task}\n\n代码:\n{content}") .param("prompt", EVALUATOR_PROMPT) .param("task", task) .param("content", content)) .call() .entity(EvaluationResponse.class); } // 使用原始的记录类 public static record Generation(String thoughts, String response) {} public static record EvaluationResponse(Evaluation evaluation, String feedback) { public enum Evaluation { PASS, NEEDS_IMPROVEMENT, FAIL } } public static record RefinedResponse(String solution) {} } ``` 1. 一个模型作为由浅入深的代码生成器 2. 另一个模型作为性能分析员 3. 一直优化直到最佳 ### 2. [路由模式](https://github.com/spring-projects/spring-ai-examples/tree/main/agentic-patterns/routing-workflow)(routing-workflow) 模式能够根据用户请求和上下文的分类将输入智能路由到专门的处理程序。 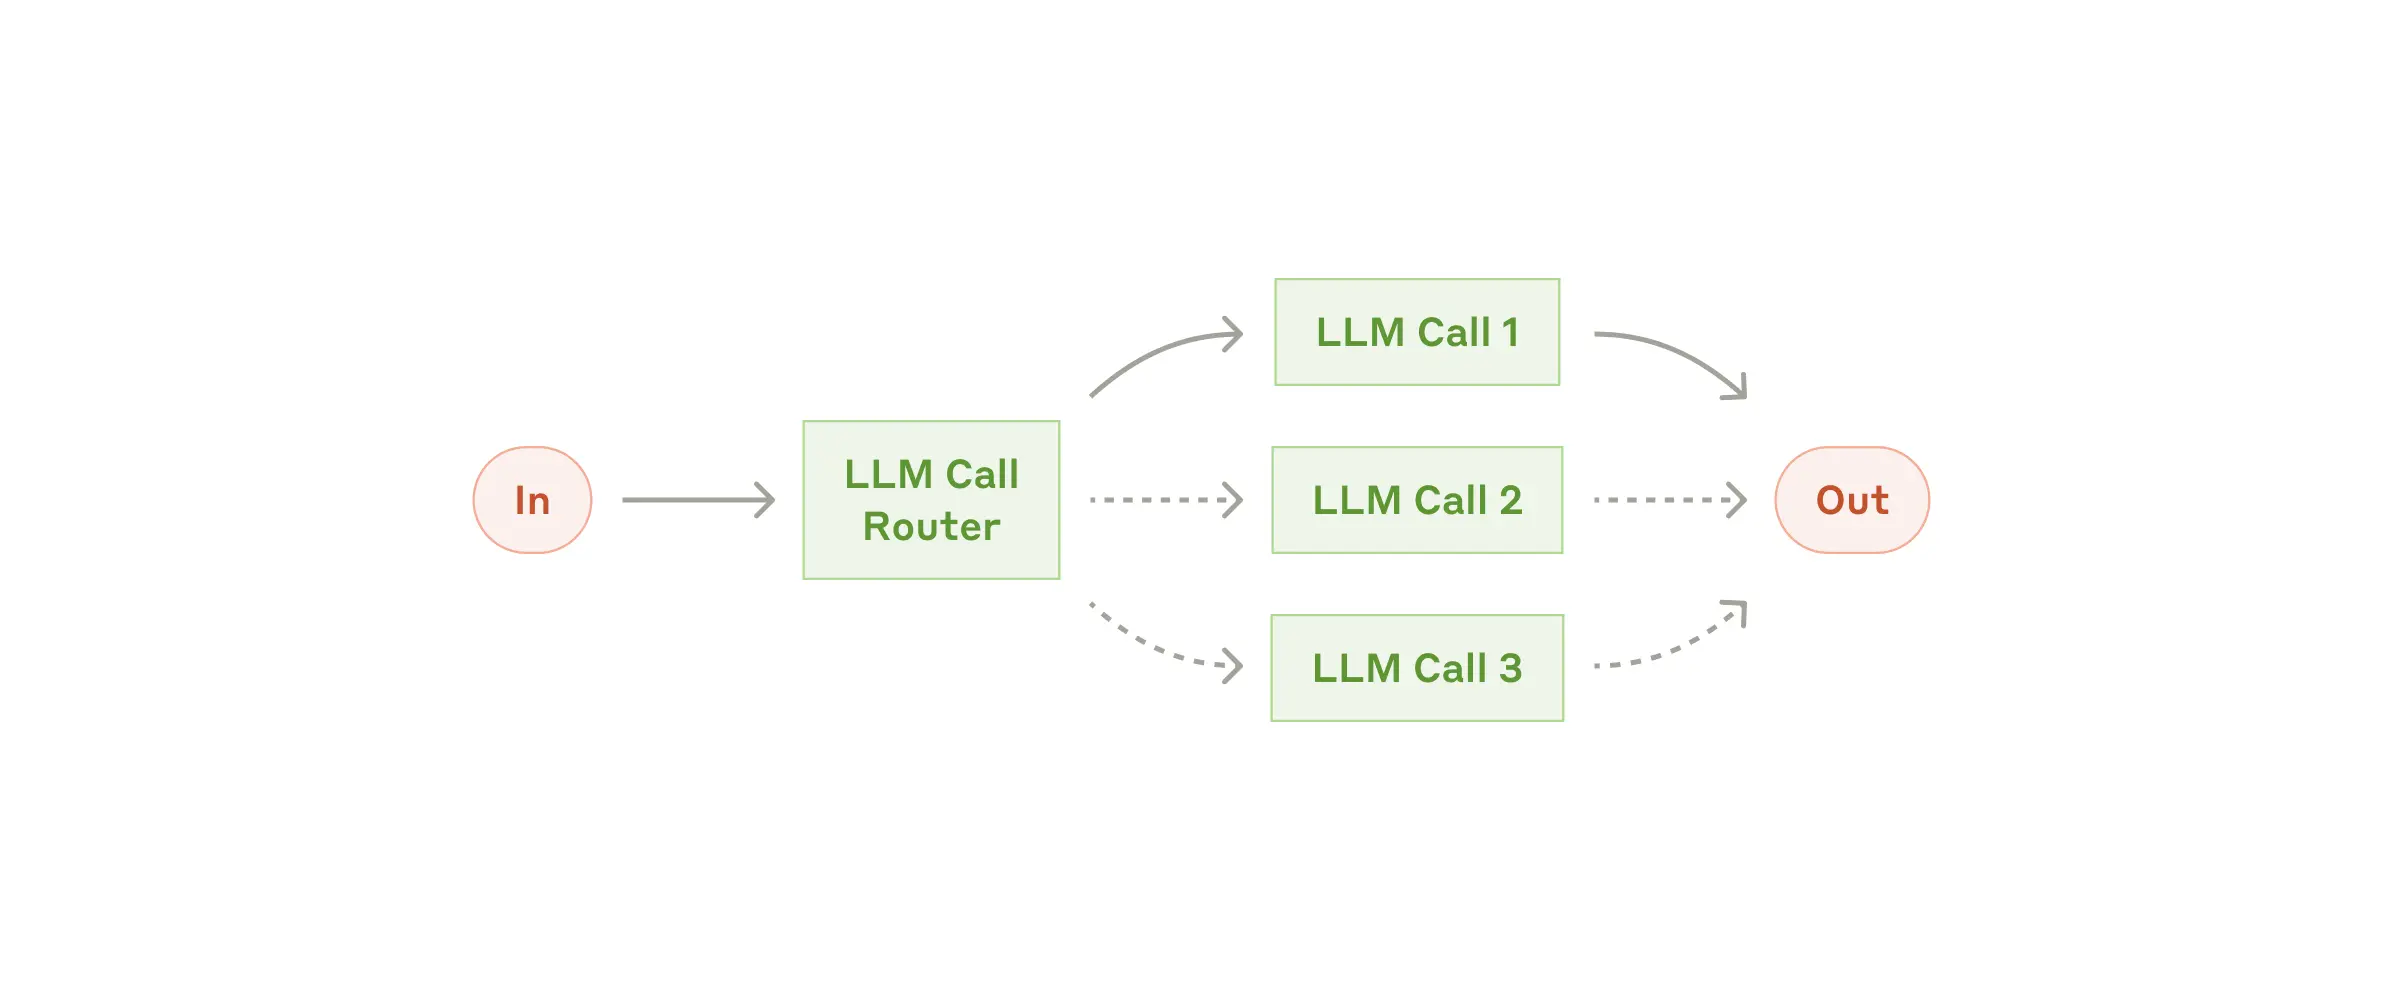 这个工作流特别适用于复杂任务,其中: - **路由器LLM**: 通过设置提示词进行路由规则设定,由usermessage决定路由的分支。 - 分类可以通过 LLM 或业务代码进行处理 - 不同类型的输入需要不同的专门处理或专业知识 ### 3. [编排工作者](https://github.com/spring-projects/spring-ai-examples/tree/main/agentic-patterns/orchestrator-workers)(orchestrator-workers) 这种模式是一种灵活的方法,用于处理需要动态任务分解和专门处理的复杂任务 manus就是这个模式  该模式包含三个主要组件: - **编排器(Orchestrator)**:分析任务并确定所需子任务的LLM - **工作者(Workers)**:执行特定子任务的专门 LLM - **合成器(Synthesizer)**:将工作者输出合并为最终结果的组件 ```java public class SimpleOrchestratorWorkers { private final ChatClient chatClient; // 中文编排器提示词 private static final String ORCHESTRATOR_PROMPT = """ 你是一个项目管理专家,需要将复杂任务分解为可并行执行的专业子任务。 任务: {task} 请分析任务的复杂性和专业领域需求,将其分解为2-4个需要不同专业技能的子任务。 每个子任务应该: 1. 有明确的专业领域(如:前端开发、后端API、数据库设计、测试等) 2. 可以独立执行 3. 有具体的交付物 请以JSON格式回复: { "analysis": "任务复杂度分析和分解策略", "tasks": [ { "type": "后端API开发", "description": "设计并实现RESTful API接口,包括数据验证和错误处理" }, { "type": "前端界面开发", "description": "创建响应式用户界面,实现与后端API的交互" }, { "type": "数据库设计", "description": "设计数据表结构,编写SQL脚本和索引优化" } ] } """; // 中文工作者提示词 private static final String WORKER_PROMPT = """ 你是一个{task_type}领域的资深专家,请完成以下专业任务: 项目背景: {original_task} 专业领域: {task_type} 具体任务: {task_description} 请按照行业最佳实践完成任务,包括: 1. 技术选型和架构考虑 2. 具体实现方案 3. 潜在风险和解决方案 4. 质量保证措施 请提供专业、详细的解决方案。 """; public SimpleOrchestratorWorkers(ChatClient chatClient) { this.chatClient = chatClient; } public void process(String taskDescription) { System.out.println("=== 开始处理任务 ==="); // 步骤1: 编排器分析任务 OrchestratorResponse orchestratorResponse = chatClient.prompt() .system(p -> p.param("task", taskDescription)) .user(ORCHESTRATOR_PROMPT) .call() .entity(OrchestratorResponse.class); System.out.println("编排器分析: " + orchestratorResponse.analysis()); System.out.println("子任务列表: " + orchestratorResponse.tasks()); // 步骤2: 工作者处理各个子任务 orchestratorResponse.tasks().stream() .map(task -> { System.out.println("-----------------------------------处理子任务: " + task.type()+"--------------------------------"); String content = chatClient.prompt() .user(u -> u.text(WORKER_PROMPT) .param("original_task", taskDescription) .param("task_type", task.type()) .param("task_description", task.description())) .call() .content(); System.out.println(content); return task; }).toList(); System.out.println("=== 所有工作者完成任务 ==="); } // 数据记录类 public record Task(String type, String description) {} public record OrchestratorResponse(String analysis, List<Task> tasks) {} public record FinalResponse(String analysis, List<String> workerResponses) {} } ``` 测试 ```java @SpringBootApplication public class Application { public static void main(String[] args) { SpringApplication.run(Application.class, args); } @Bean public CommandLineRunner commandLineRunner(DashScopeChatModel dashScopeChatModel) { var chatClient = ChatClient.create(dashScopeChatModel); return args -> { new SimpleOrchestratorWorkers(chatClient) .process("设计一个企业级的员工考勤系统,支持多种打卡方式和报表生成"); }; } } ``` ### 4. [链接](https://github.com/spring-projects/spring-ai-examples/tree/main/agentic-patterns/chain-workflow)(**chain-workflow**) 该模式将复杂的任务分解为一系列步骤,其中每个 LLM 调用都会处理前一个调用的输出。  这种模式特别适用于: - 具有清晰顺序步骤的任务 - 当您愿意用延迟换取更高准确性时 - 每个步骤都建立在前一步输出基础上的场景 **使用场景** 常见应用包括: - 数据转换管道 - 多步骤文本处理 - 结构化步骤的文档生成 与 `orchestrator-workers` 或 `evaluator-optimizer` 模式不同,链式工作流不是基于多个独立的 LLM 角色协作,而是通过单一的处理链条,每个步骤都建立在前一步的输出基础上 **代码** ```java public class DocumentGenerationChainWorkflow { private final ChatClient chatClient; public DocumentGenerationChainWorkflow(ChatClient chatClient) { this.chatClient = chatClient; } public DocumentResult processDocumentGeneration(String requirements) { List<String> steps = new ArrayList<>(); String currentOutput = requirements; System.out.println("=== 开始文档生成链式流程 ==="); // 门控:需求验证 if (!validateRequirements(currentOutput)) { return new DocumentResult("需求验证失败,流程终止", steps, false); } steps.add("需求验证: 通过"); // 步骤1: 生成大纲 - 基于原始需求 currentOutput = generateOutline(currentOutput); steps.add("大纲生成: 完成"); // 步骤2: 扩展内容 - 基于大纲 currentOutput = expandContent(currentOutput); steps.add("内容扩展: 完成"); // 步骤3: 优化语言 - 基于扩展后的内容 currentOutput = optimizeLanguage(currentOutput); steps.add("语言优化: 完成"); // 步骤4: 格式化 - 基于优化后的内容 currentOutput = formatDocument(currentOutput); steps.add("文档格式化: 完成"); System.out.println("=== 文档生成流程完成 ==="); return new DocumentResult(currentOutput, steps, true); } private boolean validateRequirements(String requirements) { String validationPrompt = """ 请验证以下文档需求是否清晰完整: 需求: {requirements} 如果需求清晰完整,请回复"PASS",否则回复"FAIL"。 """; String result = chatClient.prompt() .user(u -> u.text(validationPrompt).param("requirements", requirements)) .call() .content(); return result.trim().toUpperCase().contains("PASS"); } private String generateOutline(String requirements) { String outlinePrompt = """ 基于以下需求,生成详细的文档大纲: 需求: {input} 请生成包含主要章节和子章节的结构化大纲。 """; return executeStep(outlinePrompt, requirements); } private String expandContent(String outline) { String contentPrompt = """ 基于以下大纲,为每个章节生成详细内容: 大纲: {input} 请为每个章节编写具体内容,保持逻辑连贯。 """; return executeStep(contentPrompt, outline); } private String optimizeLanguage(String content) { String optimizePrompt = """ 优化以下文档内容的语言表达: 原始内容: {input} 请改进语言表达,使其更加专业、清晰、易读。 """; return executeStep(optimizePrompt, content); } private String formatDocument(String content) { String formatPrompt = """ 将以下内容格式化为专业文档: 内容: {input} 请添加适当的标题层级、列表、表格等格式,生成最终的markdown文档。 """; return executeStep(formatPrompt, content); } private String executeStep(String prompt, String input) { return chatClient.prompt() .user(u -> u.text(prompt).param("input", input)) .call() .content(); } public record DocumentResult(String finalDocument, List<String> steps, boolean success) {} } ``` 测试 ```java @Bean public CommandLineRunner commandLineRunner(DashScopeChatModel dashScopeChatModel) { var chatClient = ChatClient.create(dashScopeChatModel); return args -> { String requirements = """ 需要编写一份关于微服务架构设计的技术文档,包括: 1. 架构概述 2. 服务拆分策略 3. 数据一致性方案 4. 监控和运维 目标读者:技术团队和架构师 """; DocumentGenerationChainWorkflow.DocumentResult result = new DocumentGenerationChainWorkflow(chatClient) .processDocumentGeneration(requirements); System.out.println("生成结果: " + (result.success() ? "成功" : "失败")); System.out.println("最终文档:" + result.finalDocument()); System.out.println("处理步骤: " + result.steps()); }; } ``` ### 5. [并行化](https://github.com/spring-projects/spring-ai-examples/tree/main/agentic-patterns/parallelization-worflow)(**parallelization-workflow**) 该模式对于需要并行执行 LLM 调用并自动进行输出聚合的情况很有用。 deepseek MoE 多专家 多路并行  并行化工作流模式通过并发处理多个 LLM 操作来提高效率,主要有两种变体: 1. **分段处理(Sectioning)**:将复杂任务分解为独立的子任务并行处理 2. **投票机制(Voting)**:对同一任务运行多次以获得不同视角或进行多数投票 **使用场景** 该模式特别适用于: - 处理大量相似但独立的项目 - 需要多个独立视角的任务 - 处理时间关键且任务可并行化的场景 ## ```java public class ParallelizationWorkflowWithAggregator { private final ChatClient chatClient; private static final String RISK_ASSESSMENT_PROMPT = """ 你是一个风险评估专家,请分析以下部门在数字化转型过程中面临的主要风险: 请从以下角度分析: 1. 技术风险 2. 人员风险 3. 业务连续性风险 4. 预算风险 5. 应对建议 """; public ParallelizationWorkflowWithAggregator(ChatClient chatClient) { this.chatClient = chatClient; } public AggregatedResult parallelWithAggregation(List<String> inputs) { // 步骤1: 并行处理 List<String> parallelResults = parallel(inputs); // 步骤2: 聚合结果 String aggregatedOutput = aggregateResults(parallelResults); return new AggregatedResult(parallelResults, aggregatedOutput); } private List<String> parallel(List<String> inputs ) { ExecutorService executor = Executors.newFixedThreadPool(inputs.size()); try { List<CompletableFuture<String>> futures = inputs.stream() .map(input -> CompletableFuture.supplyAsync(() -> { return chatClient.prompt(RISK_ASSESSMENT_PROMPT + "\n输入内容: " + input) .call() .content(); }, executor)) .collect(Collectors.toList()); CompletableFuture<Void> allFutures = CompletableFuture.allOf( futures.toArray(CompletableFuture[]::new)); allFutures.join(); return futures.stream() .map(CompletableFuture::join) .collect(Collectors.toList()); } finally { executor.shutdown(); } } // 聚合器:将多个并行结果合并为统一输出 private String aggregateResults(List<String> results) { String aggregatorPrompt = """ 你是一个数据聚合专家,请将以下多个分析结果合并为一份综合报告: 原始分析任务: {originalPrompt} 各部门/地区分析结果: {results} 请提供: 1. 综合分析摘要 2. 共同趋势和模式 3. 关键差异对比 4. 整体结论和建议 请生成一份统一的综合报告。 """; String combinedResults = String.join("\n\n---\n\n", results); return chatClient.prompt() .user(u -> u.text(aggregatorPrompt) .param("originalPrompt", RISK_ASSESSMENT_PROMPT) .param("results", combinedResults)) .call() .content(); } public record AggregatedResult(List<String> individualResults, String aggregatedOutput) {} } @SpringBootApplication public class Application { public static void main(String[] args) { SpringApplication.run(Application.class, args); } @Bean public CommandLineRunner commandLineRunner(DashScopeChatModel dashScopeChatModel) { var chatClient = ChatClient.create(dashScopeChatModel); return args -> { List<String> departments = List.of( "IT部门:负责系统架构升级,团队技术水平参差不齐,预算紧张", "销售部门:需要学习新的CRM系统,担心影响客户关系,抗拒变化", "财务部门:要求数据安全性极高,对云端存储有顾虑,流程复杂", "人力资源部门:需要数字化招聘流程,缺乏相关技术人员,时间紧迫" ); System.out.println("=== 并行分析 + 聚合处理 ==="); ParallelizationWorkflowWithAggregator.AggregatedResult result = new ParallelizationWorkflowWithAggregator(chatClient) .parallelWithAggregation( departments); System.out.println("\n=== 各部门独立分析结果 ==="); for (int i = 0; i < result.individualResults().size(); i++) { System.out.println("部门" + (i + 1) + ":"); System.out.println(result.individualResults().get(i)); System.out.println("\n" + "-".repeat(50) + "\n"); } System.out.println("\n=== 聚合器综合报告 ==="); System.out.println(result.aggregatedOutput()); }; } } ``` ## ## agent实战《手写manus》 ## 效果展示 话不多说,先看运行效果,以下是我们通过几个实际问答记录展示的 Spring AI Alibaba OpenManus 实际使用效果。 1. **打开百度浏览器,在搜索框输入:阿里巴巴最最近一周股价,根据搜索到的信息绘制最近一周的股价趋势图并保存到本地目录。** 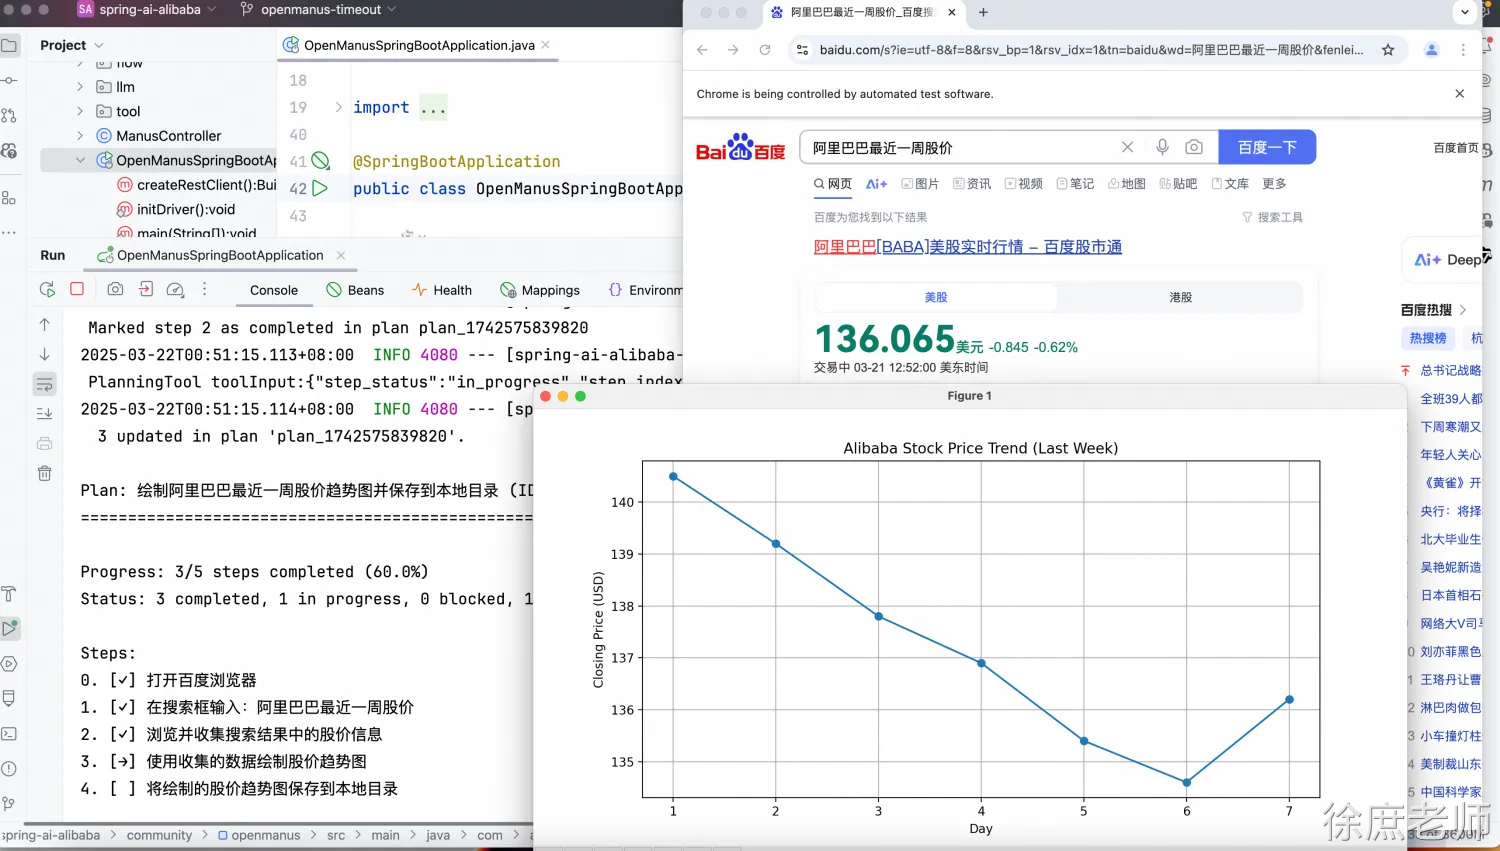 1. **我计划在接下来的五一劳动节假期到韩国旅行,行程是从杭州出发到韩国首尔,总预算为10000元。我想体验韩国的风土人情、文化、普通老百姓的生活,总行程计划为5天。请提供详细的行程并制作成一个简单的HTML旅行手册,其中包含地图、景点描述、基本的韩语短语和旅行提示,以供我在整个旅程中参考。** 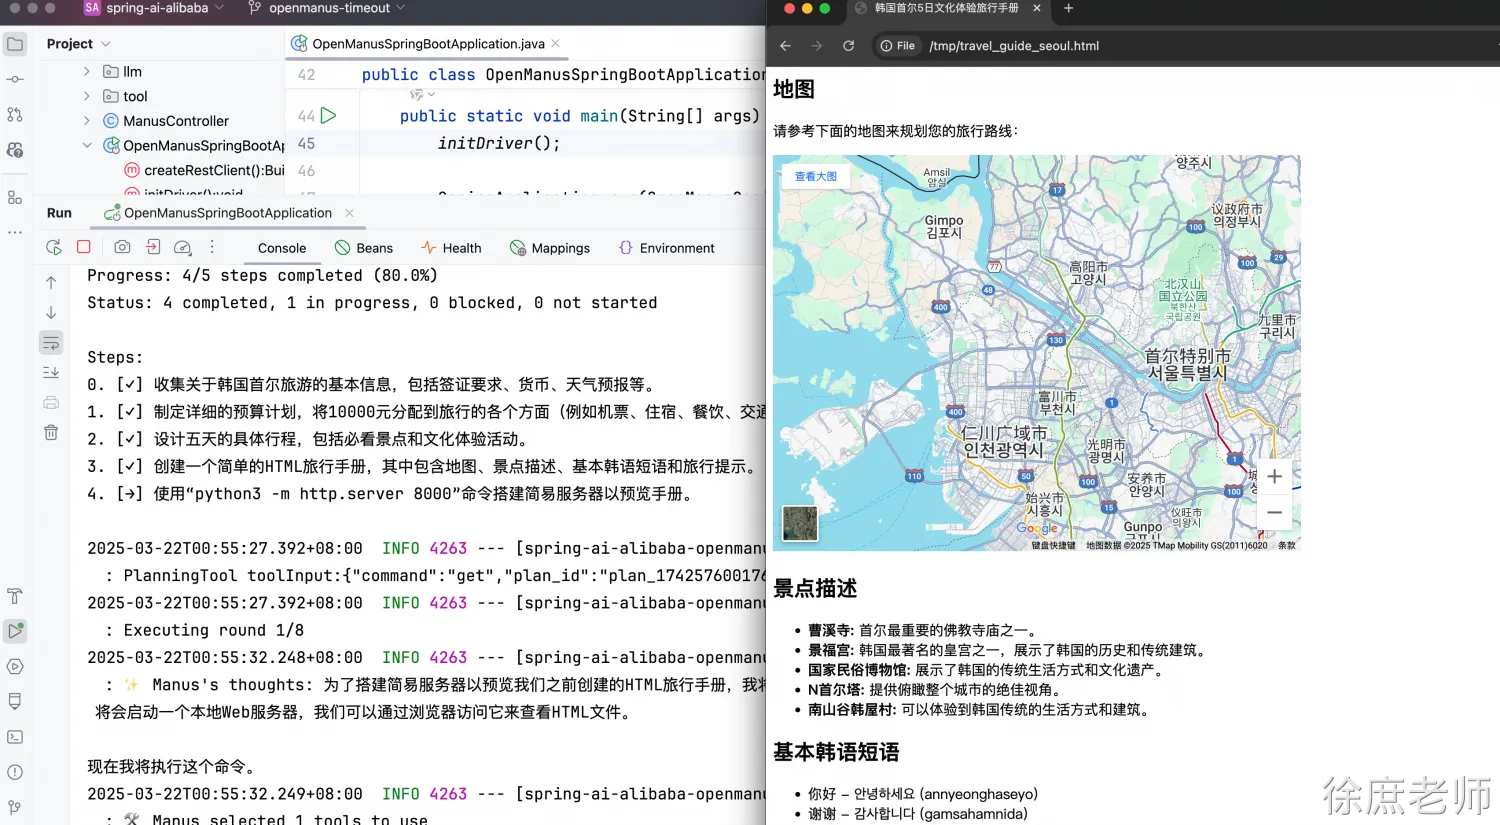 1. **在本机的/tmp/docs目录下有一些中文文档 ,请依次将这些文档翻译为中文并保存到一个独立文件,将新生成的文件都存放到/tmp/endocs目录下** 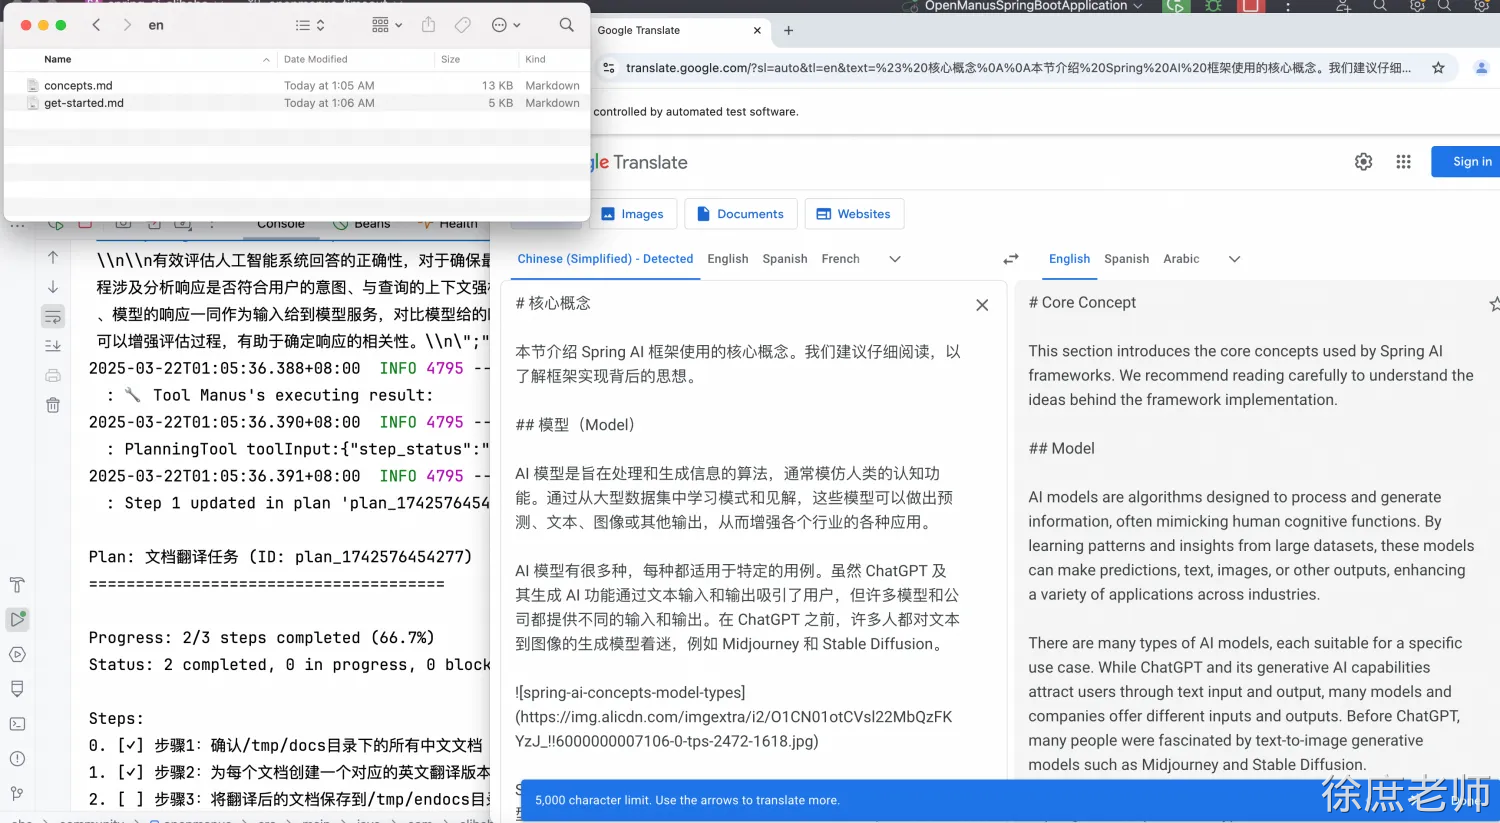 ## 总体架构与原理 Spring AI Alibaba Openmanus 与 Python 版本 OpenManus 设计理念相似,其总体架构如下图所示。 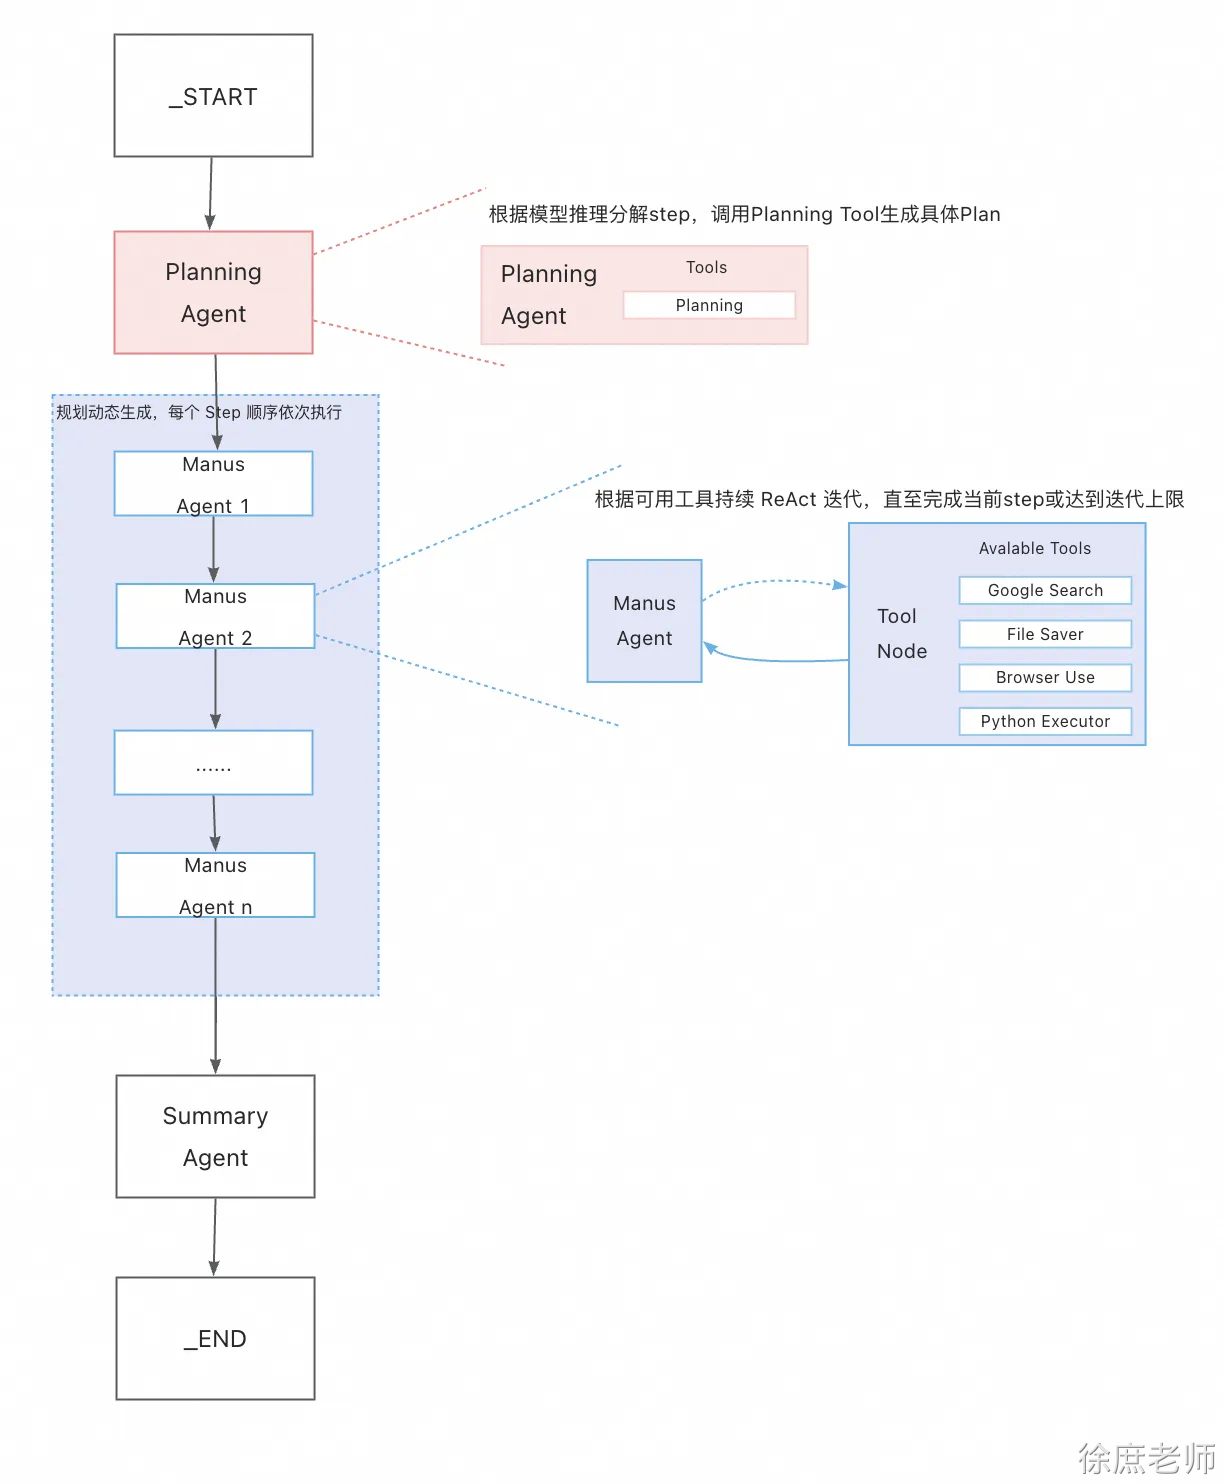 分析上图架构,我们可以把它看作是一款多 Agent 智能自动协作实现,其中: - Planning Agent 负责任务的分解与规划,将用户问题拆解成几个可顺序执行的 step。planning agent 调用 planning tool 动态生成一个串行的 Manus Agent 子工作流。 - 多个 Manus Agent 组成一个链式、可顺序依次执行的子工作流。子工作流中的每个 agent 对应上述规划的一个 step,每个 agent 都是一个 ReAct 架构设计,即通过多轮 Tool 调用完成具体子任务。 - Summary Agent 用来做最后的任务总结